background image

34

Belkin

®

 Advanced Secure Windowing KVM User Manual

SECTIONS

Table of Contents

1

2

3

5

6

oPeraTIon

4

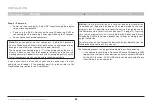
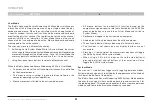
Maximizing a window to full-screen mode

To maximize a window to its full size, enter System Mode by pr 
or – mouse side buttons, bringing the system cursor to the window that 
should be maximized, and then double-clicking on that window.
The selected window will maximize to its native input resolution. No 
other windows or bars will be displayed. 
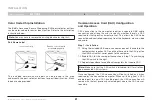
To leave maximize mode, change back to System Mode (by pressing the 
mouse side buttons) and rearrange windows as needed. 

note:

 When the Belkin Advanced Secure Windowing KVM maximizes 

a window it will change output display resolution to the input 
resolution. The reaction of this change on the display may change 
according to the display design. Some displays may automatically 
adjust to new resolution and rescale (showing full image), while others 
may not and will show black borders around the image.

note:

 Maximizing a window to full-screen mode in the 204M is 

slightly different than other models. See detailed explanation below.

note:

 When using the Belkin Advanced Secure Windowing KVM, it 

is possible to maximize a window directly from User Mode. Pressing 
CTRL | CTRL | f will maximize the window in which the user is working. 

note:

For tile mode press CTRL | CTRL | q
For scale mode press CTRL | CTRL | s
For system mode press CTRL | CTRL | o
For User Mode press CTRL | CTRL | u 

Summary of Contents for F1DN204M-3

Page 1: ...Advanced Secure Windowing KVM User Manual F1DN204M 3 Advanced Secure 4 Port Multi Display Windowing KVM PP 3 0 Document Number HDC10388 Rev C...

Page 2: ...bels 6 Other Features 7 Equipment Requirements 8 System Requirements 9 Front Panel Features F1DN204M 3 12 Rear Panel Features F1DN204M 3 13 Specifications 14 Installation 16 Before Installation 16 Ins...

Page 3: ...osing the organization to the risks of information leakage through the KVM The Belkin Advanced Secure Windowing KVM device uses advanced video processing technology to draw a high resolution dynamic m...

Page 4: ...essive moisture water or any other liquid The product is not working well even after carefully following the instructions in this user s manual The product has been dropped or is physically damaged Th...

Page 5: ...r set definitions 3 The appropriate usage of peripherals e g keyboard mouse display authentication device is described in detail in this User Manual s appropriate sections Do not connect any authentic...

Page 6: ...Before re allocating computers to channels it is mandatory to power cycle product keeping it powered OFF for more than 1 minute 10 Product log access and administrator configuration options are descr...

Page 7: ...keyboard and mouse switched together purging keyboard buffer when switching channels All these features contribute to strong isolation between computer interfaces maintained even when product is power...

Page 8: ...parate cables used for this port enable further protection and isolation of this function Secure Packaging Tear away packaging ensures secure delivery of the product as it is routed to the end user Ta...

Page 9: ...e Belkin Advanced Secure Windowing KVM supports parallel switching of a wide set of user authentication devices including CAC smart card and biometric readers Audio Support The Belkin Advanced Secure...

Page 10: ...ed per connected computer Note Due to USB signal limitations the cable length cannot exceed 15 feet 4 6m unless an active USB extender is used Belkin DVI D USB KVM Cable Kits with audio F1D9012b06 6 f...

Page 11: ...devices Standard USB keyboard Standard USB mouse and Bar code readers emulating USB keyboard Notes a Console USB keyboard and mouse ports are switchable i e you can connect keyboard to mouse port and...

Page 12: ...2 mouse console port is compatible with the following types of devices 5 button PS 2 mouse Regular PS 2 using a regular PS 2 mouse might create some limitations and is not recommended User Authentica...

Page 13: ...proximity to one another Displays must be with either 1920x1080 or 1920x1200 native resolution User Audio Devices Product is compatible with the following types of user audio devices Stereo headphones...

Page 14: ...Windowing KVM User Manual SECTIONS Table of Contents 1 3 4 5 6 Overview 2 Front Panel Features F1DN204M 3 2 3 1 4 5 6 1 LED Indicator 3 Tamper Evident Seal 5 Name Label Guide 2 Port Selector 4 CAC En...

Page 15: ...mouse port 13 Restore to Factory Default 2 DCU port Non operative for future use 8 Computer USB KM port 14 Secondary Display Out port 3 Console Audio out jack 9 Computer audio port 15 Video Diagnosti...

Page 16: ...r or PS 2 Mini DIN 6 pin female connector Console Mouse Input USB Type A female connector or PS 2 Mini DIN 6 pin female connector Console Audio input jack 1 8 3 5mm stereo female jack Console CAC Inpu...

Page 17: ...nsole Display Resolutions Supported Resolution Model F1DN204M 3 1280x800 16 10 1280x1024 5 4 1600x1200 4 3 1680x1050 16 10 1920x1080 16 9 1920x1200 16 10 2x1920x1080 16 9 2x1920x1200 16 10 Input Compu...

Page 18: ...label to assure that the product is properly sealed If the label is damaged or missing contact Belkin support and do not use the product Where to locate the Belkin Advanced Secure Windowing KVM The en...

Page 19: ...of 4 6 meters 15 feet Display cable length The Belkin Advanced Secure Windowing KVM may be extended to around 10 meters without video quality degradation depends on display and cable quality and must...

Page 20: ...to resolution changes This feature is essential to support window maximization Native resolution of the display should match output resolutions supported by The Belkin Advanced Secure Windowing KVM Di...

Page 21: ...n device to the CAC USB port Connect the user headphones or amplified speakers to The Belkin Advanced Secure Windowing KVM audio output jack Note Do not connect a microphone to the Belkin Advanced Sec...

Page 22: ...tly If you encounter an error check your cable connections for that computer and reboot If the problem persists please refer to the Troubleshooting section in this User Manual Notice If during install...

Page 23: ...ws the user to specify whether there is a CAC required for that specific computer or not This allows the CAC to be connected and controlled separately from the keyboard mouse video and audio Step 1 In...

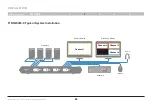
Page 24: ...S Table of Contents 1 2 4 5 6 Installation 3 F1DN204M 3 Typical System Installation Channel 2 Channel 3 Channel 4 Channel 1 Setup Channel 2 Channel 3 Channel 4 1 2 3 Scale Tile Channel 1 1 2 3 4 Secon...

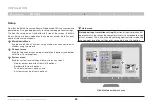
Page 25: ...olution 4 options and border color from 16 color options 3 System menu Enables system level settings Administrator can select Display output resolution from 2 6 8 options Border width from 6 options T...

Page 26: ...e the display to a different type or restore factory defaults To restore factory default settings use a paper clip or another sharp object and momentarily press the recessed RFD switch located at the...

Page 27: ...hown as a smaller window or will be rescaled resulting a degradation in the displayed video quality 2 It is recommended that both displays will be identical type and model 3 Displays should be oriente...

Page 28: ...r or technical support Now that product computers and peripherals are connected and powered up it is ready for use Default Channel After product boots up the default active channel will be channel 1 T...

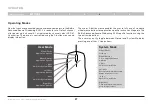
Page 29: ...l mouse buttons for application specific tasks and still operate The Belkin Advanced Secure Windowing KVM specific functions using the two extra side buttons The user may easily toggle between Normal...

Page 30: ...ode Hold uppermost right corner of display for 4 seconds Move to System mode CTRL CTRL O Move to User mode CTRL CTRL U Press Side Mouse Button Move between sources 1 to 4 change active pane Note sourc...

Page 31: ...Left CTRL button Move drag panes In Tile mode touch the upper left corner of a specific pane to move it N A Left Click Mouse button Resize pane In Tile mode touch the lower right corner of a specific...

Page 32: ...RL F11 J K Switch positions back between Primary and Secondary displays Note J stands for Primary display K stands for Secondary display N A Presentation Mode define a channel that will always appear...

Page 33: ...hannel is controlled by the console mouse The mouse cursor symbol is generated controlled by the computer operating system application Mouse movement is limited to the active window area All mouse but...

Page 34: ...under the channel menu Pressing both right and left keys on an active window will allow moving the picture inside the window only applicable if the source resolution is larger than the window size Pre...

Page 35: ...e by pressing or mouse side buttons In System Mode the user should drag the mouse while holding the right mouse button when the system cursor is located on the bottom right corner of the desired windo...

Page 36: ...re Windowing KVM maximizes a window it will change output display resolution to the input resolution The reaction of this change on the display may change according to the display design Some displays...

Page 37: ...channel Once a channel had been deactivated it would not participate in cyclic toggling between windows and will not be displayed in any way Dual display operation Maximizing a window When in System...

Page 38: ...ndow simply by pointing on the active window pressing the mouse side buttons and moving the mouse wheel This will toggle the scaling of the active window between 1 2 times 1 4 times and no scaling kee...

Page 39: ...estore the factory settings of the Belkin Advanced Secure Windowing KVM It is possible to restore the device to its original factory settings through the use of the Restore Factory Defaults switch see...

Page 40: ...ower resolution using administrator mode Window showing background color no image inside Check that the channel is not deactivated by user Check that video cable is connected properly between The Belk...

Page 41: ...lugged into the computer the HID USB driver is installed on the computer Rebooting may be necessary when trying this Make sure you are not using a wireless keyboard or a keyboard with an integrated US...

Page 42: ...to the KVM Check that the USB cable between the KVM and the computer is completely connected Try connecting to a different USB port on the computer Make sure the mouse works when directly plugged int...

Page 43: ...ue de la classe B est conforme la norme NMB 003 du Canada Warranty Belkin International Inc Limited 3 Year Product Warranty What this warranty covers Belkin International Inc Belkin warrants to the or...

Page 44: ...e 800 282 2355 within 15 days of the Occurrence Be prepared to provide the following information a The part number of the Belkin product b Where you purchased the product c When you purchased the prod...

Page 45: ...WARRANTY Some states do not allow limitations on how long an implied warranty lasts so the above limitations may not apply to you IN NO EVENT SHALL BELKIN BE LIABLE FOR INCIDENTAL SPECIAL DIRECT INDI...

Page 46: ...rage you to contact us immediately at the following email address gov_security belkin com or our technical support line at TOLL FREE 1 800 282 2355 After your communication is received Belkin Governme...

Page 47: ...rademarks of respective manufacturers listed Windows and Windows Vista are either registered trademarks or trademarks of Microsoft Corporation in the United States and or other countries Mac OS is a t...

Reviews: