Start up
DRYPOINT RA 200 – 2500 NA
13
3.2.
First start-up
This procedure should be followed on first start-up, after periods of extended shutdown or following
maintenance procedures.
Qualified personnel must perform the start-up.
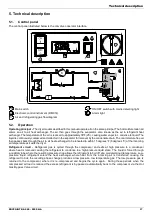
Sequence of operations (refer to paragraph 5.1 Control Panel).
•
Ensure that all the steps of the “Installation” chapter have been observed.
•
Ensure that the connection to the compressed air system is correct and that the piping is suitably fixed and supported.
•
Ensure that the condensate drain pipe is properly fastened and connected to a collection system or container.
•
Ensure that the by-pass system (if installed) is closed and the dryer is isolated.
•
Ensure that the manual valve of the condensate drain circuit is open.
•
Remove any packaging and other material which could obstruct the area around the dryer.
•
Activate the mains switch.
•
Turn on the main switch - pos. 1 on the control panel.
•
Check that the mains detection light of the ON/OFF button - pos. 4 of the control panel - is ON.
•
Wait at least two hours before starting the dryer (compressor crankcase heater must heat the oil of the compressor) - only
models DRYPOINT RA 600-2500 NA.
•
Ensure the cooling water flow and temperature is adequate (Water-Cooled).
•
Switch ON the dryer pressing the button "I - ON" of the ON/OFF switch - pos. 4 of the control panel.
•
Ensure that DMC14 electronic instrument is ON.
•
Ensure the consumption matches with the values of the data plate.
•
Check that the rotation direction of the fan corresponds with the arrows on the condenser (Air-Cooled).
•
Allow the dryer temperature to stabilize at the pre-set value.
•
Slowly open the air inlet valve.
•
Slowly open the air outlet valve.
•
Slowly close the central by-pass valve of the system (if installed).
•
Check the piping for air leakage.
•
Ensure the drain is regularly cycling - wait for its first interventions.
3.3.
Start-up and shut down
For short periods of inactivity, (max 2-3 days) we recommend that power is maintained to the dryer
and the control panel. Otherwise, before re-starting the dryer, it is necessary to wait at least 2 hours
for the compressor crankcase heater to heat the oil of the compressor (only models DRYPOINT RA
600-2500 NA).
Start-up (refer to paragraph 5.1 Control Panel) :
•
Check the condenser for cleanliness (Air-Cooled).
•
Ensure the cooling water flow and temperature is adequate (Water-Cooled).
•
Check that the mains detection light of the ON/OFF button - pos. 4 of the control panel - is ON.
•
Switch ON the dryer pressing the button "I - ON" of the ON/OFF switch - pos. 4 of the control panel.
•
Ensure that DMC14 electronic instrument is ON.
•
Wait a few minutes; verify that the DewPoint temperature displayed on electronic instrument DMC14 is correct and that the
condensate is regularly drained.
•
Switch on the air compressor.
Shut down (refer to paragraph 5.1 Control Panel) :
•
Check that the DewPoint temperature indicated on the DMC14 is within range.
•
Shut down the air compressor.
•
After few minutes, shut down the dryer pressing the button "0 - OFF" of the ON/OFF switch - pos. 4 of the control panel.
NOTE : A DewPoint within 32°F (0°C) and 50°F (10°C) displa yed on DMC14 is correct according to the possible
working conditions (flow-rate, temperature of the incoming air, ambient temperature, etc.).
During the operation, the refrigeration compressor will run continuously. The dryer must remain on during the full
usage period of the compressed air, even if the air compressor works intermittently.
The number of starts must be no more than 6 per hour. The dryer must stop running for at least 5
minutes before being started up again.
The user is responsible for compliance with these rules. Frequent starts may cause irreparable damage.
Summary of Contents for DRYPOINT RA 1000/AC NA
Page 37: ...List of attachments DRYPOINT RA 200 2500 NA 37 7 2 2 Exploded view DRYPOINT RA 200 350 NA ...
Page 38: ...List of attachments 38 DRYPOINT RA 200 2500 NA 7 2 3 Exploded view DRYPOINT RA 400 500 NA ...
Page 39: ...List of attachments DRYPOINT RA 200 2500 NA 39 7 2 4 Exploded view DRYPOINT RA 600 1250 NA ...
Page 40: ...List of attachments 40 DRYPOINT RA 200 2500 NA 7 2 5 Exploded view DRYPOINT RA1500 2500 NA ...
Page 51: ...List of attachments DRYPOINT RA 200 2500 NA 51 ...

