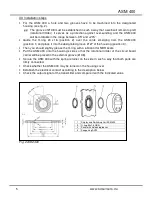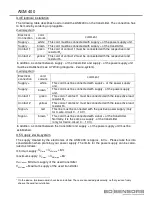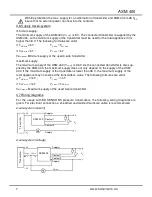
13
www.bdsensors.de
ASM 400
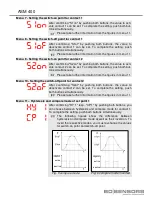
Fig. 7 Hysteresis mode
Fig. 8 Hysteresis mode
inverted
Menu 12 – Hysteresis and compare mode of set point 2
After confirming "HY 2 " resp. "CP 2" by pushing both buttons, you
can choose between hysteresis and compare mode for contact 2.
To complete the setting, push both buttons simultaneously.
Please take further information from the figures in menu 11.
Menu 13 – Setting the switch-on delay for set point 1
After confirming "d1on" by pushing both buttons, the switch-on
delay after reaching contact 1 can be set. The time can be set
from 0 to 100 seconds. To complete the setting, push both buttons
simultaneously.
Menu 14 – Setting the switch-off delay for set point 1
After confirming "d1of" by pushing both buttons, the switch-off
delay after reaching contact 1 can be set. The time can be set
from 0 to 100 seconds. To complete the setting, push both buttons
simultaneously.
Menu 15 – Setting the switch-on delay for set point 2
After confirming "d2on" by pushing both buttons, the switch-on
delay after reaching contact 2 can be set. The time can be set
from 0 to 100 seconds. To complete the setting, push both buttons
simultaneously.
Menu 16 – Setting the switch-off delay for set point 2
After confirming "d2of" by pushing both buttons, the switch-off de-
lay after reaching contact 2 can be set. The time can be set from 0
to 100 seconds. To complete the setting, push both buttons simul-
taneously.
active
inactive
active
inactive
Summary of Contents for ASM 400
Page 18: ...ASM 400 Dimensions...
Page 19: ...19 www bdsensors de ASM 400...


