11
www.bdsensors.de
ASM 400
4.6 Menu list
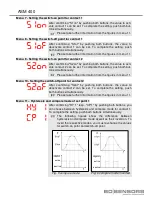
Menu 1 – Access protection
If the
password is active
, the menu
"PAon"
will appear. Before
being able to perform settings in the menu system, you must first
enter the password. Proceed as follows for deactivation: Press
both buttons simultaneously to confirm the menu item "PAon".
Then set a password using the "
▲
" or "
▼
" buttons and confirm it
by pushing both buttons together. The menu system is now un-
locked and "PAof" will appear in the display. You can now pro-
ceed as desired.
If the
password is inactive
, the menu
"PAof"
will appear. To
activate the access protection, press both buttons simultaneously.
Then set your password using the "
▲
" or "
▼
" buttons to activate
the access protection. Confirm the password with both buttons.
The menu system is now locked and "PAon" will appear in the
display.
The default setting for the password is "0005".
A modification of the password is described in the special
menu 4.
Menu 2 - Setting the decimal point position
After confirming "dP" by pushing both buttons, the position of the
decimal point can be selected. Set the desired position by using
the "
▲
" or "
▼
" button. To complete the setting, push both buttons
simultaneously.
Menu 3 - Setting the zero point
After confirming "ZP" by pushing both buttons, the zero point can
be set. The value set is shown when the output signal of the
transmitter is 4 mA (zero point). To complete the setting, push
both buttons simultaneously.
Menu 4 - Setting the end point
After confirming "EP" by pushing both buttons, the end point can
be set. The value programmed will be shown when the electrical
output signal of the transmitter is 20 mA (End point). To complete
the setting, push both buttons simultaneously.
Menu 5 – Setting the damping
After confirming "FILt" by pushing both buttons, the time constant
for a simulated low-pass filter can be set. This function allows get-
ting a constant display value although the measuring values may
vary considerably. The permissible range reaches from 0.3 till 30
seconds. To complete the setting, push both buttons simulta-
neously.
Menu 6 – Activation of the exceeding message
After confirming "HILo" by pushing both buttons, the alarm for ex-
ceeding the range of the display can be activated. Conditions "on"
or "off" can be selected. To complete the setting, push both but-
tons simultaneously.
Summary of Contents for ASM 400
Page 18: ...ASM 400 Dimensions...
Page 19: ...19 www bdsensors de ASM 400...


