background image

310

Rev. C

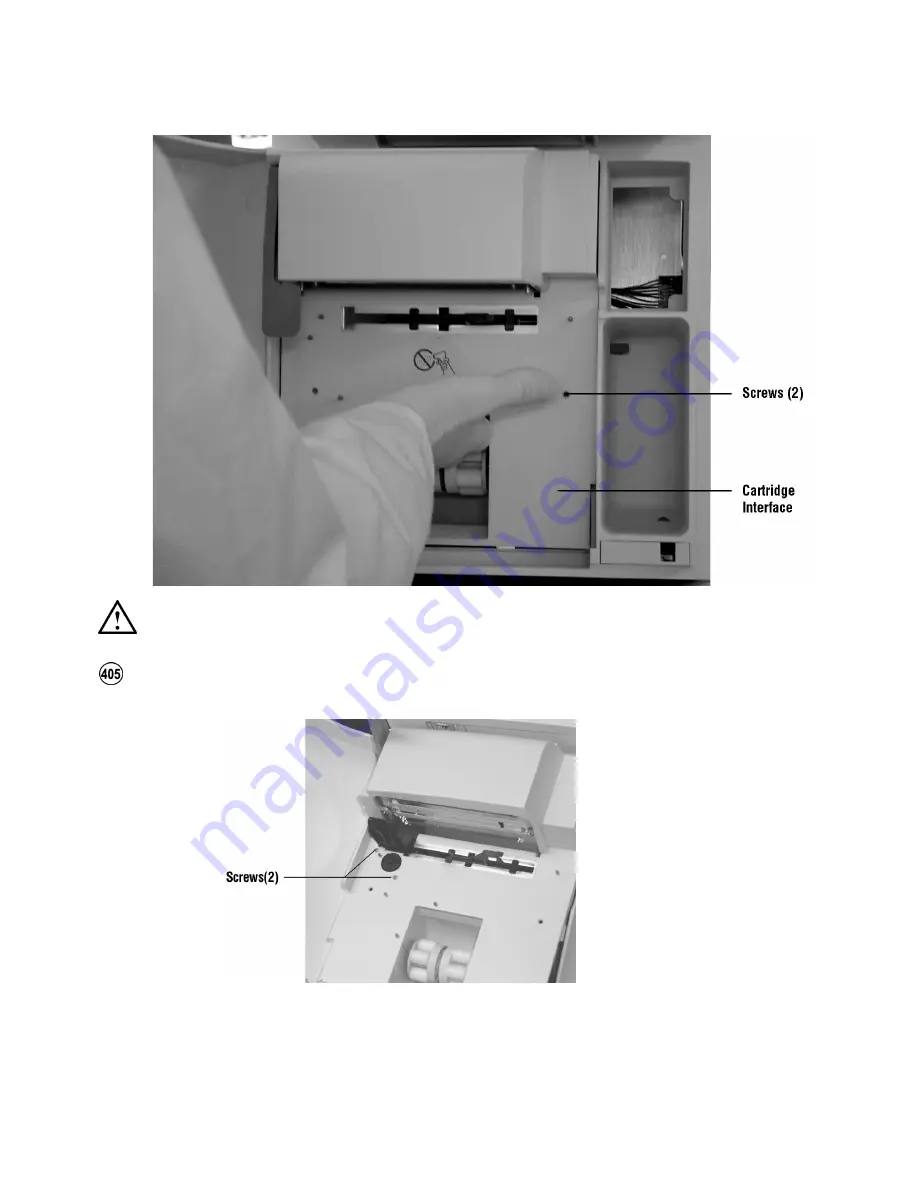
a. Using a small Phillips screwdriver, remove the two flat-head 

screws in the front of the cartridge interface assembly.

b. Remove the two screws from the front of the cartridge interface 

assembly securing the sample chamber interface assembly.

CAUTION:  

Do not touch the sensor contact area.

Summary of Contents for RapidPoint 400 Series

Page 1: ...Service Manual 105953 Rev C 2003 02...

Page 2: ...of Hyundai Panellink is a trademark of Silicon Image Inc Sharp is a trademark of Sharp Corporation Sound Blaser is a trademark of Creative Technology Ltd Velcro is a trademark of Velcro Industries B V...

Page 3: ...Mechanical Descriptions 23 Overview 25 The Base Model 26 Measurement Cartridge 31 Measurement Cartridge Fluidics 33 Sample Entry 33 Sliding Valve 33 Tubing 35 Reagent System 35 Sensor Module 36 KCl Re...

Page 4: ...53 Touch Screen 53 Printer 54 Display Board 54 Display Support 54 CO oximeter Components 55 CO ox Measurement Components 56 Illumination Housing Assembly 57 Neon Board Assembly 57 Fiber Bundle Assemb...

Page 5: ...igital Signals 77 Digital Input Signals 77 Digital Output Signals 78 Analog Signals 79 Analog and Other Input Signals 79 Analog and Other Output Signals 80 Circuit Description 80 Microcontroller and P...

Page 6: ...ata Bus I O Latch CPLD and Communications Circuitry 88 Control Micro stepper Processor and Sample and Wash Pump Driver Circuitry 88 Control Heater DAC Driver Circuitry and Valve Driver Circuitry 89 Po...

Page 7: ...PC Board 101 Digital Signals 102 Digital Input Signals 102 Digital Output Signals 102 Analog Signals 103 Analog and Other Input Signals 103 Analog and Other Output Signals 104 Circuit Descriptions 10...

Page 8: ...Signals 111 System Diagrams and Cable Drawings 113 System Diagrams 115 Cable Drawings 130 Calibrations 141 Calibrating the System 143 Calibrating the Touch Screen 145 Emergency Calibration of the Touc...

Page 9: ...ed 177 AQC Cartridge Not Valid 177 AQC Connector is Open 177 AQC Pending 177 Additional Cal Required 177 Additional Wash Required 178 Analysis is turned off by a remote computer 178 Bubbles in the Sam...

Page 10: ...5 Electronics Error 1 13 196 D35 Electronics Error 14 196 D38 Temp Error 1 198 D38 Temp Error 2 13 198 D39 Obstruction 200 D40 Wash Not Detected 201 D41 No AQC Material Detected 202 D60 Communications...

Page 11: ...he error 220 System Error Turn the power switch off Wait 10 seconds then turn the switch on 221 System requires operator attention 221 Temp Not Ready 222 Temp Out of Range 223 Temp Warning 225 The lan...

Page 12: ...ons for a Printed Temperature Report 235 Testing the Measurement Valve in Diagnostics 235 Testing the AutomaticQC Cartridge Valve in Diagnostics 237 Testing the Pumps 238 Using the Measurement Cartrid...

Page 13: ...ce Assembly Illustrations 281 Cartridge Interface Assembly Parts List 286 Power Module Assembly Illustrations 287 Power Module Assembly Parts List 293 CO ox Module Components Illustrations 294 Replaci...

Page 14: ...iskette Drive Assembly 323 Replacing the Display Printer Assembly 326 Replacing the Paper Cover 330 Replacing the Door Lock Module 333 Replacing the Hard Drive 334 Replacing the Power Supply Module 33...

Page 15: ...e Illumination Housing Assembly 360 Replacing the Polychromator Module 362 Replacing the Sample Chamber Interface Assembly 365 Replacing the Main Board 367 Replacing the UIP Board 370 Replacing the Ma...

Page 16: ...ng the Rapidpoint 400 Series System 391 Installing the System 391 Installing the AutomaticQC Cartridge 394 Relocating the System 396 Shipping or Storing the System 397 Connecting to a Computer System...

Page 17: ...plete in the Rapidlink Database 416 Setting Up RapidQC Hct in the Rapidlink System 417 Finishing the Rapidpoint Setup 417 Rapidpoint 400 Series Cartridge Usage 419 Overview 419 Verifying Modes of Oper...

Page 18: ...ible Calibrations 429 Cartridge Initialization Init 430 Initialization Calibration Timeline 431 Remote Access Setup to the Rapidlink System 433 Installing and Configuring Remote Access Setup RAS 434 C...

Page 19: ...ndicatesabuttononthescreen Forexample iftheword setup appears as Setup it refers to the button labeled Setup Buttons that youusefrequently arerepresentedon thescreenwith a symbol instead of text In th...

Page 20: ...symbol reminds you to push the measurement cartridge firmly to lock it in place This symbol identifies the area on the wash waste cartridge where you push to install the cartridge correctly This symbo...

Page 21: ...system is approved by UL as meeting U S requirements for safety This symbol indicates that the system meets the requirements of the European Union This symbol indicates that the system is approved by...

Page 22: ...he result is below the reporting range the system has an atypical response when measuring this parameter The system does not report results for other parametersthatusetheaffectedparameter Forexample i...

Page 23: ...33 Sample Entry 33 Sliding Valve 33 Tubing 35 Reagent System 35 Sensor Module 36 KCl Reservoir 40 Wash Waste Cartridge 41 Cartridge Interface Module 43 AutomaticQC Cartridge 46 AutomaticQC Cartridge F...

Page 24: ...Display Board 54 Display Support 54 CO oximeter Components 55 CO ox Measurement Components 56 Illumination Housing Assembly 57 Neon Board Assembly 57 Fiber Bundle Assembly 58 Sample Chamber Interface...

Page 25: ...onents of the Rapidpoint 400 seriessystems Eachcomponentcontainsindividualmodulesthatperform a series of related functions The Rapidpoint 400 series systems consists of the following components Measur...

Page 26: ...el Rapidpoint 400 Series System door open 1 Measurement cartridge 7 Paper advance knob 2 Door 8 Ampule breaker 3 Door latch 9 Air filter carrier 4 Cartridge handle 10 Sample port 5 Display 11 Support...

Page 27: ...mbly Delivers and collects light from the CO ox sample chamber 2 Drive Wheel Opens and closes the CO ox sample chamber 3 Pumps Move samples and reagents through the measurement and wash waste cartridg...

Page 28: ...28 Rev C Rapidpoint 400 Series System with AutomaticQC Cartridge Installed Rapidpoint 400 Series System with Bar Code Scanner Holder 1 AutomaticQC cartridge 2 Cartridge connector...

Page 29: ...Rev C Mechanical Descriptions 29 Rapidpoint 400 Series System left side 1 Diskette drive...

Page 30: ...mentsystem 3 Screen Latch Allows you to adjust the viewing angle of the screen 4 Handle Helps you to move the system 5 Co ox Lamp Appears only in Rapidpoint 405 systems 6 Power Switch 7 Fuse Compartme...

Page 31: ...ristaltic pumps the sensor module with the electronic components the wash waste cartridge the thermal control The external area of the cartridge consists of the platen area which contains the pump tub...

Page 32: ...tridge can be installed and still have 28 days of use before expiration If a cartridge is installed after the Install by date it is stable for the number of days remaining before expiration that is 28...

Page 33: ...nges capillaries or aspiration adapters during sample aspiration connects to the wash and waste ports for automatic cleaning The sample entry components consist of a luer and capillary seal The capill...

Page 34: ...the probe tip into the syringe creating the fluid path for sample aspiration Vent AQC controls the aspiration of an external QC sample using the front hole of the probe Zero Reagent Load aspirates th...

Page 35: ...s Each bag contains a fitting When the measurement cartridge is installed and locked into place pierce pins which are part of the interface assembly puncture each bag creating a fluid path The pierce...

Page 36: ...bing and to the preheater The sample then passes over the sensors for analysis The sensor module provides measurements for pH pO2 pCO2 sodium potassium ionized calcium chloride glucose Hct total hemog...

Page 37: ...he blood chloride Cl chloride ion concentration metabolites glucose Glu glucose concentration oxygenation hematocrit Hct thevolumeoccupiedbyredbloodcells in a given volume of blood value is determined...

Page 38: ...contained in the sample pO2 FIO2 theratioofarterialpO2 tothefractionof inspired oxygen calcium adjusted for pH 7 4 Ca 7 4 the ionized calcium concentration of blood normalized to pH 7 4 anion gap AnG...

Page 39: ...ectors to monitor and control the movement and the positioning of fluids during the system sequences CO oximetry Parameters total hemoglobin tHb the total of all measured hemoglobin fractions oxyhemog...

Page 40: ...oblems The IDEE Rom Identifies the following analyzer software version date installed on the analyzer date removed fro analyzer if removed normally analyzer serial number KCl Reservoir The KCl reservo...

Page 41: ...open or closed The cartridge contains the wash fluid which cleans the sample path after analysis and calibration The cartridge also contains the waste bag which stores liquid waste The wash waste car...

Page 42: ...e probe seals inside the fitting in the bag Two bag clamps one at the top of each bag hold the bags in position Two hangers one at the top of the cartridge and one at the bottom of the cartridge hold...

Page 43: ...f the system and holds all devicesandpartsnecessarytointerfacethesystemwiththemeasurement cartridge The location pins position the measurement cartridge on the cartridge interfaceframe Threebagpiercep...

Page 44: ...interface module and protects and guides the connector block The cam shaft used in conjunction with the cartridge handle raises and lowers the connector block The connector block provides the electric...

Page 45: ...oard takes the signals from the contact board and simultaneously transmits them into one signal that travels back to the system A programmable gain amplifier on the multiplexer board provides the gain...

Page 46: ...m where a support bracket secures it in place The ampule breaker and an access panel must be removed before the cartridge is installed Four standoffsattach the cartridge to the system where the ampule...

Page 47: ...Thevalvehasfivepositions each of whichenablesoneofthe five QC reagents to be pumped through the stainless steel probe in the center of the valve The probe remains stationary while the valve travels v...

Page 48: ...artridge AutomaticQC Cartridge Indicating Lever Closed Position 1 Bracket to secure the cartridge to the side of the system 2 Standoffs 4 3 EEPROM 4 Cartridge connector 5 Cartridge Lever 1 Cartridge c...

Page 49: ...stem the cartridge connector located on the front of AutomaticQC cartridge connects the AutomaticQC cartridge to the measurement cartridge Fluidic connectivity between the two cartridges is provided b...

Page 50: ...s the stepper motor to move the sliding metal latch plate and release the standoffs If power is lost the AutomaticQC cartridge can also be disengaged from the system by moving a release tab located be...

Page 51: ...allation of the cartridge the connector is moved horizontally and connects with the measurement cartridge It provides the sample path from the AutomaticQC cartridge to the measurement cartridge The ca...

Page 52: ...tor shaft The pump that services the measurement cartridge generates flow by compressing the tubing against the fixed platen of the cartridge As the individual rollers rotate through the platen area a...

Page 53: ...lay support In addition the display module contains the roll of printer paper and the paper cover Liquid Crystal Display The LCD is a 265 mm 10 4 inch diagonal display with active matrix color LCD tha...

Page 54: ...rd The printer cable carries the signals for the data the motor control the paper empty sensor and the printhead up sensor The display board communicates with the main board Display Board The display...

Page 55: ...Hb FMetHb FCOH in whole blood samples Measurement occurs as the sample flows through the sample chamber Light is transmitted through a fiber bundle to the optics head As the sample flows through the s...

Page 56: ...mponents consist of the following illumination housing assembly neon board assembly fiber bundle assembly sample chamber interface sample chamber polychromator module photo feedback sensor The CO ox c...

Page 57: ...housing assembly to a photo feedback sensor located on the main PB board This sensor continuously monitors lamp output and generates a signal that regulates power to the lamp Illumination Housing Asse...

Page 58: ...is focused onto the sample chamber transmits a small portion light from the illumination module to the photo feedback sensor which controls the halogen lamp output transmits light from the neon refer...

Page 59: ...nnected from the optical head to the polychromator relays the light for measurement The spring link holds and locates the optical head The detector module uses a thermistor to ensure that the CO ox sa...

Page 60: ...surementpositionwhenthemotormoves the shunt into the closed position When the shunt returns to the open position the measurement cartridge reagent system cleans the sample chamber A heater chip ensure...

Page 61: ...r The first mirror collimates light from the slit so that nearly parallel light falls on the diffraction grating The diffraction grating disperses the light coming from the collimating mirror into its...

Page 62: ...62 Rev C...

Page 63: ...ls 72 Circuit Description 74 Amperometric Circuits 74 Potentiometric Circuits 75 Hematocrit Fluid Detector Circuits 75 Display PC Board 77 Digital Signals 77 Digital Input Signals 77 Digital Output Si...

Page 64: ...ory Communications Circuitry 86 UIP Main Interconnect Board ISA Interface Circuitry 87 UIP Display Module COM1 COM2 LPT1 and Utility Circuitry 87 UIP COM3 Circuitry 87 UIP ISA Address Bus Decoder Data...

Page 65: ...7 Digital Output Signals 97 Multiplexer Board Interface 98 Digital Input Signals 98 Digital Output Signals 98 Analog and Other Output Signals 99 Main Interconnect PC Board 100 ISA Connectors 100 Multi...

Page 66: ...rd Controller 108 Battery 108 Miscellaneous Function Connector 108 Peripheral Interfaces 109 Serial Ports 109 Parallel Port 109 Floppy Disk Controller 109 Co oximeter OMZ Heater PC Board 110 Analog Si...

Page 67: ...s for each printed circuit board are included in Replacing Parts The electronic system directs the operation of all Rapidpoint 400 series systems components including the fluidic system the measuremen...

Page 68: ...Rev C Electronic System The Rapidpoint 400 series systems electronic system consists of the following PC boards Contact Display Dualopto Main Main Interconnect Multiplexer UIP User Interface Processo...

Page 69: ...7 C connections to an EEPROM device located within the sensor module for storing calibration and configuration information specific to the measurement cartridge Digital Signals Digital Input Signals D...

Page 70: ...turn for the glucose circuit 5_VDC_LAC Isolated positive power supply for the lactate circuit Voltage is 3 5 0 5 V at 250 A For future use 5_VDC_LAC Isolated negative power supply for the lactate circ...

Page 71: ...sensor CA_VO Voltage output signal for the Ca sensor MG_CL_VO Voltage output of the Cl sensor NA_VO Voltage output signal of the Na sensor BUN_VO For future use HCO3_VO Voltage output signal of the H...

Page 72: ...terminal of the preheater thermistor THM_PRE_LO The other terminal of the preheater thermistor THM_SMP_HI One terminal of the sample thermistor THM_SMP_LO The other terminal of the sample thermistor...

Page 73: ...pass through signal connected to the other end of the sample thermistor PO2_RF The voltage sensed internal to the pO2 sensor PO2_CN The voltage control electrode for the pO2 sensor GLU_RF The voltage...

Page 74: ...le limits the diffusion rate so thatthe outputcurrentis proportional to the glucoseconcentrationin the sample Another current output GLU_WA is from the inactive electrode of the sensor This current co...

Page 75: ...or Circuits The Contact board has two hematocrit fluid detector circuits These circuits are conductometric that is they measure the electrical conductance resistance of the fluid appearing between the...

Page 76: ...tial amplifier with a gain of 51 The HCT_SIG signal is the peak to peak voltage at HCT_HS minus the peak to peak voltage at HCT_LS multiplied by a gain of 51 Hematocrit circuit 2 is identical to the c...

Page 77: ...neration of the voltage necessary to turn the LCD backlight on and off Digital Signals Digital Input Signals Input Signal Description LCD_ENAB Enables operation of the LCD LCD_DIM Turns inverter provi...

Page 78: ...Y Handshake signal This signal indicates that the printer is currently busy and cannot accept any new data at this time LPT1ACK Handshake signal This signal asserts when LPT1BUSY is becoming de assert...

Page 79: ...f paper It is the open collector output of an optocoupler and requires a 100K ohms resistor pullup to the VCC line to operate A paper out condition is indicated by a voltage of greater than 2 5 V on t...

Page 80: ...motor This signal conforms to the requirements outlined in the Digital Inputs Signals section above VCC Electronics 5 V power supply This signal conforms to the requirements outlined in the Digital I...

Page 81: ...C This additional memory is intended for the downloadable font feature U14 a 128K x 8 flash EEPROM device is for program memory U10 is a power logic octal D type latch Touch Screen Switches Transisto...

Page 82: ...main board through a 4 pin male IDC connector J1 The two LEDs inside the interrupters U1 and U2 connect in series and can be checked at test points TP3 and TP4 for a voltage of approximately 2 5V The...

Page 83: ...bus for all other devices on the Main board The microprocessor uses a frequencysynthesizer Y1 for generating both its internal and external system clock U55 is a power supervisor and watchdog The out...

Page 84: ...e complex programmable logic device CPLD U37 The majority of this IC takes the address bus signals A1 to A15 chip select signals CS9 to CS10 and other 68332 control signals such as R W and forms vario...

Page 85: ...ontains the interface to the Multiplexer board located in the measurement block module This module receives parallel data bits from the U38 latches U38 returns the properly conditioned sensor analog s...

Page 86: ...detector signals are monitored The fluid detector signals are sent to a pair of comparators located in U17 The non inverting input pins of thesecomparators connect to a dual 12 bit DAC U24 The DAC all...

Page 87: ...the LIS communications port on the Rear Interconnect board assembly Connector J19 also contains the LPT1 parallel port signals These signals originate on the UIP Processor board and exit the Main boar...

Page 88: ...TheLAB BofICU20takesthedatabussignals USD0toUSD3 inandout as well as inputs for the FIFO status flags and door and waste switch signals The LAB C decodes chip selects for the Controller IC and serial...

Page 89: ...als from RTP CPLD U38 and forms the proper sequencing signals to drive the luer position motor located in the equipment wall module These driver signals exit the Main board through J3 Power System Sta...

Page 90: ...also splits to drive heaters through power transistor Power Supply Voltage Description 12_VDC supply Overvoltage protected by transient protector U42 and is current limited from shorts by R174 12_VDC...

Page 91: ...Overview 91 Signal HEAT24V_EN controls power to the heaters and is enabled by a latched bit on IC U38 on the RTP data bus LEDs CR10 to CR13 indicate which of the four power supply voltages VCC 12 V 1...

Page 92: ...s I OCS16 I O 16 bit chip select IRQ3 IRQ7 IRQ9 IRQ12 IRQ 14 IRQ15 Interrupt request lines These lines signal the microprocessor when an I O device requires attention An interrupt request is generated...

Page 93: ...memory decode is within the low 1 MB of the memory space SMEMW originates from MEMW and the decode of the low 1 MB memory This signal is active low T C Terminal count This signal provides a high pulse...

Page 94: ...OM1RX Transmit signal for the touch screen serial port to the UIP Processor board from the Main board COM1CTS Clear to send signal for the touch screen serial port from the UIP Processor board to the...

Page 95: ...R Printer error Possible error sources are print head temperature out of range print head voltage out of range print head in the up position or printer out of paper LPT1PE Printer is out of paper LPT1...

Page 96: ...gnals LCD_YD VSYNC LCD frame start signal LCD_ HSYNC LCD line start signal LCD_XCK CK LCD clock signal ENAVEE LCD negative supply control signal ENAVDD LCD positive supply control signal Input Signal...

Page 97: ...put Signal Description LCD_ENAB Enables operation of the LCD LCD_DIM Turns the LCD backlight inverter on and off LCD_DU0 7 Upper byte of LCD data signals LCD_DL0 7 Lower byte of LCD data signals LCD_Y...

Page 98: ...side of the bridge Typical voltage is 595 9 mV THM_PRE_LO High terminal of the preheater thermistor HCT1_SIG Outputof thefirst hematocritcircuit This signaloriginates on the Contact board and passes t...

Page 99: ...itry DAC_LO Signal return line for the DAC signal VREF 5 V measurement system voltage reference from the DAS circuitry 12_VDC 12 VDC from the filtered supply 12_VDC 12 VDC from the filtered supply 12_...

Page 100: ...board to the Main board ISA Connectors All the ISA bus signals are sent from the UIP Processor board through a 98 pin female edge connector J1 This connector routes all signals to the Main board thro...

Page 101: ...Multiplexer board provides the following four galvanically isolated dual channel amperometric circuits with precision bias voltage a precision reference bridge and amplifier for the sample temperatur...

Page 102: ...ge transfer process in the hematocrit circuits DRIVE Signal provides the AC excitation voltage for the hematocrit sensors Output Signal Description PREMUX0 7 8 bit bus driven by the DAS circuitry and...

Page 103: ...M 5 VDC ground return from the DAS circuitry See the Digital Signals section for details HCT1_SIG Output of the first hematocrit circuit This signal originates on the Contact board and passes through...

Page 104: ...the oxygen circuit 5_VDC_PO2 Isolated negative power supply for the oxygen circuit 5_RTN_PO2 Isolated power supply return for the oxygen circuit 5_VDC_GLU Isolated positive power supply for the gluco...

Page 105: ...for the EEPROM PREMUX_SIG_HI Multiplexed sensor signal offset adjusted and properly amplified output of the Multiplexer board PREMUX_SIG_LO Signal low sense return for PREMUX_SIG THM_BLK_HI Signal con...

Page 106: ...tanceis convertedinto avoltagemeasured by the DAS circuitry on the Main board Additionally it is necessary to monitor the temperature of the connector block and the sample preheater This monitoring is...

Page 107: ...or IDE controller with primary channel routed to 2 5 inch hard drive interface Primary channel supports Master Slave IDE devices Interrupt controller Timer counters DMA controller Real time clock RTC...

Page 108: ...only input power requirement onboard 1 8 to 2 5 volt power supply for the CPU core onboard 2 5 volt power supply for the CPU I O onboard 3 3 volt power supply for the chip set memory and PCI devices M...

Page 109: ...COM2 is through a standard header connector on the board that is shared with the parallel port Both COM ports are 16C550 compatible and contain FIFOs Parallel Port The parallel port is in a user defi...

Page 110: ...nctions interfaces the slide cell position detectors located on the OMZ Interface board in the optics head with the Main board amplifes and powers the Co ox heater OMZ Heater PC Board Block Diagram Mu...

Page 111: ...ound signal to a LED from the MUX board 5 VOLTS Power supply input signal from the MUX board GROUND Power supply return signal from the MUX board assembly HEATER_IN Heater control signal from the MUX...

Page 112: ...112 Rev C...

Page 113: ...09 130 D C Power Harness Assembly 113836 131 Diskette Drive Cable Assembly 570255 132 Diskette Power Harness 570254 132 Hard Drive Cable Assembly 570257 133 Inboard 1 Harness 113770 133 Inboard 2 Harn...

Page 114: ...114 Rev C...

Page 115: ...map illustrates system navigation The fluidic diagrams illustrate the various valve positions with the associated fluid path The system block text diagram illustrates the major Rapidpoint 400 series...

Page 116: ...116 Rev C Rapidpoint 400 Series Systems Menu Map...

Page 117: ...Rev C System Diagrams and Cable Drawings 117 Fluidic Diagrams...

Page 118: ...118 Rev C...

Page 119: ...Rev C System Diagrams and Cable Drawings 119...

Page 120: ...120 Rev C...

Page 121: ...Rev C System Diagrams and Cable Drawings 121...

Page 122: ...122 Rev C...

Page 123: ...Rev C System Diagrams and Cable Drawings 123...

Page 124: ...124 Rev C...

Page 125: ...Rev C System Diagrams and Cable Drawings 125...

Page 126: ...126 Rev C...

Page 127: ...Rev C System Diagrams and Cable Drawings 127...

Page 128: ...128 Rev C Rapidpoint 400 Series Systems Electronic Block Text Diagram...

Page 129: ...Rev C System Diagrams and Cable Drawings 129 Rapidpoint 400 Series Systems Cable Interconnect Diagram...

Page 130: ...130 Rev C Cable Drawings A C Power Harness Assembly 570250 Cable Harness Outboard Assembly 113509...

Page 131: ...Rev C System Diagrams and Cable Drawings 131 D C Power Harness Assembly 113836...

Page 132: ...132 Rev C Diskette Drive Cable Assembly 570255 Diskette Power Harness 570254...

Page 133: ...Rev C System Diagrams and Cable Drawings 133 Hard Drive Cable Assembly 570257 Inboard 1 Harness 113770...

Page 134: ...134 Rev C Inboard 2 Harness 113523 LCD Backlight Cable Assembly 108771...

Page 135: ...Rev C System Diagrams and Cable Drawings 135 Preamp Module Cable Assembly 570269...

Page 136: ...136 Rev C UIP Display Cable Assembly 570263 UIP LPT1 COM2 Cable Assembly 570267...

Page 137: ...Rev C System Diagrams and Cable Drawings 137 UIP Utility Cable Assembly 570268 UIP COM1 Inboard Cable Assembly 570272...

Page 138: ...138 Rev C Flex Circuit Display 570516 100 Pin Cable Assembly 111326 Patch Cord Cable 122254...

Page 139: ...Rev C System Diagrams and Cable Drawings 139 Fiber Bundle Assembly 1315271...

Page 140: ...140 Rev C...

Page 141: ...Rev C Calibrations 141 Calibrations Calibrating the System 143 Calibrating the Touch Screen 145 Emergency Calibration of the Touch Screen 147...

Page 142: ...142 Rev C...

Page 143: ...he day 2 At the Analysis screen touch the Status button 3 Touch Calibrate NOTE You cannot perform calibrations for at least 3 hours after installing a new measurement cartridge During this period the...

Page 144: ...e 4 1 Calibration Message If a parameter fails the calibration the calibration repeats When the calibration is finished the Analysis screen appears 1 Shows time remaining until the calibration finishe...

Page 145: ...button 3 Touch Setup 4 Touch Secured Options 5 Touch Screen Calibration The Calibration screen appears with the Target button in the upper left corner of the screen If you do not want to calibrate the...

Page 146: ...6 Rev C 7 Touch the button again when it appears on the screen The system returns to the Setup menu when the touch screen is calibrated 8 Touch the Continue button twice to return to the Analysis scre...

Page 147: ...screen with the Bayer logo appears touch the screen within 4 seconds Wait for the system to complete startup and the Calibration screen appears 3 Touch the button that appears on the screen The butto...

Page 148: ...148 Rev C...

Page 149: ...Technique 172 Bar Code Quality 172 Resetting the Bar Code Scanner 172 Printer 173 Touch Screen 174 Communication 175 Viewing the Events Log 176 System Messages 177 AQC Cartridge Expired 177 AQC Cartr...

Page 150: ...186 D4 Offset Error Glu pO2 186 D21 Processing Error 188 D23 Reagent Error 1 8 or 10 13 189 D23 Reagent Error 9 190 D24 AQC Material Error 192 D33 Valve Error 1 193 D33 Valve Error 2 194 D35 Electroni...

Page 151: ...ridge 217 No M Cartridge 217 No Paper in Printer 218 No W Cartridge 219 Out of Reporting Range 219 QC Lot Not Defined 219 QC Material Expired 219 Question Result 219 Required QC Due 220 Sensors Unavai...

Page 152: ...System Error Call your service representative for assistance 228 Unsuccessful Connection Review the setup values Ensure that the cables are connected and that the network is operating 229 W Cartridge...

Page 153: ...53 Testing the IDEE ROM and Cartridge Connector Switch 251 Lamp Calibration Test 252 Wavelength Calibration Test 253 Lamp On Off Test 254 Sample Chamber Test 255 Shutting Down the System 256 Recoverin...

Page 154: ...154 Rev C...

Page 155: ...nual The QC button on the Analysis screen is not available Probable Cause Corrective Action The lot is expired for the control that is currently scheduled or no lot is entered for the control 1 Define...

Page 156: ...automatic calibration 2 If the parameter fails the 2 point calibrations the problem is with the measurement cartridge Replace the measurement cartridge Refer to Replacing the Measurement and Wash Wast...

Page 157: ...y fail Required QC or AutomaticQC analysis more frequently Refer to Viewing and Editing Target Ranges for Quality Control in Section 6 in the Rapidpoint 400 Series Operator s Manual if you need to adj...

Page 158: ...ause Corrective Action The parameter failed calibration 1 View the Events Log to determine the event causing the parameter to fail and follow the appropriate solutions for that event 2 Subsequent cali...

Page 159: ...idpoint 400seriessystemhasturnedanalysis functions off for the Rapidpoint 400 series system Perform other tasks such as recalling results and accessing the Setup options if necessary Contact your syst...

Page 160: ...shows the number of samples or amountoftime 00 34minutesinthis example remaining until the wash waste cartridge is depleted or expired No action is necessary at this time You can monitor thenumberofsa...

Page 161: ...amp has burned out 1 Shut down the system as described in Shutting DowntheSystem page 256 wait10 seconds and then turn the system on If thelamp stilldoesnotwork the D75 LampFailure message appears in...

Page 162: ...Section 1 in the Rapidpoint 400 Series Operator s Manual 3 Analyzethesampleagainensuringthatthesample has no bubbles Checking for bubbles is especially important for samples introduced from capillary...

Page 163: ...t result Analyze the sample againoranalyzea QCsample to verify the result The system did not correct the hematocrit result for sodium Na or potassium K because the sodium or potassium sensor is out of...

Page 164: ...off at the Analysis screen Analyze the sample again ensuring that the parameteristurned on at the Analysis screen as described in Analyzing Patient Samples in Section 1 in the Rapidpoint 400 Series O...

Page 165: ...aphics are turned on in Setup as described in Selecting Parameters and Units of Measure and Selecting Patient and Sample Demographics in Section 6 in the Rapidpoint 400 Series Operator s Manual You se...

Page 166: ...sample was analyzed using a different sample type button than the mixed venous button or the sample was analyzed without the interference correction which caused results to be unreliable because of th...

Page 167: ...You have installed an expired measurement cartridge a used measurement cartridge or you installed the measurement cartridge without using the prompted method 1 Touch Cancel View the events log on the...

Page 168: ...installing a new cartridge and closing the connector a message appears indicating that the cartridge was not installed correctly The AutomaticQC cartridge was not pushed in firmly enough to lock it i...

Page 169: ...e accession number the bar code appears in the wrong field on the screen The wrong field was selected when you scanned the bar code Touch the button for the appropriate field or touch the field and th...

Page 170: ...abel as described in Bar Code Quality on page 172 3 Ensurethatthebarcodescanneriscorrectly connected to the Rapidpoint 400 series system 4 Ensure that the bar code scanner is turned on and that the co...

Page 171: ...4 Ensure that the bar code scanner is turned on and that the correct symbology and format for patient bar codes are selected as described in Selecting Bar Code Options in Section 6 in the Rapidpoint...

Page 172: ...round with black print provides the highest contrast Label quality can interfere with correct scanning Avoid using labels with a highly laminated surface or with poorly printed bar codes such as those...

Page 173: ...Section 3 in the Rapidpoint 400 Series Operator s Manual 3 Ensure that the paper is not jammed Clear the jam if one exists 4 If you are unable to clear the paper jam call for technical assistance 5 En...

Page 174: ...uches For example you must touch to the right or the left of an item to select it The touch screen requires calibration Refer to Calibrating the Touch Screen in Calibrations When relocating the system...

Page 175: ...dpoint 400 series system is correctly configured to communicate with the Rapidlink system or the LIS and that the connection is turned on Refer to Connecting to a Computer System for more information...

Page 176: ...s the list of messages about current system conditions such as a message for a sensor that is out of calibration Refer to System Messages on page 177 for more information about each message 3 Touch th...

Page 177: ...ridge AQC Cartridge Not Valid The system detects that the AQC cartridge just installed has exceeded its Installbydate thata usedcartridgewas reinstalled or that the cartridge was installed without usi...

Page 178: ...r the system Replace the sample port when prompted The system cannot analyze the current patient or QC sample because it detects bubbles in the sample This can occur if the sample contained bubbles wh...

Page 179: ...form calibrations when the wash waste cartridge is expired during diagnostic tests and during the procedure for removing obstructions When this condition occurs the Wait screen appears while the syste...

Page 180: ...nd of sample analysis This message usually appears if you analyze a sample before the CO ox sample chamber reaches its normal operating temperature The system does not report the sample results Analyz...

Page 181: ...only after all other corrective actions have been completed If cartridge replacement does not solve the problem 1 Use the measurement cartridge simulator to perform the sensor test 2 Replace the conne...

Page 182: ...bration limits 1 Perform a full calibration 2 If the parameter remains out of calibration replace the cartridges to make the parameter available for analysis Refer to Replacing the Measurement and Was...

Page 183: ...nd limit checked for both calibration points Inherent noise or instability is determined during the measurement A special case exists for pCO2 which reports a D2 error when a drift error occurs for pH...

Page 184: ...tions Perform service solutions only after all other corrective actions have been completed If cartridge replacement does not solve the problem 1 Use the measurement cartridge simulator to perform the...

Page 185: ...tHb Thesystem turned the tHb parameter off because the CO ox module exceeded calibration limits 1 Perform a full calibration 2 If the parameter remains out of calibration replace thecartridgestomaket...

Page 186: ...the measurement cartridge simulator to perform the sensor test 2 Replace the connector block 3 Replace the cartridge interface module D4 Offset Error Glu pO2 The system turned the parameter identifie...

Page 187: ...is not reported with D3 for the same sensor and same calibration point D4 for pO2 occurs only during a 2 point calibration operation D4 for Glu occurs during a 2 point calibration operation and a was...

Page 188: ...tem error occurred 1 When prompted shut down the system as described in Shutting Down the System on page 256 wait 10 seconds and then turn the system on 2 If the message appears again record the messa...

Page 189: ...message If you need to replace only the wash waste cartridge refer to Replacing the Wash Waste Cartridge in Section 3 in the Rapidpoint 400 Series Operator s Manual If you need to replace both cartri...

Page 190: ...ace the sample port as described in Replacing the Sample Port in Replacing Components 2 If prompted replace the cartridges as described in Replacing the Measurement and Wash Waste Cartridges in Sectio...

Page 191: ...agent loads aspreag_seq Qualifier 4 occurs during 2 point and FULL 2 point calibration reagent loads aspreag1_seq Qualifier 5 occurs during FULL 2 point calibration reagent loads aspreag1_seq Qualifie...

Page 192: ...ive Action D24 AQC Material Error Thesystemdetectsthattheflowofoneormorequalitycontrol materials is inadequate or incorrect The system automatically repeats the QC sample If the system cannot correct...

Page 193: ...ective Action D33 Valve Error 1 Qualifiers 1 Measurement cartridge The system detects a problem with the valve inside the measurement cartridge 1 When prompted shut down the system as described in Shu...

Page 194: ...assistance If the problem occurs during AutomaticQC analysis 1 Shut down the system as described in Shutting Down the System on page 256 wait 10 seconds and then turn the system on 2 If the message a...

Page 195: ...tain position due to a drive valve failure or a latch failure When the AQC cartridge does not eject the D33 is detected after closing the cartridge connector when replacing the cartridge when the cart...

Page 196: ...qualifier and call for technical assistance Service Solutions Perform service solutions only after all other corrective actions have been completed 1 Perform the test to measure the 5 volt supply Ref...

Page 197: ...tion when the system fails any tests that check the DAS functionality of the Main board Qualifier 13 occurs during washes and pump MITs Qualifier 14 occurs if the door opens without the door lock bein...

Page 198: ...er all other corrective actions have been completed 1 Check that the filter is not blocked or that nothing is blocking air to the main board 2 Check cables and connections to the fan 3 Check that the...

Page 199: ...lacement procedure will preempt the temperature handling All D38 types except D38 1 are detected by the temperature control system software which runs once per second D38 1 is detected on startup duri...

Page 200: ...to replace the sample port If the system is unable to clear the obstruction it prompts you to replace the cartridges 1 When prompted replace the sample port as described in Replacing the Sample Port...

Page 201: ...ies Operator s Manual 2 If the message appears again record the message and call for technical assistance Service Solutions Performservicesolutionsonlyafterallothercorrectiveactionshave been completed...

Page 202: ...prompts you to replace the AutomaticQC cartridge 1 When prompted replace the cartridge as indicated in the message Refer to Replacing the AutomaticQC Cartridge on page 168 2 If prompted to replace the...

Page 203: ...in the fluidic path of the measurement or AutomaticQC cartridge A D41 is detected during the priming of an AutomaticQC cartridge D41 is cleared by a successful AutomaticQC cartridge replacement turnin...

Page 204: ...Ensure that the cable is not damaged and that it is the correct cable for connecting the systems 3 EnsurethattheRapidlinkdatamanagementsystemortheLIS is correctly configured to communicate with the R...

Page 205: ...ord the message and call for technical assistance Service Solutions Performservicesolutionsonlyafterallothercorrectiveactions have been completed 1 Repeat 2 point calibrations 2 Replace the measuremen...

Page 206: ...bon cable and reattach Power up the system 4 If the error persists replace the polychromator module For Error 11 1 Repeat 2 point calibrations 2 Perform the Wavelength Calibration test without the car...

Page 207: ...rcorrectiveactions have been completed For Error 9 1 Repeat 2 point calibrations 2 Check that the screws are tight on the polychromator to ensure it is properly grounded 3 Remove the polychromatorribb...

Page 208: ...ach zero full calibration and CO ox sample measurement when excessive noise occurs for the tHb analytical detector during a dark noise BIT 7 detection occurs during PUI and for each zero full calibrat...

Page 209: ...alyzed 1 When prompted shut down the system as described in Shutting Down the System page 256 wait 10 seconds and then turn the system on 2 If the message appears again replace the cartridges Refer to...

Page 210: ...ed in Shutting Down the System page 256 wait 10 seconds and then turn the system on 2 If the message appears again replace the lamp as described in Replacing the CO ox Lamp in Replacing Components Ser...

Page 211: ...ed in the CO ox electronic components NOTE The system can measure samples and report results for parameters that are still available 1 Shut down the system as described in Shutting Down the System pag...

Page 212: ...IT Message Probable Cause and Corrective Action D77 Coox Temperature Error An error has occurred in the CO ox temperature control components This error can occur if a temperature control component has...

Page 213: ...o 37 25 C and is still out of range 15 minutes after the temperature operational exception is detected CO ox results are not reported all other parameters in calibration report results CO ox sample re...

Page 214: ...le port canalso causethis problem Thesharpedges of capillary tubes can damage the sample port affecting sample aspiration 1 Toavoidbubbles inpatientsamples ensurethatyouusethe recommended collection s...

Page 215: ...eplacing the Measurement and Wash Waste Cartridges in Section 3 to install a new cartridge 2 If the cartridge does not match the software use a different cartridge or install the correct version of so...

Page 216: ...ent Samples in Section 1 in the Rapidpoint 400 Series Operator s Manual to identify the minimum sample volume for the sample device that you are using Service Solutions Performservicesolutionsonlyafte...

Page 217: ...g the AutomaticQC Cartridge on page 168 Service Solutions Performservicesolutionsonlyafterallothercorrectiveactions have been completed If cartridge replacement does not solve the problem 1 Examine th...

Page 218: ...fore leaving the customer site 1 Use the measurement cartridge simulator to perform the measurement test 2 Check cables and connections to cartridge interface assembly 3 Replace the connector block 4...

Page 219: ...are currently scheduled for Required QC analysis but no lot information is entered for a control that is currently scheduled Define a new lot of the control as described in Defining New Lots of Contro...

Page 220: ...duled for the next level of QC analysis are not available for example because they are out of calibration Determine why parameters are not available and correct the problem Refer to Button and Paramet...

Page 221: ...ons occurs Required QC analysis is currently scheduled The cartridges are nearly expired or depleted One or more parameters are turned off because they failed Required QC or AutomaticQC analysis Requi...

Page 222: ...minutes or more Message Probable Cause and Corrective Action Temp Not Ready Thesystemdetectsthatthetemperatureofthesensormodule is outside the acceptable measurement range This message can occur when...

Page 223: ...g Message Probable Cause and Corrective Action Temp Out of Range The system detects that the temperature of the sample is beyond the acceptable measurement range at the end of sample analysis This mes...

Page 224: ...Not in Retro Calibration Mode At the end of measurement the measurement module temperature was found to be outside the range 37 0 2 C for all patient sample types For QC sample types the range will be...

Page 225: ...o long If necessary you can analyze samples while this message is displayed 1 If possible wait until the system removes the message from the Status screen indicating the temperature is now within rang...

Page 226: ...efer to the related exceptions Temp Not Ready and Temp Out of Range If during a non fatal temperature error no measurement cartridge is installed then the measurement cartridge replacement procedure w...

Page 227: ...turer The system did not detect a sample Remove the sample device if present and touch Continue Replace the sample port when prompted The system cannot report results for the patient or QC sample beca...

Page 228: ...potassium sensor is out of calibration The system uses a default value of 140 mmol L for sodium or a value of 4 mmol L for potassium to correct the Hct result On the screen and the report the letter...

Page 229: ...Rapidlink data management system or the LIS is correctly configured to communicate with the Rapidpoint 400 series system 5 Ensure that the cable is not damaged and that it is the correct cable for co...

Page 230: ...are performed Once a measurement cartridge is removed if reinstalled it is likely to fail within a few days To verify repairs you may reinstall the measurement cartridge while remaining in Diagnostics...

Page 231: ...ay The Diagnostics screen appears temperature prints the temperature for various system components lamp cal tests and calibrates the halogen lamp wavelength cal tests neon lamp operation and alignment...

Page 232: ...ints the report Sample Measurement Report If you want to print the Then touch Using the following cartridge measurement report Measurement simulator sensor report Sensor real printer report Printer re...

Page 233: ...ng the Printer Use this procedure to check that the printer character set is functioning correctly 1 Touch the Recall button 2 Touch Sample Totals 3 Touch Diagnostics CAUTION The system cannot perform...

Page 234: ...appears NOTE Ensure that printer paper is inserted into the printer 5 Touch Printer The paper advances and the printer begins to print 6 Discard the printout then touch Printer again 7 Verify the pri...

Page 235: ...ence is running or has run in the last 60 seconds 3 Steady State Count Time in seconds that the heater has been at the steady state Uses this signal for error checking and block set point changes 4 Bl...

Page 236: ...test moves the valve to three positions numbered 1 through 3 The number of the current position appears on the screen when you touch Change The test is complete when position 3 appears on the screen...

Page 237: ...ves the valve to all 14 positions The number of the current position appears on the screen when you touch Change The test is complete when position 14 appears on the screen 9 Touch Stop to stop the te...

Page 238: ...en working with biohazardous materials CAUTION The system cannot perform routine fluidic activities while you are at the Diagnostics screen or while you are performing diagnostic tests When you exit f...

Page 239: ...on the screen 11 Touch Stop to stop the test 12 Repeat this procedure from step 6 if you want to test the other pump 13 Touch the Continue button three times to return to the Analysis screen If you w...

Page 240: ...ple Totals 3 Touch Diagnostics 4 Enter the service password or use the password of the day 5 Touch the Continue button 6 Remove the measurement and the wash waste cartridges a Open the door BIOHAZARD...

Page 241: ...1145 to 1662 4 GLU_A 50 to 50 340 to 460 3000 to 3700 5 GLU_B 50 to 50 340 to 460 3000 to 3700 6 LAC_A N A N A N A 7 LAC_B N A N A N A 8 K 1229 to 809 246 to 214 732 to 1232 9 Na 787 to 349 39 to 511...

Page 242: ...n b If the test fails again replace the connector block For more information refer to Illustrated Parts Lists are within the ranges provided in the measurement channels table remove the cartridge simu...

Page 243: ...e cartridge simulator NOTE Perform steps 4 through 14 to test the pump flow for either the sample or the wash pump 4 Place the inlet tubes into a beaker of reagent water 5 Place the outlet tubes into...

Page 244: ...ts of the valve position 2 measurement in the system Diagnostic Tests Tools Required Verification Gauge NOTE Prior to use check that the valve alignment gauge is correctly set to zero If adjustment is...

Page 245: ...eads within 0 0 5 If the result Then is not within the acceptable range loosen the set nut on the gauge and adjust the gauge to zero When adjustment is complete tighten the set nut Go to step 2 is wit...

Page 246: ...tinue button 8 Touch M Valve 9 Touch Start The valve moves to position 1 on the screen 10 Touch Change The valve moves to position 2 on the screen 11 With the valve in position 2 verify that the gauge...

Page 247: ...otals 5 Touch Diagnostics 6 Enter the service password or use the password of the day The Diagnostics screen appears 7 Touch AQC Valve 8 Touch Start The position number on the display is at 1 The AQC...

Page 248: ...o the following figure which shows how the AQC valve appears when the position number on the display is 2 The AQC valve is at fluid position 1 and is in alignment with the probe hole AQC Valve at Flui...

Page 249: ...E The AQC valve positions are tested twice during the alignment test Once with the measurement cartridge valve in the wash position and again with the valve in the ventAQC position For positions 1 7 a...

Page 250: ...lay AQC Valve Alignment minimum acceptability NOTE The criteria for a pass on each of the valve positions is determined by the ability to see any edge of the probe hole Position Indicated on Display F...

Page 251: ...tch is moved back to the ON position the message disappears 19 Return to the Diagnostics screen 20 When the test is complete put the AQC cartridge simulator switch in the OFF position If you want to T...

Page 252: ...ration During the test the lamp is turned on using the most recent lamp calibration settings and a full lamp calibration and diagnostic test is performed NOTE Perform this test whenever the lamp is ch...

Page 253: ...ecall button 3 Touch Sample Totals 4 Touch Diagnostics 5 Enter the service password or use the password of the day The Diagnostics screen appears 6 Touch the Wavelength Cal button Allkeysaredisabled t...

Page 254: ...y This test may be used to directly turn the lamp on and off using the most recent lamp calibration settings to control the intensity of the lamp while diagnosing problems with the illumination system...

Page 255: ...hamber An error flag indicating a sample chamber position error is detected if the sample chamber fails to move to the targeted position during testing NOTE A measurement cartridge or a measurement ca...

Page 256: ...ering from a Power Loss Cartridges installed in the system remain stable for 60 minutes without power If power is removed from the system for less than 60 minutes you can resume operating the system w...

Page 257: ...splays the Rapidpoint 400 series system title screen 2 If prompted replace the cartridges Refer to Replacing the Measurement and Wash Waste Cartridges in Section 3 in the Rapidpoint 400 Series Operato...

Page 258: ...258 Rev C...

Page 259: ...ssembly Illustrations 261 Main Assembly Parts List 278 Cartridge Interface Assembly Illustrations 281 Cartridge Interface Assembly Parts List 286 Power Module Assembly Illustrations 287 Power Module A...

Page 260: ...260 Rev C...

Page 261: ...Illustrated Parts Lists 261 Main Assembly Illustrations System Frame rear view 1 Paper cover 2 Handle 3 Display printer assembly 4 Display support 5 Spring pawl shown in the forward position 6 Display...

Page 262: ...262 Rev C Handle Pawl...

Page 263: ...Rev C Illustrated Parts Lists 263 Wash Waste Switch Rubber Feet...

Page 264: ...264 Rev C Display Display Bracket...

Page 265: ...Rev C Illustrated Parts Lists 265 Front View of the System Rapidpoint 400 System 1 Cartridge interface assembly 2 Door hook 3 Pre amp cable 4 EDS Ground strap 5 Outboard cable harness 6 Door switch...

Page 266: ...266 Rev C Front View of the System Rapidpoint 405 System 1 CO ox sample chamber interface assembly 2 Fiber bundles 3 5 pin connector...

Page 267: ...Rev C Illustrated Parts Lists 267 Front Door Door Hook...

Page 268: ...268 Rev C Cartridge Interface Assembly Front Door Switch...

Page 269: ...Rev C Illustrated Parts Lists 269 ESD Ground Strap Polychromator Module 1 CO ox polychromator module...

Page 270: ...270 Rev C Diskette Drive Diskette Drive Side 1 Diskette drive cable 2 Diskette drive fascia 3 Diskette drive...

Page 271: ...Rev C Illustrated Parts Lists 271 Diskette Drive Diskette Drive Cable Shield...

Page 272: ...the rear interconnect cable 2 Connector for the power harness 3 UIP board 4 UIP utility cable 5 UIP display cable 6 Main board 7 UIP LPD Com 2 cable 8 Connector tor the patch cable 9 UIP Com Inboard c...

Page 273: ...Rev C Illustrated Parts Lists 273 Connector UIP PCB UIP PCB with Cables...

Page 274: ...274 Rev C Main PCB Main PCB Attached to Frame...

Page 275: ...Rev C Illustrated Parts Lists 275 AQC Frame Assembly AQC Frame Assembly 1 AQC frame assembly 2 Main Interconnect board...

Page 276: ...276 Rev C AQC Latch Assembly Front View AQC Latch Assembly Rear View 1 AQC latch assembly...

Page 277: ...Rev C Illustrated Parts Lists 277 Cover...

Page 278: ...10 Wash Waste Switch 570312 126864 kit 11 Screw Phillips Pan head C12a SEMS 106144 126864 kit 12 Boot Switch Lever 108686 126864 kit 13 Screw Shoulder 4 40 0 125 X 25 109232 14 Panel Access AQC 12092...

Page 279: ...8 46 Cable Assembly UIP COM1 Inboard 570272 48 Drive Disk DSDD 3 5 inch 122199 122530 49 Bracket Disk Drive 100369 50 Screw Metric Pan head 823705002 51 Washer Lock 4 823342003 52 Fascia Diskette Driv...

Page 280: ...ut KEP 6 32 SCP 823737005 82 Strap ESD Ground 110507 122566 84 Tape Conductive 825025001 85 Door Lock Assembly 116315 122561 86 Screw Thread forming 3 24 117671 87 Door Hook 126788 89 Harness Inboard...

Page 281: ...sts 281 Cartridge Interface Assembly Illustrations Cartridge Interface Assembly 1 Outboard cable harness 2 Spring plate 3 Connector block 4 Thermal cover 5 Cartridge handle 6 Cartridge interface frame...

Page 282: ...282 Rev C Pump Housing Peri pump Motor and Mount...

Page 283: ...Rev C Illustrated Parts Lists 283 Peri pumps Spring Plate...

Page 284: ...284 Rev C Connector Block Cartridge Handle...

Page 285: ...Rev C Illustrated Parts Lists 285 Preamp Cable Cover...

Page 286: ...ri pump 570223 122549 kit 13 Roller Cage 100552 122554 14 Mount Motor 570546 122549 kit 15 Plate Spring 570547 16 Housing Pump 100146 122546 17 Spring Peri pump 570320 122567 20 Probe Motor 109678 21...

Page 287: ...r Module Assembly Illustrations Power Module Assembly Rapidpoint 400 System 1 Power supply 2 Power entry with switch 3 Rear interconnect board 4 Patch cord 5 Hard drive cable 6 Hard drive 7 Fan 8 DC p...

Page 288: ...288 Rev C Power Module Assembly Rapidpoint 405 System 1 Neon board assembly 2 Fiber bundle assembly 3 Illumination housing assembly 4 Fiber bundle assembly...

Page 289: ...Rev C Illustrated Parts Lists 289 Power Module Frame Power Entry with Switch...

Page 290: ...290 Rev C Rear Interconnect Board Fan...

Page 291: ...Rev C Illustrated Parts Lists 291 Power Supply Patch Cord with Ferrite Filter...

Page 292: ...292 Rev C Hard Drive...

Page 293: ...odule Power Entry with Switch 100376 122547 11 Fan Cooling 100053 122533 12 Screw Phillips Pan head 6 32 X 1 4 823810205 13 Nut KEP 6 32 SCP 823737005 14 Strip Contact 101802 17 Fuse 5 X 20 MM 105836...

Page 294: ...294 Rev C CO ox Module Components Illustrations Sample Chamber Interface Assembly RSL Part 131530...

Page 295: ...Rev C Illustrated Parts Lists 295 Polychromator Module Assembly Part Number 130594 Illumination Housing Assembly Part Number 131529...

Page 296: ...296 Rev C Neon Board Assembly Part Number 131526...

Page 297: ...dle Assembly Part Number 130527 A Terminal A connects to the sample chamber interface B Terminal B connects to the illumination housing assembly C Terminal C connects to the neon board assembly D Term...

Page 298: ...298 Rev C...

Page 299: ...rface Assembly 309 Replacing the Connector Block Assembly 313 Removing the AutomaticQC Cartridge 318 Replacing the AutomaticQC Frame Assembly 320 Replacing the Diskette Drive Assembly 323 Replacing th...

Page 300: ...Cages 345 Replacing the Pump Motors 349 Replacing the Wash Waste Switch 354 Replacing the Fiber Bundle Assembly 356 Replacing the Neon Board Assembly 358 Replacing the Illumination Housing Assembly 36...

Page 301: ...Replacing Components 301 Replacing the Main Interconnect Board 372 Removing the Rear Cover and Power Module Assembly 375 Installing the Rear Cover Cartridge Interface Assembly and Power Module Assembl...

Page 302: ...302 Rev C...

Page 303: ...following procedure 1 At the Analysis screen touch the Status button 2 At the Status screen touch Replace Port 3 When prompted replace the sample port Refer to Figure 4 1 NOTE Touch the Video button t...

Page 304: ...stem 1 Touch to view the video 2 Squeeze the tabs firmly 3 Remove the sample port from the system 4 Squeeze the tabs on the new sample port and install the sample port in the system 5 Touch the Contin...

Page 305: ...edure from step 3 the system returns to the Analysis screen resume operating tasks the system displays the Status screen and prompts you to replace the cartridges replace the measurement and wash wast...

Page 306: ...shown 1 Turn off the power switch and disconnect the power cord from the electrical outlet 2 Disconnect the power cord from the rear panel of the system 3 Locate the fuse holder on the rear panel of t...

Page 307: ...fuses 6 Slide the fuse holder into the fuse compartment 7 Reconnect the power cord to the system 8 Reconnect the power cord to the electrical outlet and turn the power switch on After the Rapidpoint...

Page 308: ...er to the following figure Replacing the CO ox Lamp 4 Remove the old lamp and discard it 5 Install a new one 6 Reconnect the power cord to the system 7 Reconnect the power cord to the electrical outle...

Page 309: ...ove the rear cover Refer to Removing the Rear Cover and Power Module Assembly on page 375 3 Open the door a Slide the front of the system to the edge of the work surface b Usingasmallflat bladescrewdr...

Page 310: ...remove the two flat head screws in the front of the cartridge interface assembly b Remove the two screws from the front of the cartridge interface assembly securing the sample chamber interface assemb...

Page 311: ...n the cartridge interface wall f Disconnect the harness OMZ 5 pin from J2 on the OMZ PCB on the sample chamber interface assembly This harness is also connected to the connector block assembly g Pull...

Page 312: ...ter is not present k Remove the AQC cable P40 from the cable clamp and disconnect the AQC connector l Remove the cartridge interface assembly from the system 5 Install the new cartridge interface asse...

Page 313: ...ernal cables from the back of the system 2 Remove the rear cover Refer to Removing the Rear Cover and Power Module Assembly on page 375 3 Remove the cartridge interface assembly Refer to Replacing the...

Page 314: ...ge interface assembly have in line connectors and do not require using the pin extractor 7 Using the pin extractor twist and remove wires 18 19 20 and 21 from the outboard cable harness connector 8 Re...

Page 315: ...k connector wires which run along the rear of the cartridge interface frame 10 Remove the cam shaft a Using the flat blade screwdriver remove the pinion gear from the end of the cam shaft b Using eith...

Page 316: ...ame b Slide the springs onto the alignment pins Mount the connector block by sliding the block alignment pins through the holes in the cartridge interface frame c Reinstall the camshaft NOTE The posit...

Page 317: ...18 and 19 and the two black wires to positions 20 and 21 in the outboard cable harness connector and secure with a cable tie 15 Reinstall the cartridge interface assembly Refer to Installing the Rear...

Page 318: ...screws one screw on each side and two screws on the rear of the cover NOTE Position the instrument handle in the up position Using a flat head screwdriverpry thecoverandtheside withoutthe AutomaticQC...

Page 319: ...en the cartridge and the side of the system and lift the tab to release the cartridge NOTE If the cartridge does notrelease from the system pushthecartridge into the system to fully engage the anchors...

Page 320: ...o Removing the AutomaticQC Cartridge on page 318 2 Turn the system off and disconnect all the external cables from the back of the system 3 Remove the rear cover Refer to Removing the Rear Cover and P...

Page 321: ...r AutomaticQC clip from between the AutomaticQC frame assembly and the base wall c Disconnect the cable J43 from the AutomaticQC frame assembly While pulling the AutomaticQC latch assembly from the sy...

Page 322: ...away from the wall interface and lift it out of the system c Disconnect the cable from the AutomaticQC frame assembly to the outboard cable harness 7 Reinstall the AutomaticQC frame assembly and the...

Page 323: ...over and Power Module Assembly on page 375 3 Disconnect the following cables 4 Remove the diskette drive from the interface wall NOTE Ifrequired removethe spring clipon thebottom ofthediskette drive b...

Page 324: ...two Phillips head screws at the top and bottom of the diskette drive connector clamp d Remove diskette drive cable form its cable clamp 1 Diskette drive cable 2 Screw at top of diskette drive connecto...

Page 325: ...ystem and adjust the screws as necessary 6 Reassemble in the reverse order Refer to Installing the Rear Cover Cartridge Interface Assembly and Power Module Assembly on page 378 CAUTION Wheninsertingth...

Page 326: ...m off and disconnect all the external cables from the back of the system 2 Remove the ampule breaker or Automatic QC cartridge and open the front door 3 Remove the rear cover and power module assembly...

Page 327: ...ng screws to 6 inch lb 6 Remove the diskette drive Refer to Replacing the Diskette Drive Assembly on page 323 7 Using the tilt display handle pull the display forward 8 Disconnect the display cable fr...

Page 328: ...13 Install the new display module NOTE Leave some slack in the display cable between the display and the interface wall to allow for movement of the display a Reinsert the display cable through the sl...

Page 329: ...tooth at a time until correctly seated d Tilt the display module back completely Locate the hinge brackets at the base of the display and pull the hinge brackets forward Tighten the two screws located...

Page 330: ...Power Module Assembly on page 375 3 Remove the ampule breaker or AutomaticQC cartridge and open the front door 4 Using the tilt display handle pull the display forward 5 Using a flat blade screwdrive...

Page 331: ...ot until it locks into place NOTE If the spring pawl jams position a screwdriverbehind the spring pall and push it forward while sliding the display support forward one tooth at a time until correctly...

Page 332: ...332 Rev C 10 Replace the rear cover Refer to Installing the Rear Cover Cartridge Interface Assembly and Power Module Assembly on page 378...

Page 333: ...bladescrewdriver accessthedoor locksolenoid through the middle hole of the three access holes in the bottom front right corner of the system and push the solenoid toward the back of the system until t...

Page 334: ...nal cables from the back of the system 2 Remove the rear cover and power module assembly Refer to Removing the Rear Cover and Power Module Assembly on page 375 NOTE Retain grommets and nylon spacers a...

Page 335: ...the longer screws 4 Install the new hard drive a Before connecting the hard drive cable align the cable with the four pins b Install the hard drive 5 Ensure that the hard drive cable is correctly rec...

Page 336: ...of the touch screen during start up Refer to Emergency Calibration of the Touch Screen in Calibrations b Enter the data on the Service Data screen c Restore the setup data d Enter the IP addresses if...

Page 337: ...odule assembly Refer to Removing the Rear Cover and Power Module on page 375 3 Remove the power supply module a Cut the cable tie securing the DC power harness to the frame b Disconnect the cables fro...

Page 338: ...J2 and J3 6 Ensure that all cables are not crimped or pinched 7 Reassemble in the reverse order Refer to Installing the Rear Cover Cartridge Interface Assembly and Power Module Assembly on page 378 1...

Page 339: ...the power module and disconnect the cable 4 Pass the rear interconnect cable and the DC power harness from the Main board NOTE Installthenew fan with the air flow arrow pointingtoward the system inter...

Page 340: ...ternal cables from the back of the system 2 Remove the rear cover and power module assembly Refer to Removing the Rear Cover and Power Module Assembly on page 375 3 Disconnect the power entry module f...

Page 341: ...module 7 With a screw driver push down on the spring locks on the top and bottomofthepowerentrymoduleandpushthepowerentrymoduleout of the frame 8 Install the new power entry module a Pass the power en...

Page 342: ...342 Rev C c Attach conductive tape to each side d Reconnect the power entry module to the power supply e Reconnect the grounding tag 9 Install the rear interconnect board...

Page 343: ...1 Turn the system off and disconnect all the external cables from the back of the system 2 Remove the rear cover and power module assembly Refer to Removing the Rear Cover and Power Module Assembly on...

Page 344: ...terconnect cable is soldered to the board a Remove the four hex standoffs from the frame b Remove the screw holding the clip at the top of the board 5 Remove the in line coupler from the board 6 Insta...

Page 345: ...bles power LIS and bar code reader from the back of the system 2 Remove the rear cover Refer to Removing the Rear Cover and Power Module Assembly on page 375 3 Remove the cartridge interface assembly...

Page 346: ...346 Rev C 4 Remove the pump motor on the right hand side as viewed from the front opposite side to the cartridge release lever a Remove the four thread forming screws from the motor mount...

Page 347: ...of the motor shaft 5 Install the new pump roller cages a Slide the roller cageontothe shaftofthemotor housingwith the flat of the cage towards the flat of the housing b Push the roller cage until the...

Page 348: ...cking tabs on the pump housing or the spring plate can pop off and interfere with system operation 7 Reassemble in the reverse order Refer to Replacing the Cartridge Interface Assembly on page 309 and...

Page 349: ...e system 2 Remove the rear cover Refer to Removing the Rear Cover and Power Module Assembly on page 375 3 Remove the cartridge interface assembly Refer to Replacing the Cartridge Interface Assembly on...

Page 350: ...ing the pin extractor disconnect the motor wires from the outboard cable harness D connector 5 Remove the motor Do not reverse the motors when removing orreplacing them or the new system will not func...

Page 351: ...Rev C Replacing Components 351 a Remove the four thread forming screws from the motor mount...

Page 352: ...all the new motor a Position the roller cage in the housing with the flat of the roller facing the flat of the housing b Replace the motor by pressing it until the cage and motor are fully seated CAUT...

Page 353: ...the pins are seated securely in the outboard cable harness NOTE Whenreinstallingthecartridgeinterfaceassembly donotbumpthe spring plate and locking tabs on the pump housing or the spring plate can po...

Page 354: ...embly on page 375 3 Remove the ampule breaker and AQC frame assembly cover or the AutomaticQC cartridge 4 Remove the AQC frame assembly Refer to Replacing the AutomaticQC Frame Assembly on page 320 5...

Page 355: ...l the new wash waste switch assembly a Place the switch assembly on the interface wall shelf orientation will be at an angle b Pull the switch up so that the shelf is positioned between the bracket an...

Page 356: ...e assembly a Disconnect the four sections of the fiber bundle assembly b Carefully remove the fiber bundle from the two cable clamps BIOHAZARD Refer to Biohazards and Warnings CAUTION Do notbend twist...

Page 357: ...result in erroneous optics readings 5 Reconnect the new fiber bundle assembly 6 Check that the fiber bundle is not bunched or crimped 7 Reassemble in the reverse order Refer to Installing the Rear Co...

Page 358: ...age 375 3 Remove the neon board assembly a Disconnect the neon power cable P6 b Pull up on the spring clip securing the fiber bundle to the neon board assembly then grasp the ferrule and remove the fi...

Page 359: ...rews 5 Reconnect the fiber bundle to the neon board assembly and secure with the spring clip 6 Reconnect the neon power cable P6 Ensure that the wires are dressed correctly 7 Check that the fiber bund...

Page 360: ...umination housing assembly a Disconnect the fiber bundle from the illumination housing assembly b Using a Phillips screwdriver remove the two Phillips screws located at the rear of the frame securing...

Page 361: ...assembly 6 Check that the fiber bundle is not bunched or crimped 7 Reassemble in the reverse order Refer to Installing the Rear Cover Cartridge Interface Assembly and Power Module Assembly on page 37...

Page 362: ...ver and power module assembly Refer to Removing the Rear Cover and Power Module Assembly on page 375 3 Remove the cartridge interface assembly Refer to Replacing the Cartridge Interface Assembly on pa...

Page 363: ...the Main board and lock the connector note the orientation key b Place the bottom of the polychromator on the 1 inch standoff and insert the two long screws to the standoffs at the top located on the...

Page 364: ...r fiber bundle to the sample chamber interface assembly 6 Check that the fiber bundle is not bunched or crimped 7 Reassemble in the reverse order Refer to Installing the Rear Cover Cartridge Interface...

Page 365: ...on page 309 3 Remove the rear cover and power module assembly Refer to Removing the Rear Cover and Power Module Assembly on page 375 4 Disconnect both the polychromator fiber bundle and the fiber bund...

Page 366: ...alling the Rear Cover Cartridge Interface Assembly and Power Module Assembly on page 378 9 After reassembly ensure that the optics head pivots springs and moves easily from side to side 10 Perform all...

Page 367: ...retain a Loosen the screw do not remove on the bottom of the polychromator located on the 1 inch standoff b Disconnect the ribbon cable from the Main board c Remove the polychromator and set to the si...

Page 368: ...the following cables from the Main Board UIP display cable UIP utility cable UIP LTPT1 comm cable UIP comm1 inboard cable 11 Removethethreescrewsandthecopper groundingclipsfromtherear of the Main boa...

Page 369: ...er bundle terminal D at U3 on the Main board f Reinstall the two screws to the standoffs on the Main Interconnect board g Reconnect all the cables 16 Reinstall the polychromator a Reconnect the ribbon...

Page 370: ...all the external cables from the back of the system 2 Remove the rear cover and power module assembly Refer to Removing the Rear Cover and Power Module Assembly on page 375 3 Disconnect following cabl...

Page 371: ...P board to the standoffs 5 Remove the UIP board from the Main Interconnect board 6 Install the new UIP board 7 Reconnect all the cables 8 Reassemble in the reverse order Refer to Installing the Rear C...

Page 372: ...moving the Rear Cover and Power Module Assembly on page 375 3 Remove the polychromator a Using a Phillips screwdriver remove the two screws from the standoffs located on the bracket of the Main Interc...

Page 373: ...cable UIP utility cable Diskette drive UIP LPT1 comm cable UIP comm1 inboard cable 5 Remove the three screws securing the UIP board to the standoffs 6 Remove the UIP board from the Main Interconnect...

Page 374: ...ibbon cable to at J7 on the Main board and lock the connector note the orientation key b Place the bottom of the polychromator on the 1 inch standoff and insert the two long screws to the standoffs at...

Page 375: ...isconnect all the external cables from the back of the system 2 Remove the halogen lamp 3 Remove the rear cover a Using the Phillips screwdriver remove four screws one screw on each side and two screw...

Page 376: ...he frame b Slightly spread the sides at the bottom of the power module frame while slowly pulling the frame straight back to expose the cables c Disconnect the hard drive cable from the UIP board d Re...

Page 377: ...using assembly 5 Remove the power module assembly 6 If removing the cartridge interface assembly refer to Replacing the Cartridge Interface Assembly on page 309 7 Refer to Installing the Rear Cover Ca...

Page 378: ...ver and power module assembly Go to step 2 cartridge interface assembly a Reconnect the door latch assembly harness P60 Ensure that the harness is positioned to the right hand side b Reconnect the was...

Page 379: ...e through the access hole and reconnect j Reinstall the pre amp cable cover NOTE Pull the fiber bundle cables through the thermal baffle as you install the cartridge interface assembly CAUTION Do not...

Page 380: ...380 Rev C...

Page 381: ...Rev C Spare Parts 381 Spare Parts Spare Parts Listing 383...

Page 382: ...382 Rev C...

Page 383: ...ble DC Power Harness N 126789 09637530 Cable Hard Disk Drive I F N 126793 06753890 Cable Patch Cord Assembly N 122523 07814311 Cartridge Handle Assembly N 122567 06465852 Cartridge Housing Peri Pump S...

Page 384: ...tor N 122547 05840439 Power Entry Module with Switch N 122560 07748025 Power Module Assembly R 122552 05773995 Power Supply Assembly Module R 126791 00181984 Pump Housing Clips pack of 4 N 122546 0793...

Page 385: ...31527 01908624 CO ox Fiber Bundle Assembly N 131744 09250113 Verification Gauge N 131745 07295535 Measurement Cartridge Simulator 400 405 R 131609 04729860 Pawl Flipper Kit N N non repairable part R r...

Page 386: ...386 Rev C...

Page 387: ...ty and Health Administration s Bloodborne Pathogens Standard 1 3 Use this summary for general information only It is not intended to replace or supplement your laboratory or hospital biohazard control...

Page 388: ...area disinfected Disinfect tools and other items that have been near any part of the instrument sample path or waste area with 10 v v bleach Do not eat drink smoke or apply cosmetics or contact lenses...

Page 389: ...ds Do not operate electrical equipment after liquid has been spilled on it Turn off and disconnect the electrical equipment immediately and dry it thoroughly Do not operate electrical equipment in an...

Page 390: ...us disease transmitted by blood body fluids and tissue approved guideline NCCLS Documentation M29 A Wayne PA NCCLS 1997 Dec 90p 3 Federal Occupational Safety and Health Administration Bloodborne Patho...

Page 391: ...rature to successfully completetheinstallation Iftheambienttemperatureisnearthelimitsofthe recommended operating temperature 15 to 32 C the touch screen can become out of calibration Calibrate the scr...

Page 392: ...per advance knob clockwise to move 2 to 3 inches of the paper through the top of the printer NOTE When you close the printer compartment ensure that the edge of the printer paper extends beyond the to...

Page 393: ...e cartridges Refer to Replacing the Measurement and Wash Waste Cartridges in Section 3 in the Rapidpoint 400 Series Operator s Manual if required a Open the door b Lift up the measurement cartridge la...

Page 394: ...itution squality control protocol before analyzing patient samples Installing the AutomaticQC Cartridge Use this procedure to install an AutomaticQC cartridge on your Rapidpoint 400 series system for...

Page 395: ...Panel 4 View the video before you begin Observe the steps for replacing the cartridge 5 Remove the access panel 6 Install the AutomaticQC cartridge Refer to Replacing the AutomaticQC Cartridge in Sec...

Page 396: ...installed cartridges by leaving the system without power for more than 60 minutes NOTE When relocating the system a change in ambient temperature of greater than 5 C may cause the screen to become out...

Page 397: ...system as described in this procedure 1 Disinfect the exterior surfaces of the system Refer to Cleaning and Disinfecting the Exterior Surfaces in Section 3 in the Rapidpoint 400 Series Operator s Manu...

Page 398: ...Options c Touch Unscheduled QC d Touch the Continue button twice The Status screen appears NOTE Clean and disinfect any areas that may be contaminated from spills around the measurement and wash wast...

Page 399: ...the door opens again i Close the door again j Touch Cancel on the message The Status screen appears 6 Shut down the system a Touch the Status button b Touch Shutdown A message appears asking if you r...

Page 400: ...400 Rev C...

Page 401: ...ink systems You can connect the Rapidpoint 400 series system to a Rapidlink data management system using either of the following methods If your Rapidlink system is part of an Ethernet network that us...

Page 402: ...ou want to assign the Rapidpoint 400 series system IP address for the default router port assigned to the network segment on which the Rapidpoint system is located Network mask for the institution s n...

Page 403: ...ccessful o When prompted that the connection was unsuccessful touch the Continue button to display the Communications screen 4 Connect the network cable to the RJ 45 connector on the rear panel of the...

Page 404: ...e DHCP k Touch the Continue button l At the Communications screen touch the Continue button m The Wait screen appears while the system tests the connection between the Rapidpoint 400 series system and...

Page 405: ...ect the interface cable to the Rapidpoint 400 series system and to the Rapidlink workstation a Connect the 9 pin connector on the cable to the serial RS 232 port located on the rear panel of the Rapid...

Page 406: ...t this time the connection is unsuccessful 9 Whenpromptedthattheconnectionwasunsuccessful touchContinue to display the Communications screen 10 At the Rapidlink workstation enter the communication set...

Page 407: ...off and disconnect the power cord from the electrical outlet 5 Connect the interface cable to the Rapidpoint 400 series system and to the LIS a Connect the 9 pin connector on the cable to the serial R...

Page 408: ...8 At the Communications screen touch the Continue button The Wait screen appears while the system tests the connection between the Rapidpoint 400 series system and the LIS If an error message appears...

Page 409: ...ode scanner connector is located on the rear panel of the system and is labeled with a bar code symbol 3 Tighten the hold down screws on the connector 4 Attach the holder for the bar code scanner to t...

Page 410: ...ser beam lights when the bar code scanner is working 7 RefertoSelectingBarCodeOptionsinSection6intheRapidpoint 400 Series Operator s Manual to define the bar code scanner settings for the Rapidpoint 4...

Page 411: ...12345 b Touch the Status button c Touch Setup d Enter the default password 12345 and then touch the Continue button e Touch Secured Options f Touch the down arrow button and then touch Save Setup g Wh...

Page 412: ...e f Touch the Continue button as needed to access the Setup or Status screen 3 If required record the System Name a Touch System Options b Touch Other Options c Write down the required information 4 I...

Page 413: ...mpted remove the diskette form the drive and touch the Continue button f Touch Copy Sensor Data g Select today s date and touch Copy h Insert another blank preformatted diskette into the diskette driv...

Page 414: ...from theoutside ofthe Rapidpoint 400 series system 4 Install a new roll of paper in the printer 5 Connect the following to the back of the Rapidpoint 400 series system bar code scanner power cord NOT...

Page 415: ...from the drive and touch the Continue button 8 Touch System Options 9 Touch Date and Time 10 Change the date and time and then touch the Continue button 11 Leave the Rapidpoint 400 series system on t...

Page 416: ...pear Setting Up RapidQC Complete in the Rapidlink Database 1 Select the Quality Control tab 2 Select QC Setup 3 Select Add Control 4 Choose the Rapidpoint 400 name for the new Rapidpoint 400 series sy...

Page 417: ...the Rapidpoint 400 system name 9 Select Setup Active Levels 10 Select a Level enter the lot number the expiration date and start date and package insert ranges for each level of Hct QC 11 Repeat step...

Page 418: ...Finishing the Rapidpoint Setup and continue with the procedure 5 If required enter the FTP Server name or IP address a Touch the Recall button b Touch Sample Totals c Touch Service Data d Enter the s...

Page 419: ...ic messages Attempting to install the wrong cartridge type in the wrong mode can invalidate an otherwise good measurement cartridge Measurement cartridges last 28 days or 400 750 samples or whichever...

Page 420: ...d in the FOR DEMONSTRATION ONLY mode DONOTinstallademonstrationcartridgewhileinUSERmode except just before you remove power to enter FOR DEMONSTRATION ONLY mode DO NOT change measurement cartridges fr...

Page 421: ...ng with real cartridges or no cartridge 2 Touch Replace on the Cartridge Status screen and install a demonstration measurement cartridge a demonstration wash waste cartridge and a demonstration Automa...

Page 422: ...R DEMONSTRATION ONLY mode to practice with setup options and cartridge replacement 9 When the demonstration is complete touch Continue 10 Touch Replace on the Cartridge Status screen The door opens 11...

Page 423: ...e USER mode software loads This takes a few minutes If Then the message FOR DEMONSTRATION ONLY is not displayed 1 Touch Replace on the Cartridge Status screen 2 Open the door and verify that the cartr...

Page 424: ...rebooted with a valid real measurement cartridge in place NOTE When replacing an AutomaticQC cartridge if you eject the old cartridge and do not have the replacement cartridge available the Return bu...

Page 425: ...Diagnostics If Then a yellow dialog box appears and indicates that the measurement cartridge is not valid install a previously used measurement cartridge or demonstration cartridge 1 Touch Continue 2...

Page 426: ...426 Rev C...

Page 427: ...unknown sample patient or QC is used in conjunction with the slope and the offset to calculate analyte concentration Calibration Types There are three types of calibrations run on the Rapidpoint 400 s...

Page 428: ...and 50 seconds 5 50 to complete Every third full 2 point calibration includes a blood fiber removal sequence preceding the calibration Retrospective Calibration Retrocal A patient sample run during t...

Page 429: ...etecyclefromsampleloadinguntil the wash is complete takes 2 minutes Calibration Schedule After the initialization init period calibrations are scheduled as follows 1 point every 30 minutes 2 point eve...

Page 430: ...ors thecartridgemustgo through a 22 minute initialization init When a new cartridge is placed correctly on the Rapidpoint 400 series system the system performs an electronic check initializes the luer...

Page 431: ...the two scheduled calibrations When the initialization and respective calibration retrocal are complete the scheduled calibration timeline of 1 point calibrations every 30 minutes 2 point calibration...

Page 432: ...432 Rev C...

Page 433: ...system The 2 1 version of the Rapidpoint 400 series system uses Windows NT as an operating system This configuration does not require or use an FTP server All new Rapidlink configurations provided by...

Page 434: ...ose this window 8 At the Windows NT Setup dialog box select Continue 9 At the Add RAS Device dialog box ensure that the correct modem is selected and then select OK 10 At the Remote Access Setup dialo...

Page 435: ...otocol and then select Disable 24 Remove the Windows NT Workstation or NT Server CD from the CD ROM drive 25 Close the Network applet and restart the system when prompted Configuring RAS To Start Auto...

Page 436: ...irectories The Rapidlink system must have two directories for the Rapidpoint 400 series system to use The Upload directory is used by the Rapidpoint 400 series system to copy files to The Download dir...

Page 437: ...tab and then select Shared As c Ensure that the Share Name is Upload or Download and then select Apply d Select the Security tab and then select Permissions NOTE Some systems may not have a Security...

Page 438: ...438 Rev C...

Page 439: ...ed message 177 AQC Cartridge Not Valid message 177 AQC Connector is Open message 177 AQC cover part number 383 AQC frame assembly illustrations 275 part number 383 AQC latch assembly illustrations 276...

Page 440: ...ess outboard 130 inboard 1 harness 133 inboard 2 harness 134 LCD backlight 134 patch cord 138 preamp module 135 UIP COM1 inboard 137 UIP display 136 UIP utility 137 cable harness outboard drawing 130...

Page 441: ...110 data acquisition system DAS 85 display board 77 dualopto board 82 main board 83 main interconnect board 100 multiplexer board interface 98 multiplexer board 101 real time processor RTP 83 UIP mai...

Page 442: ...dle 297 illumination housing 295 neon board assembly 296 polychromator 295 sample chamber interface 294 CO ox neon board assembly mechanical description 57 part number 384 CO ox OMZ heater board circu...

Page 443: ...Glu pO2 message 186 pCO2 pH Na K Ca Cl Hct message 186 D40 Wash Not Detected message 201 D41 No AQC Material Detected message 202 D60 Communications Error message 204 D70 Optics Error 2 message 205 3...

Page 444: ...message 214 door hook location 267 part number 383 door lock module replacing 333 door switch assembly part number 383 door switch location 268 download directories adding 436 dualopto board circuit...

Page 445: ...d drive location 292 replacing 334 hazards See warnings I IDEE ROM explanation of system detecting 420 in the demonstration measurement cartridge 421 illimination housing illustration 295 illumination...

Page 446: ...off test 254 LCD backlight cable drawing 134 liquid crystal display mechanical description 53 LIS See laboratory information system connection M M Cartridge Expired message 216 M Cartridge Not Valid m...

Page 447: ...ting 235 mechanical descriptions 23 61 AutomaticQC cartridge 46 base model 26 54 cartridge interface module 43 CO ox fiber bundle assembly 58 illumination housing assembly 57 measurement components 56...

Page 448: ...part numbers air filter 383 ampule breaker 383 AQC cover 383 AQC frame assembly 383 AQC latch assembly 383 AQC simulator 383 cartridge handle assembly 383 cartridge housing peri pump spring kit 383 c...

Page 449: ...286 main assembly 278 power supply assembly 293 password entering 411 patch cord cable drawing 138 patch cord with ferrite filter location 291 patient samples result symbols 22 Pawl filpper kit part...

Page 450: ...384 replacing 337 preamp cable cover illustration 285 preamp module cable drawing 135 printed reports sample measurement example 232 sample printer example 234 sample sensor example 233 sample tempera...

Page 451: ...00 system 396 remote access service selecting 434 remote access setup to Rapidlink system 433 removing AutomaticQC cartridge 318 demonstration cartridges using the shutdown button 422 replaceable halo...

Page 452: ...connection 405 rubber feet pack of 4 part number 384 rubber feet location 263 S sample chamber interface illustration 294 sample chamber test 255 sample devices 33 sample entry mechanical description...

Page 453: ...ng valve mechanical description 33 sodium and potassium unexpected results 166 spare parts listing 383 spare parts 381 385 spares kit See Rapidpoint 400 spares kit spring plate location 283 status scr...

Page 454: ...6 D38 Temp Error 1 198 D38 Temp Error 2 to 13 198 D39 Obstruction 200 D4 Offset Error Glu pO2 186 pCO2 pH Na K Ca Cl Hct 186 D40 Wash Not Detected 201 D41 No AQC Material Detected 202 D60 Communicatio...

Page 455: ...calibrations overview 427 detecting IDEE ROM explanation 420 installing a new Rapidpoint 400 414 installing the Rapidpoint 400 391 relocating the Rapidpoint 400 396 shutting down the 256 swapping out...

Page 456: ...ter status 155 communications 175 the printer 173 the touch screen 174 tubing mechanical description 35 types of calibrations 427 U u symbol 163 UIP board with cables location 273 UIP board replacing...

Page 457: ...s of operation 420 viewing the events log 176 W W Cartridge Expired message 229 wand See bar code scanner warnings biohazards 387 electrical 389 wash pump test 230 wash waste cartridge depleted 160 ex...

Page 458: ...458 Rev C...

Reviews: