


6. Adjustments with the ADVANCED menu
3. Select your desired aspect ratio by pressing the
◄
or
►
key.
-
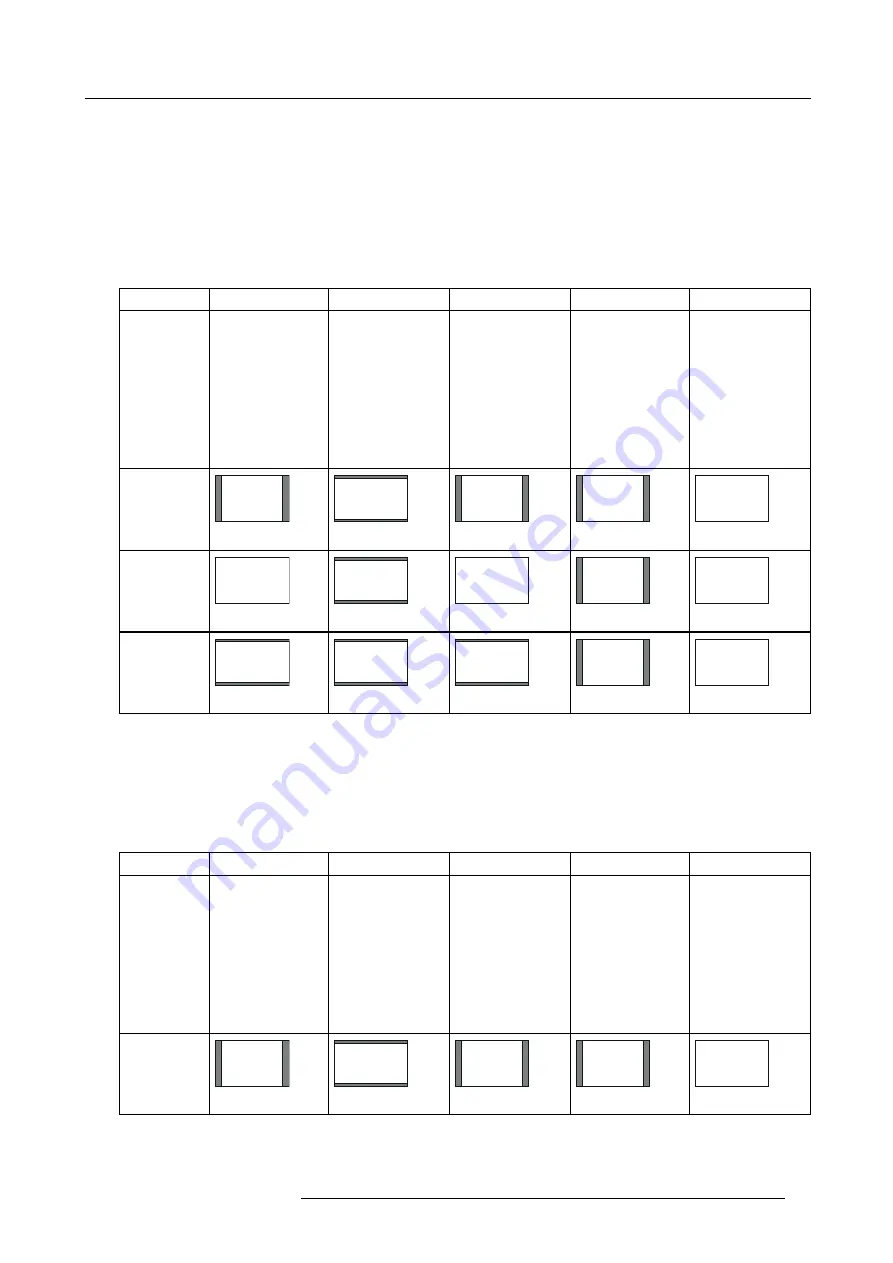
Select the aspect ratio from NORMAL, 16:9, NATIVE (for PHWU-81B/PHWX-81B only), 4:3, and FULL.
-
When 16:9 is selected by SCREEN in the INSTALLATION 2 menu, 16:9 cannot be selected.
-
When 4:3 is selected by SCREEN in the INSTALLATION 2 menu, 4:3 cannot be selected.
-
The tables on pages 46 and 47 show the image display patterns depending on the settings.
4. To cancel the menu, press the
MENU
key.
For PHWU-81B:
When SCREEN is 16:10:
Setting
NORMAL
16:9
NATIVE
4:3
FULL
Input signal
Input video signal is
displayed at the max
height (1200 pixels)
or max width (1920
pixels) of the panel
while its aspect ratio
is maintained.
Regardless of the
type of input signal,
image is displayed
at 16:9 aspect
ratio (1920 x 1080
pixels). Select to
expand squeezed
(or horizontally
compressed)
images such as
DVD images to 16:9.
Input video signal
is displayed at its
original pixel size.
(When the pixel size
is larger than the
panel size, only the
center part of the
image is displayed.)
Regardless of the
type of input signal,
image is displayed
at 4:3 aspect ratio
(1600 x 1200 pixels
Regardless of the
type of input signal,
image is displayed
at the full panel size
(1920 x 1200 pixels).
UXGA signal
1600 x 1200
(4:3)
4:3
1600 x 1200
16:9
1920 x 1080
4:3
1600 x 1200
4:3
1600 x 1200
16:10
1920 x 1200
WUXGA signal
1920 x 1200
(16:10)
16:10
1920 x 1200
16:9
1920 x 1200
16:10
1920 x 1200
4:3
1600 x 1200
16:10
1920 x 1200
1080p signal
1920 x 1080
(16:9)
16:9
1920 x 1080
16:9
1920 x 1080
16:9
1920 x 1080
4:3
1600 x 1200
16:10
1920 x 1200
•
In such cases as when you keep projecting images in the narrower area than the screen for a long time and then change the
mode to FULL, the masking areas may remain as afterimage around the displayed image. Consult your dealer in this case.
•
If you change the screen setting, the aspect setting is automatically changed to NORMAL. Therefore, in such a case, set the
desired aspect ratio again.
For PHWX-81B:
When SCREEN is 16:10:
Setting
NORMAL
16:9
NATIVE
4:3
FULL
Input signal
Input video signal is
displayed at the max
height (800 pixels)
or max width (1280
pixels) of the panel
while its aspect ratio
is maintained.
Regardless of the
type of input signal,
image is displayed
at 16:9 aspect
ratio (1280 x 720
pixels). Select to
expand squeezed
(or horizontally
compressed)
images such as
DVD images to 16:9.
Input video signal
is displayed at its
original pixel size.
(When the pixel size
is larger than the
panel size, only the
center part of the
image is displayed.)
Regardless of the
type of input signal,
image is displayed
at 4:3 aspect ratio
(1066 x 800 pixels).
Regardless of the
type of input signal,
image is displayed
at the full panel size
(1280 x 800 pixels).
XGA signal
1024 x 768
(4:3)
4:3
1066 x 800
16:9
1280 x 720
4:3
1024 x 768
4:3
1066 x 800
16:10
1280 x 800
R5905597 PHXX SERIES 20/05/2014
59
Summary of Contents for PHWU-81B
Page 1: ...PHxx series User and Installation manual R5905597 02 20 05 2014...
Page 4: ......
Page 7: ...Table of contents Glossary 135 Index 137 R5905597 PHXX SERIES 20 05 2014 3...
Page 8: ...Table of contents 4 R5905597 PHXX SERIES 20 05 2014...
Page 32: ...3 Connections 28 R5905597 PHXX SERIES 20 05 2014...
Page 42: ...4 Getting started 38 R5905597 PHXX SERIES 20 05 2014...
Page 58: ...5 Advanced menu 54 R5905597 PHXX SERIES 20 05 2014...
Page 78: ...6 Adjustments with the ADVANCED menu 74 R5905597 PHXX SERIES 20 05 2014...
Page 102: ...10 Lamp replacement 98 R5905597 PHXX SERIES 20 05 2014...
Page 136: ...B Optional lens H LENS 1 3 1 8 132 R5905597 PHXX SERIES 20 05 2014...
Page 140: ...Glossary 136 R5905597 PHXX SERIES 20 05 2014...


