261
R5910032 /00
Freya
2
5
6
1
3
4
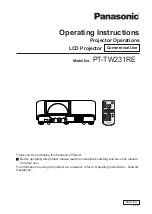
Image 14
–
5
2.
Click
Manual
(reference 1).
The network configuration parameters can now be edited.
3.
Fill in the
IP address
(reference 2).
Tip:
A network address contains 4 numbers with a value between 0 and 255, e.g.
192.168.1.101.
4.
Fill in the
Subnet mask
(reference 3), e.g. 255.255.255.0.
5.
Fill in the
Default Gateway
(reference 4), e.g. 192.168.1.1.
6.
Click
Save
(reference 5) to activate.
New settings are now active.
or
click
Discard
button (reference 8) to cancel all changes.
The address 0.0.0.0 can not be used in any of the fields.
To avoid an internal IP address conflict with the ICMP, the projector
’
s IP address must be different
from 192.168.254.x .
Summary of Contents for Freya
Page 1: ...ENABLING BRIGHT OUTCOMES User guide Freya...
Page 12: ...R5910032 00 Freya 12...
Page 26: ...R5910032 00 Freya 26 Safety...
Page 60: ...R5910032 00 Freya 60 Projector configuration process overview...
Page 74: ...R5910032 00 Freya 74 Control Projector...
Page 184: ...R5910032 00 Freya 184 Configuration Light output...
Page 208: ...R5910032 00 Freya 208 Configuration Projector automation...
Page 234: ...R5910032 00 Freya 234 Configuration Media server automation...
Page 240: ...R5910032 00 Freya 240 Configuration License and certificates...
Page 254: ...R5910032 00 Freya 254 Configuration Media server...
Page 296: ...R5910032 00 Freya 296 Diagnostics Analysis...
Page 338: ...R5910032 00 Freya 338 Specifications...
Page 348: ...R5910032 00 Freya 348 Pin configurations...
Page 354: ...R5910032 00 Freya 354 Environmental information...
Page 365: ...365 R5910032 00 Freya Z Zoom Lens 65 Index...
Page 366: ...R5910032 00 Freya 366 Index...
Page 368: ...R5910032 00 Freya 368 List of tools...
Page 369: ......