64
7
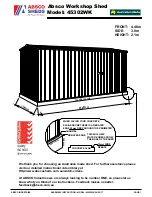
PARTS REQUIRED:
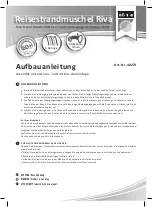
DOORS
OO
Flush
against wall panels.
Fig. A
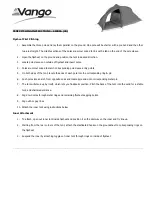
OO
Center doors on panel seam as shown
(Fig. B)
.
8
Check ledger board is still fl ush under panels.
Remove temporary supports and check doors open properly.
10
FINISH
11
You have fi nished installing your doors.
Screw hinge boards into wall supports and fl oor using ten 3" screws as shown.
Make sure screws go into framing and fl oor
(Fig. C, D)
.
9
3" (7,6 cm)
Screws into the wall
support and fl oor frame.
Fig. B
SEAM
Fig. C
3/8"
(1 cm)
Fig. D
Angle 3" (7,6 cm)
Screw
Attach temporary support
OO
as a ledger board fl ush under wall
panels for doors to rest on, using three 3" screws
(Fig. A)
.
3" (7,6 cm)
x13
OO
x1
1-1/2 x 2-1/2 x 69" (3,8 x 6,3 x 175,3 cm)
Carefully cut bottom wall frame 2 x 4 fl ush with
door frame using a saw
(Fig. F)
.
Be careful not to cut into fl oor panel!
Door
Frame
Flush