x24
1-1/2" (3,8 cm)
x2
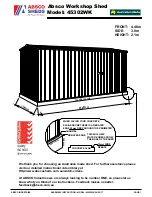
2 x 4 x 24" (5,1 x 10,2 x 61 cm)
RL
TEMPORARY SUPPORT
x2
2 x 3 x 75-1/4" (5,1 x 7,6 x 191,1 cm)
ECA
48
GABLE PANELS
PARTS REQUIRED:
x2
x2
x2
Primed
side up
Primed
side up
Primed
side up
1-3/4"
(4,5 cm)
1-1/2"
(3,8 cm)
1-1/2"
(3,8 cm)
1-1/2"
(3,8 cm)
Nails
RL (on fl at)
RL
RL
RL
ECA
ECA
You will build
TWO
assemblies. Orient
RL
and
ECA
on fl at as shown.
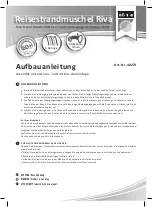
Place LEFT front gable panel as shown and secure using 1-1/2" nails.
2
1
BEGIN
3
4
5
Place second
RL
as shown. Place MIDDLE front gable panel fl ush to installed left panel. Ensure panels are fl ush.
Secure panel to installed
RL
using 1-1/2" nails. Place second
RL
as shown under MIDDLE panel and secure using
using 1-1/2" nails.
Place RIGHT front gable panel fl ush to installed middle panel. Ensure panels are fl ush.
Secure to
RL
using 1-1/2" nails.
Repeat STEPS 1 - 4 to build second gable panel.
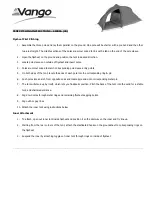
You have fi nished assembling your gable panels.
FINISH
6
Flush
Flush
Maintain
Flush
Maintain
Flush
1-3/4"
(4,5 cm)
1-1/2"
(3,8 cm)
Nails
1-1/2" (3,8 cm)
Nails