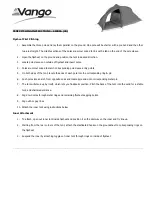


TENT PITCHING INSTRUCTIONS – SIERRA (UK)
Flysheet First Pitching
1.
Assemble the three poles and lay them parallel on the ground. One pole will be shorter with a pre bend and the other
two are straight. The middle sections of the poles are colour coded to link with a tab on the end of the pole sleeve.
2.
Open the flysheet on the ground and position the tent in desired direction.
3.
Locate pole sleeves on outside of flysheet and insert poles.
4.
Poles are colour coded to match corresponding pole sleeve entry points
5.
On both sides of the tent, locate the ends of each pole into the corresponding ring & pin
6.
Push poles into an arch from opposite ends and locate pole ends into corresponding metal pin
7.
The tent will stand up by itself, which lets you finalise its position. Pitch the back of the tent into the wind for a stable
tent, and sheltered entrance.
8.
Peg down poles through metal rings and remaining flysheet pegging points.
9.
Peg out ALL guy lines.
10.
Attach the inner tent using instructions below
Inner Attachment
1.
To attach, open out inner tent inside flysheet and position it so the doorway on the inner and fly line up.
2.
Starting from the rear corners of the tent, attach the elasticated hooks on the groundsheet to corresponding rings on
the flysheet
3.
Suspend the inner by attaching toggles of inner tent through rings on inside of flysheet
………………………………………………………………………………………………………………………………………………………………………………………