56
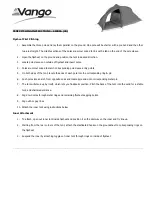
PARTS REQUIRED:
ROOF PANELS
5/8"
(1,6 cm)
GAP
Fig. D
Flush
2" Nails
Place a
48" x 31-7/8"
upper
roof panel with the rough side
up and flush to lower panels.
Ensure 5/8" gap at gable end
overhang
(Fig.D)
and 3/4"
measurement on the rafter
(Fig. A)
.
Secure the lower edge of roof
panel using two 2" nails in
corners as shown.
Move up to the top of the panel
and keep spacing between the
center of the rafter and gable
end
(Fig. F)
.
Secure with one 2" nail into
each rafter
(Fig. F)
.
Place a
48" x 96"
upper roof
panel,
rough side up and flush
with the installed
48" x 31-7/8"
panel
(Fig.C)
.
Ensure 3/4" measurement on
the rafter
(Fig. A)
.
Secure the lower edge of roof
panel using two 2" nails in
corners as shown
(Fig. F)
.
Move up to the top of the panel
and keep spacing between the
center of the rafters
(Fig. F)
.
Secure with one 2" nail into
each rafter
(Fig. F)
.
5
6
Two Nails
NAIL
FIRST
Two Nails
NAIL
FIRST
48" x 31-7/8"
48" x 96"
x1
48" x 96"
(121,9 x 243,8 cm)
x1
48" x 47-7/8"
(121,9 x 121,6 cm)
x2
48" x 31-7/8"
(121,9 x 81 cm)
3/4"
(1,9 cm)
Gauge
Block
Fig. A
3/4"
(1,9 cm)
Gauge
Block
Fig. A
24"
(61) cm)
24"
(61) cm)
24"
(61) cm)
24"
(61) cm)
NOTE:
Measurement from outside of gable.
33"
(83,8) cm)
2" Nails
STEP
STEP
Fig. F
5
6
MAINT
AIN RAFTER T
O
RAFTER DIMENSION
Flush
Fig. C