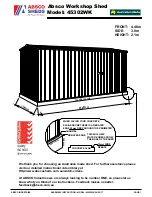
52
3" (7,6 cm)
PARTS REQUIRED:
RAFTERS
x7
x42
FINISH
5
Place remaining rafters on top plate, aligned over studs as shown and secure with 3" screws
(Fig. C)
.
Secure rafter to top plate with one 3" screw from under top plate
(Fig. B
,
C)
.
Continue securing rafter to top plate with two 3" screws above notch
(Fig. B
,
C)
.
You have fi nished attaching your RAFTERS.
4
BEGIN
¸
1
Locate fi rst rafter on top plate. Align rafter over studs at each side and tight to side wall
(Fig. A, Fig B)
.
Rest notch on top plate
.
24"
(61 cm)
24"
(61 cm)
24"
(61 cm)
24"
(61 cm)
24"
(61 cm)
24"
(61 cm)
24-3/8"
(61,9) cm)
24-3/8"
(61,9) cm)
Preassembled Rafter
Align over studs.
2
3
MEASUREMENTS ARE TO CENTER OF RAFTER
BEGIN
HERE
Fig. A
Toe-screw from inside.
Fig. B
(3) 3" (7,6 cm)
Screws
Tight to side wall
Fig. C
Tight to side wall
(3) 3" (7,6 cm)
Screws
Toe-screw from inside.
MEASURE
TO INSIDE
OF PANEL
MEASURE
TO INSIDE
OF PANEL