61
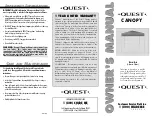
EAVE SIDE FASCIA
x52
2" (5,1 cm)
4
2
3
Position
4-3/4" x 96"
fascia board with
primed side out,
fl ush with roof panels
(Fig. A)
and gable
fascia as shown.
Secure using 2" fi nish nails into rafter ends.
Toenail at center seam
(Fig. B)
.
Position
4-3/4" x 80-5/8"
fascia board with
primed side out,
fl ush with roof panels
(Fig. A)
and
4-3/4" x 96"
fascia board as shown.
Secure using 2" fi nish nails into rafter ends.
Toenail at center seam
(Fig. B)
.
Position
4-3/4" x 32-5/8"
fascia board with
primed side out,
fl ush with roof panels
(Fig. A)
,
4-3/4" x 80-5/8"
fascia board and gable fascia as shown.
Secure using 2" fi nish nails into rafter ends.
Toenail at center seam
(Fig. B)
.
Repeat STEPS 1 - 3 on opposite eave.
You have fi nished installing your eave side fascia boards.
FINISH
5
1
BEGIN
PARTS REQUIRED:
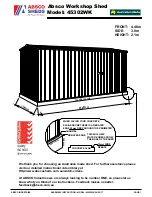
Primed Side Out
2" (5,1 cm) Finish Nails
Flush with
roof panel.
Fig.A
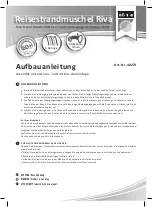
Flush
Flush
Flush
Flush
TOENAILING
Flush at
middle of rafter.
4-3/4" x 96"
4-3/4" x 80-5/8"
4-3/4" x 32-5/8"
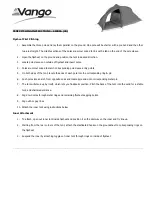
x2
3/8 x 4-3/4 x 80-5/8" (1 x 12,1 x 204,8 cm)
x2
3/8 x 4-3/4 x 96" (1 x 12,1 x 243,8 cm)
x2
3/8 x 4-3/4 x 32-5/8" (1 x 12,1 x 92,9 cm)
Fig. A
Fig. B