PAGE 60
O p e r a t i o n v i a D i s p l a y a n d K e y p a d
5.1.2
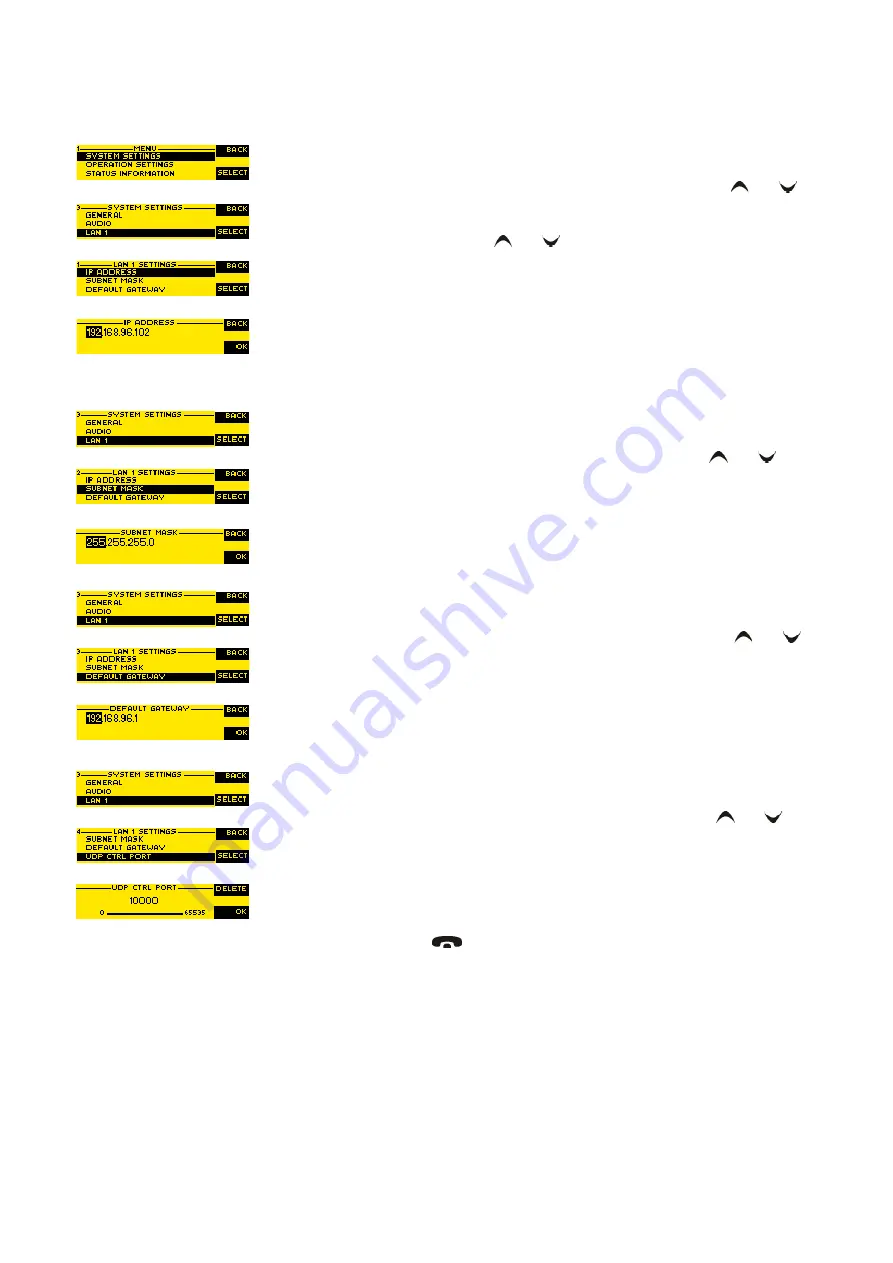
Configuration of the LAN 1 interface
To configure the
LAN 1 interface
follow the instructions below:
– Press the
Menu
softkey.
– Please mark the option
System Settings
via the cursor keys
and
and press the
Select
softkey.
– Use the cursor keys
and
to get to the option
LAN 1
and press the
Se-
lect
softkey.
– To enter or change the IP Address of the system, mark the option
IP Ad-
dress
and press the
Select
softkey.
– Now you can enter the correct IP Address via the numerical keypad.
– Confirm your entry by pressing the
Ok
button or the softkey
Ok
.
– Now press the cursor key
BACK
to get back to the menu
LAN 1
.
– Please mark the option
SUBNET MASK
via the cursor keys
and
and
press the
Select
softkey.
– Now you can enter your Subnet Mask via the numerical keypad. The de-
fault value is
255.255.255.0
.
– Confirm your entry by pressing the
Ok
button or the softkey
Ok
.
– Now press the cursor key
BACK
to get back to the menu
LAN 1
.
– Please mark the option
Default Gateway
via the cursor keys
and
and press the
Select
softkey.
– Now you can enter the IP Address of your Default Gateway via the numer-
ical keypad.
– Confirm your entry by pressing the
Ok
button or the softkey
Ok
.
– Now press the cursor key
BACK
to get back to the menu
LAN 1
.
– Please mark the option
UDP CTRL PORT
via the cursor keys
and
and
press the
Select
softkey.
– Now you can enter the UDP Control Port via the numerical keypad.
– Confirm your entry by pressing the
Ok
button or the softkey
Ok
.
– Press the
key to get back to the main menu. Now you are asked if
you want to
Save Settings?
. Via the
Yes
softkey, the configuration is
stored in the system.
Summary of Contents for MAGIC EEC
Page 1: ...MAGIC EEC ETI EDI Converter Hardware Software Manual ...
Page 2: ... ...
Page 4: ......
Page 6: ... ...
Page 10: ......
Page 16: ...PAGE 16 ...
Page 18: ...PAGE 18 S y s t e m d e s c r i p t i o n ...
Page 22: ...PAGE 22 P u t t i n g M A G I C E E C i n t o o p e r a t i o n ...
Page 62: ...PAGE 62 M e n u S t r u c t u r e A1 1 Menu ...
Page 68: ...PAGE 68 I n t e r f a c e s ...
Page 72: ...PAGE 72 T e c h n i c a l D a t a ...
Page 74: ...PAGE 74 S e r v i c e I n f o r m a t i o n ...
Page 79: ...PAGE 79 I n d e x Version 58 Voltage changes 40 W Warranty 19 Y yellow 25 ...
Page 80: ...PAGE 80 I n d e x ...
Page 82: ......


