Installing an IG550 Integrated Gateway with the J-Web Quick Configuration interface
50 Installing and Configuring the IG550 Integrated Gateway
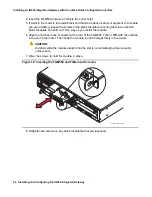
Figure 16: Attaching the brackets to the chassis
d. Lift the chassis, with its mounting brackets attached, into position on the rack. Use the
resting hole to temporarily hold the chassis.
3. Place the top screws and bottom screws in the mounting bracket into the rack. Tighten all
screws.
4. Remove the bolts or screws in the resting holes.
Gate
wa
y
AL
M
AC
T
TGM550
Conso
le
ASB
ETR
RST
Line
Trunk
1
2
3
4
Analog
ALM
AC
T
TI
M514
Line
5
6
7
8
Line
1
2
3
4
E1
/T1
ALM
AC
T
TIM
510
TS
T
SIG
SO
EI
SM
EM
SI
EO
BRI
ALM
ACT
TIM5
21
4
3
2
1
CONSOLE
AU
X
USB
0
1
1
2
3
4
5
6
J4350
POWER
PO
WER
RE
SET
CONFIG
STATUS
ALARM
HA
10
/10
0/1
00
0
0/0
0/1
0/2
0/3
LIN
K
TX
/R
X
LIN
K
TX
/R
X
LIN
K
TX
/R
X
TX
/R
X
LIN
K
Juniper
NET
W
OR
KS
qsmabrkt LAO 102406
Summary of Contents for IG550
Page 1: ...Installing and Configuring the Avaya IG550 Integrated Gateway 03 601554 Issue 2 January 2008 ...
Page 10: ...What procedure you should use 10 Installing and Configuring the IG550 Integrated Gateway ...
Page 176: ...Recovering passwords 176 Installing and Configuring the IG550 Integrated Gateway ...
Page 196: ...196 Installing and Configuring the IG550 Integrated Gateway Index ...


