AV-Box VWC-44 Operation Manual Download Page 33

VWC-44


32

Please note: 

e

  Banding effect in edge blending area is related to projector color setting and gamma curve. The 

projector should have the same gamma setting and [Display Mode]. 

f


Please disable [Dynamic] color or [Brilliant] color function in the projectors. These function will 

change gamma

 curve based on the content and affect final edge blending image quality. 

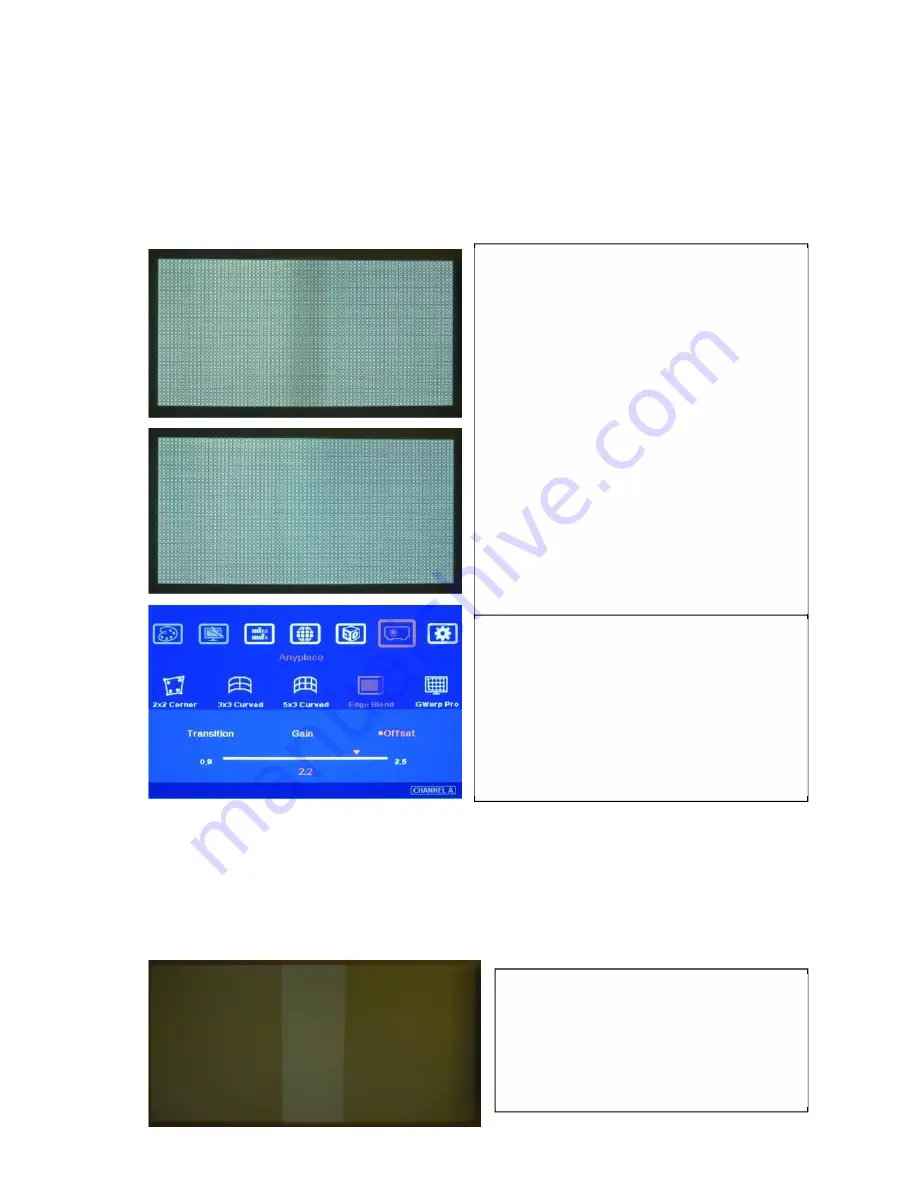
13.5.3  [Offset]: Black level uplift 

If edge blending is performed under dark environment, due to light leakage in projector optical 

system, user will see gray area in overlapped area. This gray area can’t be fixed by signal 

processing. The only way is to uplift the black level in non-overlapped area to reduce the black level 

difference. [Offset] function is to balance black level in the display under dark environment.   

Left picture is to show projector light leakage 

under dark environment. In overlapped area, 

the offset value is the sum from two projectors. 

Low contrast ratio projector will be more 

serious. 

Left picture is to show banding effect in edge

blending area.

This issue is related to many factors:

Screen: gain value under 1.5 is recommended

Projector: should be the same model with the

same gamma and Display Mode settings.

Usually DLP projector will get better result.

Signal content: To avoid pure color or pure

white color content. Multimedia is the best.

Overlap range: too small overlap range will be

easier to see banding effect. 15%-25% with

more than 40 cm is recommended. (XGA: 6-10

grids, FHD: 10-20 grids, each internal pattern

grid size is 32 pixels)

When adjusting black level, [Offset] value will be 

applied to complete color range and reduce image 

quality. [Offset] gamma adjustment can avoid this 

issue and let [Offset] adjustment only affect black 

level but not complete image.   

Summary of Contents for VWC-44

Page 1: ...VWC 44 0 VWC 44 Operation Manual Dual channel Universal Curved Screen Edge Blender Technical support E mail i av box ru Tel 8 804 333 18 83 Skype av box russia Version 2 04 Website http av box ru...

Page 2: ...djustment 16 OSD menu and operation 17 7 Picture Color Adjustment 17 8 Image Setup for PC graphics from VGA input 17 9 Image Properties 18 9 1 Color Preset mode Custom color 18 9 2 Input Signal select...

Page 3: ...rp PC tool is necessary 35 13 6 2 System configuration 35 13 6 3 Gwarp operation 36 13 6 3 1 System connection 36 13 6 3 2 Warp Adjust 37 13 6 3 3 Warp Shift 37 13 6 3 4 Edge Blend 37 13 6 3 5 Color U...

Page 4: ...will pay shipping charges for return shipments to customers Manufacturer does not assume responsibility for consequential damages expenses or loss of revenue inconvenience or interruption in operatio...

Page 5: ...balance adjustment for each projector overlapped area colour correction and non overlapped area black level uplift are also standard functions VWC 44 Users can see real time geometry and colour adjus...

Page 6: ...ignment External grid pattern can also be used if necessary d 2x2 3x3 5x3 grid pattern geometry alignment through manual operation without PC e Up to 17x17 grid pattern geometry alignment through Gwar...

Page 7: ...telligent color adjustment including preset display modes hue saturation brightness contrast sharpness adjustments and RGB separate adjustment for color fine tune 3 6 Video wall function a Video wall...

Page 8: ...due to negligence j Up to 5 profile settings for flexible display modes memory and recall k Power saving control through input source detecting l Integrated with IR extender up to 20 meters RS 232 an...

Page 9: ...D signal to the system for easy setup After finish the setup user can select optimized EDID from OSD menu to get optimized video quality i The optimized EDID should be the final resolution after edge...

Page 10: ...ve the setting into VWC 44 through the OSD menu Anyplace Gwarp Pro select UserMap 1 10 to save the settings Then PC can be removed u When Power Off ON VWC 44 it will maintain the final settings status...

Page 11: ...r 3840x2160 30Hz to get the best result in multiple projector edge blending d User needs to do geometry adjustment and warping function to align the images onto curved screen and let the images betwee...

Page 12: ...contents 2 2 4 Two projectors edge blending and one single projector display with original aspect ratio 5 If user can add one 101 at the front end user can implement PIP POP across entire display scr...

Page 13: ...solution The rest overlap areas P1 P2 P3 P4 P5 P6 P7 P8 can be set by AV BOX g If the display card doesn t have above mentioned overlap setting function then user needs to create a content with some o...

Page 14: ...rve more CPU resource to handle interactive or other operation without image lag 5 3 Case D L M shape video wall with edge blending Below is example of the application in restaurant with L shape video...

Page 15: ...ved display for most of regular curved screen Once the screen has irregular curve or special shape then to use Gwarp PC tool for the alignment may be necessary After geometry alignment user can execut...

Page 16: ...king with more projectors User can convert Nvidia 3D Vision 1080p 120Hz 3D signal and 1080p 24Hz frame packing 3D from Blue Ray into 720p XGA 100Hz 120Hz frame sequential 3D signal for DLPLink 3D Read...

Page 17: ...ttern from PC or other signal sources or see OSD menu instead of internal grid pattern user can continuously click pattern key to show it A flashing indicator at the adjusting point will appear User c...

Page 18: ...justment under Image Properties menu 8 Image Setup for PC graphics from VGA input a Automatic It will do automatic image position alignment b Manual manual setting for signal Phase and Clock to elimin...

Page 19: ...menu will apply to both processing channels 9 1 Color Preset Mode Custom color Two items under Color menu Four items under Preset Mode Preset color is Neutral This setting will apply to both processi...

Page 20: ...ore execute geometry alignment Change output resolution will also change the geometry alignment result User can press Input hotkey on front panel to change input port Message will be showed on the scr...

Page 21: ...lending 10 1 Zoom split the image Press Menu Keypad on Front Panel or remote controller to enter Video Wall OSD menu Video Wall hotkey on the bottom right position of the remote controller is availabl...

Page 22: ...tune the image in overlap region It can Use Pan to determine the location of each split image in the display in both horizontal and vertical directions Default setting Horizontal Pan 1 Vertical Pan 1...

Page 23: ...PC 3D signal will be decoded by AV BOX into signals for Right Left eyes The signal needs to be displayed through two projectors Each projector will display signal only for right eye or left eye User...

Page 24: ...ected to one projector for right left eye display e Install polarized filter at some distance from projector lens to avoid thermal damage at least 5 10 cm f Setup the polarized filter and glasses so t...

Page 25: ...n 1080p 24Hz Output to get the best 3D performance 4 sub menu under 3D Properties menu To set Right Eye Frame for RH projector and Left Eye Frame for LH projector Output Fromat setting is based on the...

Page 26: ...on capability If multiple projectors are used shutter glasses will only synchronize with one emitter among these 3D Ready projectors VWC 44 can support 100 120Hz frame sequential 3D signal up to full...

Page 27: ...cedures for active 3D Setting a To select the output resolution in AV BOX to XGA for XGA projector or 720P for projector native resolution larger than 720P through front panel or remote control hotkey...

Page 28: ...els 3x3 curved 5x3 Curved adjustment Horizontal 300 Pixels Vertical 200 pixels Maximum adjustment range in one side Horizontal 600 Pixels Vertical 400 pixels Maximum adjustment range in both side Hori...

Page 29: ...for geometry alignment a 5x3 Curved will cut the horizontal image into 4 sections and the image in each section can be independently adjusted In different output resolutions there will be different pi...

Page 30: ...tion for easier manual alignment on curved screen d If alignment by Gwarp PC Tool there is no limitation in the overlap grid number because it can execute up to 17x17 grid patterns e Once the grid bet...

Page 31: ...sate light leakage in projectors Corner to do precise Offset location alignment Shift shift the location in edge blend area In some case it may help color fine tune Color to do discrete color adjustme...

Page 32: ...al when Edge setting is not executed User needs to select correct edge for edge blending For 3 projector edge blending as example To select Left Edge for RH projector To select Right Edge for LH proje...

Page 33: ...ronment Left picture is to show projector light leakage under dark environment In overlapped area the offset value is the sum from two projectors Low contrast ratio projector will be more serious Left...

Page 34: ...sure the projector projecting area border to be as close as actual edge blending border The maximum difference should be under 300 pixels c Projector display imager such as DMD LCD and LCOS will have...

Page 35: ...ner can adjust the positions for black level Offset borders through change the end points of the borders Geometry alignment on the borders of edge blending area should be very accurate Otherwise Offse...

Page 36: ...below conditions Gwarp PC tool may be still necessary in edge blending operation a The grid pattern for manual geometry alignment is up to 5x3 only It can meet most of the application requirements How...

Page 37: ...nment user can activate OSD and access to 5x3 warp alignment in the channel that user doesn t want to change then it will show original manual alignment pattern for further operation 13 6 3 Gwarp oper...

Page 38: ...portionally with outline position To click Internal Grid will limit your adjustment within internal grid area Usually it is for detailed image position fine tune For edge blending please align all the...

Page 39: ...sable Pattern Show Grid and Internal Grid in Gwarp so that user can see the system OSD through keypad or remote controller Next step is to activate AV BOX OSD to load Gwarp result under Anyplace Gwarp...

Page 40: ...0cm 50cm overlap width between two projectors Use removable tape as temporary marks to indicate the image edges for each projector and screen center line based on the data from Excel Spread Sheet Each...

Page 41: ...ble overlap pixels If user finds the grid size between adjacent projectors is different It means the projection image sizes between two projectors are different User can adjust vertical center line po...

Page 42: ...wall are as follows Split the image for different projectors Zoom Determine the location of the image for each projector Pan To set proper overlap region in the edge between projectors Overlap Example...

Page 43: ...ter projector LH edge then please add 1 in RH edge of the 1st projector and 1 in 2nd projector LH edge g Edge Blending setting Select correct Edge for the edge blending LH projector RH edge Center pro...

Page 44: ...select Preset Mode to Neutral sRGB or Bluish Individual projector color adjustment Color function under Edge Blend menu ii Projector To adjust image position of the projector and reduce keystone angl...

Page 45: ...ault settings but the setting stored in Profile Activate Options Menu by Front Panel keypad or Remote Controller In Information menu it will show the information in AV BOX such as output mode input mo...

Page 46: ...ponds once when every time OSD key is pressed Default OSD will respond slowly at the beginning but will increase the speed of the response when OSD key is pressed continuously Slow OSD behavior is sim...

Page 47: ...onger Logo Time Out so that AV BOX will not execute geometry adjustment before projector finishes auto alignment A good match in the system power ON procedure and Logo time out will maintain the image...

Page 48: ...input source or timing changes This kind of Smooth Switching Mode is only available when the signal change is in same vertical frequency such as within NTSC or Pal If the input timing change is betwe...

Page 49: ...n use profile setting function to show different display styles in the applications If you have 4x1 display setup 1 User can implement Switching among different input ports 4 projector edge blending a...

Page 50: ...s designed with DB 9 connector The UART Protocol between AV BOX and a Host computer can be provided The protocol can be implemented via RS 232 USB Ethernet or other forthcoming communication methods D...

Page 51: ...through RJ45 User can save up to 5 settings into Profile User can connect this RS232 controller with each VWC 44 through RS232 cable in parallel Click Profile button in RS232 controller to power on o...

Page 52: ...o access the position for the modification and OSD direction keys to change the value in the IP settings Ethernet Webpage Virtual keypad in the screen If Ethernet Router supports PnP protocol user can...

Page 53: ...server can support big range of outputs from 720p to 4k 2k If no EDID selection function only one default EDID can be selected by media player The system may not show the best video quality Different...

Page 54: ...hey are not the same models it may create some difficulty and performance issue b Usually higher contrast ratio in the projector will have better black level performance The projector with contrast ra...

Page 55: ...nsate light leakage in the projector 8 White balance and grey level adjustment for each projector 9 One PC tool can control dual processing channels simultaneously 10 Able to perform flat curved scree...

Page 56: ...nd convenient features for system integrators 1 Reliable and durable design for long term industrial and commercial applications 2 Able to use low cost projector no lens shift warping or edge blend fu...

Page 57: ...eve Wang Update PC tool application V1 03 2015 12 07 Steve Wang Add color fine tune in edge blending region V2 01 2015 12 26 Steve Wang Content review and modifications V2 02 2015 01 26 Steve Wang Add...

Reviews: