background image

31

設定顯示器

主要元件

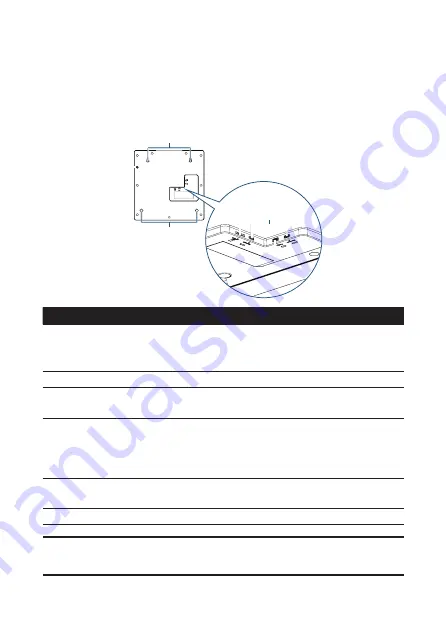
下列圖片和表格顯示接頭和其他元件位置。

1

2

3

4

5

6

項目

說明

1

電源按鈕

開啟

/

關閉顯示器。顯示器開啟時:

• 

按下電源開關以關閉顯示器背光。

• 

按住電源開關

 3 

秒鐘以關閉顯示器。

2

安裝孔

讓您將顯示器安裝到牆上。

3

microSD 


插槽

可插入

 microSD 

卡,播放儲存在

 microSD 

卡內

根目錄下的照片。

4

Micro USB  

連接埠

可連接配備

 Micro USB 

接頭的隨身碟,播放儲

存在隨身碟中根目錄下的照片。若使用

 Type 

接頭的隨身碟,請使用隨附的

 Micro USB 


Type-A USB 

連接線。

5

Type-C USB  

連接埠

可連接隨附的

 Type-C USB 

電源變壓器。

6

支架插槽

讓您安裝顯示器支架。

註:

USB

隨身碟或

micro SD card

隨插即播功能一次僅支援一個,

請勿同時插入兩個。

Summary of Contents for A.R.T. 17

Page 1: ......

Page 2: ...temperature Avoid excessive pressure or temperature changes as special liquid crystal material in the display may result in cracks scratches or damage Keep candles or other flammable items away from t...

Page 3: ...your display The illustrations in this manual may differ from the actual product and items Display Power Adapter Micro USB to Type A USB Cable Rubber Pads To learn how to use the rubber pads refer to...

Page 4: ...may cause injuries to people around it Display Mount Specifications The display is equipped with two mount holes on the back side that allow for mounting the display on a wall Firmly secure the displ...

Page 5: ...in place 1 Install the two screws into the wall based on the dimensions described in the previous section NOTE You can use a spirit level to ensure that the two screws are installed perfectly straight...

Page 6: ...allow you to position your display upright on a desktop Follow the steps below to install the stands on the display 1 Remove the rubber stoppers from the indicated locations on the rear panel of the...

Page 7: ...e the four provided rubber pads on the back side of the display so that there is space between the display and the wall for cable connection and cable routing To use the rubber pads remove the paper b...

Page 8: ...lay backlight Press and hold the power button for 3 seconds to turn off the display 2 Mount Holes Allows you to mount the display on a wall 3 microSD Card Slot Accepts microSD cards to play photos sto...

Page 9: ...neously Connecting the Power Adapter 1 Connect the supplied power adapter to the Type C USB port on the display 2 Fully insert the power cord plug into the power outlet socket The display will power o...

Page 10: ...r adapter varies depending on the country where you purchased this display For all cases use a power adapter that matches the AC voltage of the power outlet and has been approved by and complies with...

Page 11: ...on press and hold the power button for three seconds to power off the display NOTE When the display is turned on short pressing the power button for one second only turns off the backlight and does n...

Page 12: ...THE APP Downloading the App The app A R T allows you to manage and control the display from your mobile device Search for ART or AUO in the iOS App Store or Google Play Store to download and install...

Page 13: ...mobile device 2 Turn on Wi Fi on your mobile device and connect your mobile device to a Wi Fi network 3 Launch the A R T app 4 When the Device page appears tap the add button to search for available d...

Page 14: ...continue If the code does not appear for more than fifteen seconds tape Cancel and retry the step 5 7 Select the Wi Fi network which your mobile device is connected to and then follow the on screen i...

Page 15: ...DONE to return to the Device page NOTE You can select ADD ANOTHER DEVICE on this screen to connect more displays to the network 9 Once the display is paired with your mobile device and successfully co...

Page 16: ...tos and send the playlist to the display 1 On the Playlist page tap the add button NOTE If you are on the Device page and want to go to the Playlist page tap the menu button at the top left corner to...

Page 17: ...image in the playlist to be shown in the slideshow tap SKIP to exclude the image The excluded image will not be removed from the playlist and can be added back into the slideshow at any future time CR...

Page 18: ...ze is smaller than the supported screen resolution you can enable Expand image to fit the canvas to enlarge the image 4 Select the display you want to send the playlist to and then tap DEPLOY to send...

Page 19: ...llow a different mobile device to control the display follow the steps below 1 On the mobile device currently paired with the display tap Settings in the display s sub menu on the Device page 2 Find t...

Page 20: ...r mobile device 5 Your mobile device will automatically search for and list any connected displays in the Device page 6 Select the display you want to control and then input the PIN code to unlock the...

Page 21: ...ble to configure in the Settings menu Item Description Device information Shows the name and resolution of the display Tap RENAME to rename the display Slideshow speed Sets the duration each photo in...

Page 22: ...rk if you want the display to automatically synchronize the date and time with an Internet Time Server Or you can manually synchronize the date and time in the Device date time zone field Device date...

Page 23: ...Wi Fi network password is entered correctly 2 Check if your mobile device is connected to a stable Wi Fi network NOTE If you are trying to connect to the Wi Fi hotspot of a mobile device you may expe...

Page 24: ...mobile device is connected to a stable Wi Fi network 2 Close and re launch A R T Check if the display appears in the Device page 3 Re send the playlist I cannot select images stored on my mobile devi...

Page 25: ......

Page 26: ...25 5GHz EPE Class I...

Page 27: ...26 Micro USB Type A USB...

Page 28: ...27 11mm 6mm 6 5mm 200 mm 6 mm 11 mm 2 mm 6 5 mm...

Page 29: ...28 1 2...

Page 30: ...29 1 2...

Page 31: ...30...

Page 32: ...31 1 2 3 4 5 6 1 3 2 3 microSD microSD microSD 4 Micro USB Micro USB Type A Micro USB Type A USB 5 Type C USB Type C USB 6 USB micro SD card...

Page 33: ...32 1 Type C USB 2 AC...

Page 34: ...33 1 3 1 1...

Page 35: ...34 A R T iOS App Store Google Play Store ART AUO...

Page 36: ...35 1 2 Wi Fi Wi Fi 3 A R T 4 Device 5 NEXT Wi Fi...

Page 37: ...36 6 Confirm 15 Cancel 5 7 Wi Fi Wi Fi...

Page 38: ...37 8 DONE Device ADD ANOTHER DEVICE 9 Device...

Page 39: ...38 1 Playlist Device Playlist Playlist 2 NEXT...

Page 40: ...39 3 SKIP SKIP CROP CROP Add photo Remove photo Rename this playlist Delete this playlist...

Page 41: ...40 Expand image to fit the canvas 4 DEPLOY...

Page 42: ...41 A R T 1 Device Settings 2 Device sync PIN PIN PIN 0000...

Page 43: ...42 3 Wi Fi 4 A R T 5 Device 6 PIN 7...

Page 44: ...43 Device Settings Settings RENAME 5 23 59 59 0 100 4000K 5000K 6500K...

Page 45: ...44 PIN PIN 0000 Wi Fi RESET 1 Internet Device date time zone SYNC UPDATE AVAILABLE Settings...

Page 46: ...45 A R T 1 2 A R T A R T 1 Cancel A R T 1 Wi Fi Wi Fi Router 2 Wi Fi A R T Device 1 A R T A R T 2 Wi Fi Wi Fi Wi Fi 3 Wi Fi Wi Fi Wi Fi Wi Fi...

Page 47: ...46 A R T 1 A R T Device Wi Fi A R T 1 A R T User Manual 1 QR Code Display System Products Premium Signage A R T Download...

Page 48: ......

Reviews: