9
3 REMOTE DESCRIPTION
3.1
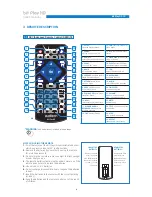
ARC (Advanced Remote Control) REMOTE
1. SETUP:
open the Settings Menu.
13. FWD:
fast-forward Audio/
Video tracks.
2. POWER:
bit Play HD power on/off.
14. REV:
rewind Audio/Video
tracks.
3. SUBTITLE:
select Video subtitle language.
15. VIDEO MODE:
change the
video resolution.
4. ZOOM:
zoom in Video mode.
16. EJECT:
extract DVD from
the external player if installed.
5. HOME:
go to the main menu.
17. 16:9:
select 16:9 video format.
6. CURSORS:
navigate the bit
Play HD internal menus.
18. BOOKMARK:
bookmark function.
7. RETURN:
return to the
previous menu.
19. AUDIO:
select Video audio language.
8. PREV:
select previous
Audio/Video tracks.
20. TIME SEEK:
seek rendering time.
9. PLAY/PAUSE:
audio/Video
track Play/Pause.
21. VOLUME:
VOL+ ->
increase volume.
VOL- ->
decrease volume.
10. NEXT:
select next Audio/Video track.
22. MUTE:
audio muting.
11. ALPHA NUMERIC
KEYBOARD:
alpha numeric
interface keyboard.
23. TITLE:
show the title of the
current file.
12. FILE:
transfer file key.
24. STOP:
stop Audio/Video tracks.
25. REPEAT
repeat Audio/Video tracks.
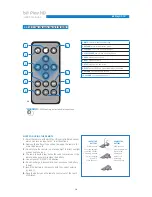
NOTES ON USING THE REMOTE.
1.
Point the remote at the bit Play HD control infrared sensor
which can receive input at 30° in all directions.
2.
Remove the batteries if you will not be using the remote
for more than a month.
3.
Do not store the remote in a place subject to direct sunlight
or near heat sources.
4.
The remote batteries last 6 months under normal use. If the
remote does not work, replace the batteries.
5.
Use only AAA 1.5 V batteries.
6.
Do not recharge, disassemble, heat or expose the batteries
to heat.
7.
Insert the batteries in the remote with the correct polarity
(+) and (-).
8.
Keep the batteries and the remote control out of the reach
of children.
*WARNING:
AAA
batteries not included in the package
.
*
USER’S MANUAL
bit Play HD /
1
7
4
2
8
5
3
11
15
16
18
17
19
20
9
10
21
22
23
24
25
12
14
13
6
INSERT THE
BATTERIES.
Remove the back
cover. Insert the
AAA batteries with
the correct polarity
(+) and (-). Close
the cover.
REMOVE THE
BATTERIES.
Remove the back
cover. Remove
the batteries and
replace them if
necessary. Close
the cover.
3


