background image

Phone 425-775-8461 • Fax 425-778-3166

®

13

tm


C

OMPONENT

 V

IDEO

 I

NPUTS

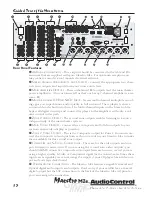
 - Component video is one of the highest quality for-

mats available. Use it whenever possible.


C

OMPONENT

 V

IDEO

 O

UTPUT

 – Connect these high quality video outputs to your 

main video display device (ie. Projector, CRT, LCD, etc.)  You will be pleased to know 
that they will convert the Composite and S-video signals to the Component outputs 
of your Maestro M2e. See page 20 for more details.


12 V

OLT

 T

RIGGER

 O

UTPUTS

 - These three outputs provide a +12 volt signal to 

control the power amplifiers, source units, video projector, screens and curtains in 
the theater. The Main Trigger output is active whenever the Maestro is turned on; 
the Video Trigger 2 is active whenever a video source is selected.


IR R

EMOTE

 C

ONTROL

 C

ONNECTIONS


- These jacks enable use of external IR sensors 

and emitters for installations where it is not desireable to use the front panel IR  
sensor.


HDMI I

NPUTS

 & O

UTPUTS

 – These inputs allow the Maestro M2e to accept digital 

video signals from source units equipped with HDMI (High Definition Multimedia 
Interface) outputs. The Maestro M2e outputs digital signals via this HDMI output to 
a projection device with an HDMI input.


A

CTIVE

 B

ALANCED

 O

UTPUTS

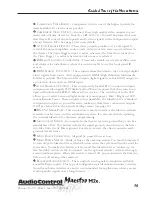
 – This conveniently located RJ-45 connector outputs 

component video signals 

PLUS

 digital audio 

OR

 remote power that then runs to an 

optional AudioControl BVR-25 balanced line receiver.  The switch next to the LED 
allows you to select between digital audio or remote power.  Hint - Bright red LED 
means Remote Power.  These outputs run in parallel to the Maestro M2e’s standard 
component outputs so you will want to make sure that these component outputs 
(YUV) are activated in the General Settings menu (see page 25).


RS-232 S

ERIAL

 P

ORT

 - This connection is used to interface the Maestro with an 

external touch-screen or other automation system. It is also used when updating 
the internal Maestro M2e firmware programming.


G

ROUND

 L

IFT

 S

WITCH


- In complex home theater systems, ground loops can be a 

painful fact of life. This button isolates the signal ground connections on the Mae-
stro M2e from the AC Power ground. For safety reasons, the chassis remains earth 
grounded at all times.


M

AIN

 P

OWER

 C

ONNECTION

 - All good AC power flows in here. 


M

AIN

 P

OWER

 S

WITCH

 – Think of this as the vacation switch. You should only need 

to turn off your Maestro M2e with this button when the system will not be used for 
some time. Normally this button is left on and the Maestro M2e is “woken up” via 
the “Standby” switch on the front panel, via the optional remote control or through 
an automation system. When this switch is turned off, you cannot turn the Maestro 
M2e on of off via any other method.


B

ALANCED

 A

UDIO

 O

UTPUTS


– These outputs send signals to amplifiers with bal-

anced XLR type inputs.  This type of configuration yields maximum noise rejection 
from the airborne interference and is recommended for applications where you are 
sending audio signals over a long distance.

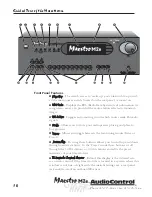
Guided Tour of the Masestro 

M2e

Summary of Contents for Maestro M2e

Page 1: ...e Balanced Technology Owners Enjoyment Manual For those who consider perfection possible 22410 70th Avenue West Mountlake Terrace WA 98043 USA Phone 425 775 8461 Fax 425 778 3166 www audiocontrol com 2006 All Rights Reserved Rev 1 1 S Y S T E M tm Home Theater ...

Page 2: ......

Page 3: ...or with Active Balanced Technology Owners Enjoyment Manual For those who consider perfection possible 22410 70th Avenue West Mountlake Terrace WA 98043 USA Phone 425 775 8461 Fax 425 778 3166 www audiocontrol com 2006 All Rights Reserved Rev 1 1 tm ...

Page 4: ...Phone 425 775 8461 Fax 425 778 3166 4 tm This page was intentionally left blank Please enjoy it ...

Page 5: ... Wiring 17 Audio Connections 17 System Diagram 18 Video Connections 19 IR Controls 20 12V Trigger Connections 21 Zone 2 21 Main User Menus Navigating the Setup Menu 23 Inputs and Volume 23 Audio Settings 23 Zone 2 Settings 24 Advanced Setup Menus General Settings 25 Speaker Sizes 26 Subwoofer Settings 27 Delay Settings 28 Level Settings 28 EX Settings 29 Speaker Eq Settings 30 Video Settings 30 Di...

Page 6: ...4 Stereo Direct 35 Display Brightness 36 Surround Modes Selecting Surround Modes 39 Automation Integration RS 232 Serial Control Protocol Commands 41 Protocol Structure 42 Command Structure and Parameters 45 IR Remote Control Codes 49 Troubleshooting General 51 Video 51 Audio 52 Appendix 55 Warranty 58 Specifications 61 ...

Page 7: ... designed to help you get the most from your Maestro M2e pre amp processor Even though you re dying to plug it in and start pushing buttons please take a little time to glance over this users guide and learn about the Maestro M2e theater surround processor Any component that does as much as the Maestro M2e does deserves all the explanation it can get Most Important Instruction of All Make certain ...

Page 8: ...omplete your performance home theater The video routing and switching in the Maestro M2e has it s roots in the broadcast studio With high video bandwidth you will see even the finest details from the video sources even with demanding 1080 and current progressive scan HDTV sig nals In addition the Maestro M2e switches high end digi tal video formats like HDMI for easy interface with todays digital p...

Page 9: ... Do you want to enjoy your home theater system in the bedroom also The Second Zone output of the Maestro en ables you to independently control the source selection and volume to a room outside of the home theater AudioControl PerfectionTheater System The Maestro M2e is part of the AudioControl Perfection Theater System Also included in this system are the Diva Digital Room Correction Processor com...

Page 10: ... your radio presets plus a good place to buy groceries Tuner Allows you toggle between the two tuning modes Tune or Preset Down Up Pressing these buttons allows you to scroll up and down through various stations In the Preset mode these buttons scroll through the 30 FM stations or 10 AM stations stored in the preset memories of your Maestro M2e IR Remote Control Sensor Behind this display is the i...

Page 11: ...llows you to Select various modes or menu screens depending upon which function you are in Mode When you are using source material containing Dolby Digital or DTS material this button lets you cycle through the various surround modes available for each Source Selection Buttons Simple enough just press a button to choose what you want to watch or listen to Mute Need to answer the phone but still ke...

Page 12: ...outputs enables listening to a source independently of the main theater system MAIN VIDEO OUTPUTS Connect these Composite and S Video outputs to your system s main video display or projector ZONE 2 VIDEO OUTPUT This is the Composite output for Zone 2 You must con nect the Composite video input from each source unit to your Maestro M2e to make them available for this second zone output COMPOSITE AN...

Page 13: ...eiver The switch next to the LED allows you to select between digital audio or remote power Hint Bright red LED means Remote Power These outputs run in parallel to the Maestro M2e s standard component outputs so you will want to make sure that these component outputs YUV are activated in the General Settings menu see page 25 RS 232 SERIAL PORT This connection is used to interface the Maestro with ...

Page 14: ...Phone 425 775 8461 Fax 425 778 3166 14 tm Guided Tour of the MasestroM2 ...

Page 15: ...tion where the remote controller sits and the Maestro M2e front panel Speaker Considerations and Placement Choosing the right speakers and putting them in the cor rect positions is crucial to getting the most out of a home theater system For the full THX surround EX playback experience we recommend two speakers placed behind you Once you have decided on the speakers you are using make certain the ...

Page 16: ... the rear wall of the theater facing the screen If you must place the speakers further apart make certain to change the Advanced Speaker Array setting in the set up menus Subwoofer The subwoofer is a large speaker that provides the bottom end kick in the system Depending on the size of your lis tening space you may require more than one subwoofer to get the bass volume levels that you desire Make ...

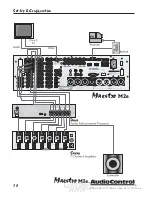
Page 17: ...This allows the RS 232 and re mote control features to work even when the Maestro M2e is in standby We always recommend the use a high quality surge protection device to keep all of your electronics safe from the evils of spikes on power systems Audio Connections Most of the sources will have two audio connections to the Maestro M2e the 2 channel analog audio and the multi channel digital audio Wh...

Page 18: ...Phone 425 775 8461 Fax 425 778 3166 18 tm MaestroM2etm Set Up Configuration ...

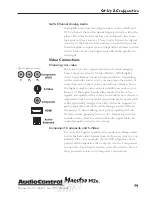
Page 19: ...tions Always choose the highest quality video output available on your sources Because of the higher bandwidths involved with video signals the quality of the interconnect cables you choose is important Video connections should always be made with cables specifically designed for video Don t be tempted to grab some extra audio RCA cables laying around Without the proper 75 ohm cabling your picture ...

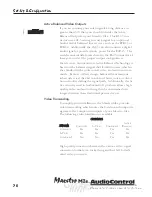
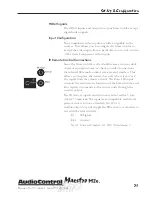
Page 20: ...d in the professional video and audio environ ments Because of their design balanced transmissions inherently reject the vast majority of hum noise or distor tion introduced along the signal path Additionally the Ac tive circuitry used in AudioControl s products allows high quality video and audio strength to be maintained over longer distances than traditional passive devices Video Transcoding To...

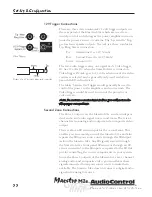
Page 21: ...t rack we have provided connections for external IR remote control receivers and emitters This allows you to place the infrared receiver where it can see the signal from the remote control The Zone 2 IR input controls the second zone functions of the Maestro M2e and also repeats commands to the source units through the emitter output The IR receiver input connections are wired with a 3 con ductor ...

Page 22: ...ntrol the projector or video screen Note Do not use a mono mini jack as you will not make the proper connections Second Zone Connections The Zone 2 outputs on the Maestro M2e send an indepen dent audio and video signal to a second room There is a 2 channel stereo analog audio output and a composite video output There is also an IR sensor input for the second zone This enables you to remotely contr...

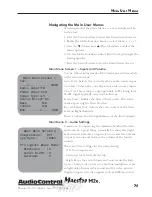
Page 23: ... Direct mode This is the same as pressing the Direct button BASS AND TREBLE TONE Adjusts the tone control of the front Left and Right channels BALANCE Adjusts the left right balance of the front outputs Main Menu 2 Audio Settings COMPRESSION Compressing the dynamic bandwidth of the audio can be a good thing especially for those late night action movie festivals Compression increases the volume of ...

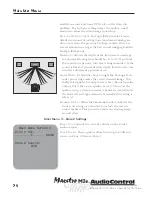
Page 24: ... more depth from front to rear turn the adjustment up towards 6 CENTER WIDTH Determines how strongly the Pro Logic II de coder processing creates the center channel image Nor mally this signal is fed only to the center channel speaker output but if the center speaker is set to None in the speaker setup a phantom center channel is created from the front left and right channels Normally this setting...

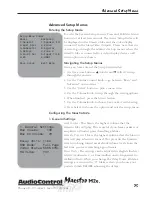
Page 25: ... Press Select to choose the option and exit the setup menu Configuring The Maestro M2e 1 General Settings MAX VOLUME This limits the highest volume that the Maestro M2e will play This is useful if you have speakers or amplifiers of limited power handling abilities MAX ON VOLUME This is the highest volume that the Maestro M2e will play when first turned This prevents the Maestro M2e from being turned...

Page 26: ...have their connectors colored red green and blue even though they are not sending an RGB signal The RGB Red Green Blue signal format is more common in Europe 2 Speaker Sizes For the purposes of setting the Maestro M2e a Large speaker is one that is capable of reproducing a full range 20 20KHZ audio signal A Small speaker is one that cannot reproduce deep bass frequencies i e typical Satel lite spe...

Page 27: ...ent to the Subwoofer This provides additional punch to the bottom end SAT SUB Provides full bass management when you are using smaller satellite type front speakers The lower bass frequencies are cut off from the Left and Right Outputs and sent to the Subwoofer Outputs CROSSOVER FREQUENCY This controls the frequency at which bass is redirected from speaker channels set to Small and sent to the Sub...

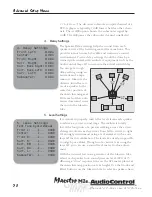
Page 28: ...al to properly match the levels from each speaker to achieve a correct sound stage The realism is totally lost if the footprints of a person walking across the screen change in volume as they move from left to center to right We strongly recommend using a test analyzer such as our IasysHT for this calibration The levels are nearly impossible to judge by ear alone Though not as accurate as using th...

Page 29: ...he Maestro M2e will automatically switch to Surround Ex decoding when Surround EX material is detected Set this option to Manual if you want to control which mode is used by the Maestro M2e AUTO PLIIX MOVIE The Maestro M2e will automatically switch to Pro Logic IIx Movie decoding when appropri ate material is detected Set this option to Manual if you want to control which mode is used by the Maest...

Page 30: ... audio inputs or select None ASSIGNING COMPONENT VIDEO INPUTS The HQ Video option lets you assign audio sources to the high quality component video inputs Select the source input you want associated with each of the component video inputs ADV 3 Digital Settings ASSIGNING THE DIGITAL AUDIO INPUTS The Digital Audio inputs on the Maestro M2e are fully assignable Any digital input can be assigned to a...

Page 31: ...ain zone and Zone 2 can be switched into stand by from the main zone ACCESS Limits which sources are available to Zone 2 To set this option Press the source input buttons to toggle a selec tion on or off using the optional remote control ADV 5 Input Trims Adjusting the Source Unit Input Volume Trims The input trims allow the installer to match the relative volumes of all sources so when you switch...

Page 32: ... input names for the front panel and on screen dis plays Saving Settings and Exiting Set up Once you are done editting your set up menus you should now save your settings and or exit the Set Up menu 1 Press the Menu button 2 Turn the volume knob to select between Exit Setup and Save Setup 3 Press the Select button Adv6 HDMI Settings Input Button DVD DVD SAT Sat Advanced Setup Menus Setup Menu Inde...

Page 33: ...ront panel display or the On Screen Display OSD on the video display The OSD is simpler to use since the larger display allows all the menu options to be listed at once Turning the Maestro M2e On There is actually two levels of turning the Maestro M2e on First the rear panel Power switch button must be selected This turns on the AC power to the Maestro M2e In most systems this power switch will AL...

Page 34: ...M2e 1 Press the Menu button to enter the Main Menu Screen 1 Inputs and Volume 2 Press the Effect until you see Audio Input 3 Press a Source Button to choose the Audio input source 4 Press the Effect again and you will see Video Input 5 Press a Source Button to choose the Video input source 6 Press the Menu button to exit the Main Menu Screen 1 7 These input selections will stay in effect until you...

Page 35: ...ource materials encoding Refer to the manual section on Surround Modes for more details about each mode DSP Effects The Maestro M2e isn t all work and no play When listening in the Stereo mode the Maestro M2e features several DSP effect modes to simulate different listening environments These effects provide varying amounts of delay and rever beration so your theater will sound completely differen...

Page 36: ...r home theater components in another room The source selections and volume control for this second zone is independent of the main theater zone outputs There are several options for controlling the second zone The Main Menu screen from the Maestro M2e the external RS 232 serial control port or the IR remote control The Zone 2 video output has an On Screen Display and setup menu independent of the ...

Page 37: ... two different music surround playback methods Those that use the internal digital decoding of the Maestro M2e Dolby Digital or DTS encoded and the newer multi channel audiophile Super Audio CD SACD and DVD Audio formats that have the decoding built into the players The SACD and DVD A formats bypass all internal processing in the Maestro M2e and feed directly to the amplifiers through the volume co...

Page 38: ...ear surround channels for playback DTS ES 6 1 Discrete This is a true discrete 6 1 channel sound format Unlike DTS ES this format has a true sixth channel mixed into the soundtracks The DTS 6 1 Discrete mode only operates on sources with DTS 6 1 encoding A list of available DVD titles with DTS ES and 6 1 Discrete can be found at www dtson line com DTS Neo 6 Cinema A movie surround decoding mode de...

Page 39: ...all channels SPORTS The Sports Stadium effect is ideal for watching live sporting events The open ambience is actively created around you The center channel is used for the dialog com mentary CHURCH The Church effect uses a reverberation algorithm that emphasizes the smooth rich reverberant sound of a large space As the name suggests it works well for simulat ing the long reverberation of a cathed...

Page 40: ... materials ProLogic processing on pure stereo sources can sound muffled and is not recommended Mode Memory The Maestro M2e automatically remembers the last sur round mode used for each source input Since most digital surround recordings have control information encoded into them the Maestro M2e will switch to the decoding method requested by the source material Some Dolby Digital Surround EX soundt...

Page 41: ...n the same installation depending on your needs Infrared Control versus RS 232 Infrared remote control systems are typically less expensive than RS 232 controllers Their main limitation is that Infra red is strictly line of sight That means that there has to be an unobstructed view between the controller sending the infrared commands and the IR sensor or front panel of the Maestro M2e When you try...

Page 42: ...l None Cable Wiring The cable wiring to connect the Maestro M2e to your con trol system will depend on the RS 232 output connection on the controller Make certain that you wire the Transmit Data output on the serial controller to the Receive Data on the Maestro M2e and vice versa on the Receive Data line on the controller system Connect the signal grounds on the control system and the Maestro M2e ...

Page 43: ...lowing format STR CC P1 P2 ETR Parameter Command Description STR PC_ Begins transmission to Maestro M2e CC see table Command code which determines type of page 47 function ie Power Volume Control Zone Selection etc P1 1 2 or Specifies which Zone or Tuner P2 1 9 Represents individual functions based on the above Command Code ie On Off Mute Source Selection Surround Modes ETR Carriage Return End tran...

Page 44: ...e Command Code ie On Off Mute Source Selection Surround Modes ETR Carriage Return End transmission As an example Confirming Power up of the Maestro M2e AV_ P11 cr Confirming Mute of the audio output on the main zone AV_ P10 cr Manually Determining RS 232 Codes When attempting to determine a specific command se quence for the Maestro M2e it is sometime helpful to con nect the Maestro M2e to a terminal...

Page 45: ..._ 2 0 0xd 0x2e 0x32 0x30 Unmute PC_ 2 1 0xd 0x2e 0x32 0x31 Request PC_ 2 9 0xd 0x2e 0x32 0x39 Volume Change Zone 1 Up PC_ 1 1 0xd 0x2f 0x31 0x31 Down PC_ 1 0 0xd 0x2f 0x31 0x30 Request PC_ 1 9 0xd 0x2f 0x31 0x39 Volume Change Zone 2 Up PC_ 2 1 0xd 0x2f 0x32 0x31 Down PC_ 2 0 0xd 0x2f 0x32 0x30 Request PC_ 2 9 0xd 0x2f 0x32 0x39 Source Selection Zone 1 DVD PC_ 1 1 0 0xd 0x31 0x31 0x30 SAT PC_ 1 1 1...

Page 46: ... 0xd 0x35 0x31 0x32 Pro Logic llx Music PC_ 5 1 3 0xd 0x35 0x31 0x33 Request PC_ 5 1 9 0xd 0x35 0x31 0x39 Effect Off PC_ 6 1 0 0xd 0x36 0x31 0x30 Music PC_ 6 1 1 0xd 0x36 0x31 0x31 Party PC_ 6 1 2 0xd 0x36 0x31 0x32 Club PC_ 6 1 3 0xd 0x36 0x31 0x33 Hall PC_ 6 1 4 0xd 0x36 0x31 0x34 Sports PC_ 6 1 5 0xd 0x36 0x31 0x35 Church PC_ 6 1 6 0xd 0x36 0x31 0x36 Request PC_ 6 1 9 0xd 0x36 0x31 0x39 Analog ...

Page 47: ... 0x2f 0x31 0x31 Down AV_ P 10 0xd 0x2f 0x31 0x30 Volume Change Zone 2 Up AV_ P 21 0xd 0x2f 0x32 0x31 Down AV_ P 20 0xd 0x2f 0x32 0x30 Selected Source Zone1 DVD AV_ 1 P 10 0xd 0x31 0x31 0x30 SAT AV_ 1 P 11 0xd 0x31 0x31 0x31 AV AV_ 1 P 12 0xd 0x31 0x31 0x32 AUX AV_ 1 P 13 0xd 0x31 0x31 0x33 VCR AV_ 1 P 14 0xd 0x31 0x31 0x34 CD AV_ 1 P 15 0xd 0x31 0x31 0x35 FM AV_ 1 P 16 0xd 0x31 0x31 0x36 AM AV_ 1 ...

Page 48: ...36 0x31 0x36 Analog Digital Analog AV_ 7 P 10 0xd 0x37 0x31 0x30 Digital AV_ 7 P 11 0xd 0x37 0x31 0x31 Navigation Cursor Up AV_ 8 P 1 0xd 0x38 0x0x31 0x3a Cursor Down AV_ 8 P 1 0xd 0x38 0x0x31 0x3b Cursor Left AV_ 8 P 1 0xd 0x38 0x0x31 0x3c OK AV_ 8 P 1 0xd 0x38 0x0x31 0x3d Cursor Right AV_ 8 P 1 0xd 0x38 0x0x31 0x3e Tuner Tune Down AV_ P 0 0xd 0x40 0x7e 0x30 Tune Up AV_ P 1 0xd 0x40 0x7e 0x31 RDS...

Page 49: ...splay 16 59 DTS NEO 6 Music 16 112 Menu 16 82 THX Off 16 113 Info 16 55 THX Cinema 16 114 Mute 16 119 THX Ultra2 Cinema 16 115 Unmute 16 120 THX Music 16 116 Mute Toggle 16 13 THX Surround EX 16 117 Volume Up 16 16 Effect Off 16 63 Volume Down 16 17 Effect Music 16 64 SAT Input 16 0 Effect Party 16 65 AV Input 16 2 Effect Club 16 66 Tuner Input 16 3 Effect Hall 16 67 DVD Input 16 4 Effect Sport 16...

Page 50: ...Phone 425 775 8461 Fax 425 778 3166 50 tm ...

Page 51: ...e Zone 2 Con figuration Menu to Off Video No video picture Verify your video display or projector is turned on and set to the correct input for the Maestro M2e Press the Menu button on the Maestro M2e and look for the Main Menu to show on the video display Verify the correct input on the video display is selected for the output of the source i e Component Video if the output of the DVD player is Co...

Page 52: ...cable tester is recom mended Confirm that you have selected the component output as it parallels to the Active Balanced Output Audio The audio doesn t match the video The Video and Audio input can be selected independently in the Main Menu Verify they are set the same Verify the correct Video Input and Digital Audio input as signments are configured for the Source input button The sound is poor or d...

Page 53: ...of connecting cables If the hum occurs on a source with an external connec tion such as an antenna or cable TV try disconnecting that input If the hum disappears put a ground isolator on that connection Try switching the ground lift switch on the back panel of the Maestro M2e No Zone 2 audio when playing a DTS encoded video Most DVD players cannot output a stereo analog version of the soundtrack w...

Page 54: ...Phone 425 775 8461 Fax 425 778 3166 54 tm ...

Page 55: ...des 20 user configured preset memories and a powerful automation integration protocol to make this part of any dream system The Diva is simple to connect into the Maestro M2e home theater system The analog inputs and outputs enable the Diva to connect between the preamplifier outputs of the Maestro M2e and the inputs of your power ampli fiers preferably the Pantages and Avalon For adjusting the Diva ...

Page 56: ...he Diva room correction processor is used To help with this task AudioControl offers a Factory Theater Calibration Service A factory trained technician using the AudioControl Indus trial IasysHT theater analyzer and other tools of the trade will come to your theater and ensure that you are getting the best sound possible from your system For more information about this service contact your AudioCo...

Page 57: ... 778 3166 57 tm Appendix Appendix C Using The Active Balanced Outputs On Your Maestro M2e Output to BVR 25 Remote Power Digital Audio Switch LED Indicator Red Remote Power OFF Digital Audio Active Balanced Outputs on Maestro M2e ...

Page 58: ...u meet all of these condi tions we will warrant all materials and workmanship on the Maestro M2e for five 5 years from the date you bought it and we will fix or replace it at our option during that time Here are the conditional conditions 1 You have to fill out the warranty card and send it to us within 15 days after purchasing the Maestro M2e 2 You must keep your sales receipt for proof of purchase ...

Page 59: ...hing will break Assuming you conform to 1 through 5 and it really isn t all that hard to do we get the option of fixing your original unit or replacing it with a new one Legalese Section This is the only warranty given by AudioControl This war ranty gives you specific legal rights that vary from state to state Promises of how well the Maestro M2e will perform are not implied by this warranty Other t...

Page 60: ...lease include the following items with the returning unit 1 A copy of your proof of purchase that sales receipt we ve been harp ing about No originals please We cannot guarantee returning them to you 2 A brief explanation of the trouble you are having with the Maestro M2e 3 A return street address No PO Boxes please 4 A daytime phone number in case our technician has a question about the problem y...

Page 61: ...Outputs 3 1 Inputs Analog Audio Inputs 7 Stereo Pairs Multi channel Analog Audio Input 1 8 channels Digital Audio Inputs 3 Coax 3 Optical Video Inputs 5 Composite 5 S Video 3 Component 2 HDMI Outputs Main Audio Output 8 channels Second Zone Audio Output 1 Stereo Pair Digital Audio Output 1 Coax 1 Optical Main Video Outputs 1 Composite 1 Active Balanced 1 S Video 1 Component 1 HDMI Second Zone Vide...

Page 62: ... For Those Who Consider Perfection Possible 22410 70th Avenue West Mountlake Terrace WA 98043 USA 425 775 8461 Fax 425 778 3166 www AudioControl com P N 913 090 0 ...

Reviews: