background image

SW5501 – SW5502 
Wireless Serial Server


User Manual 

Link modes and 

Applications 


Figure 

5.19


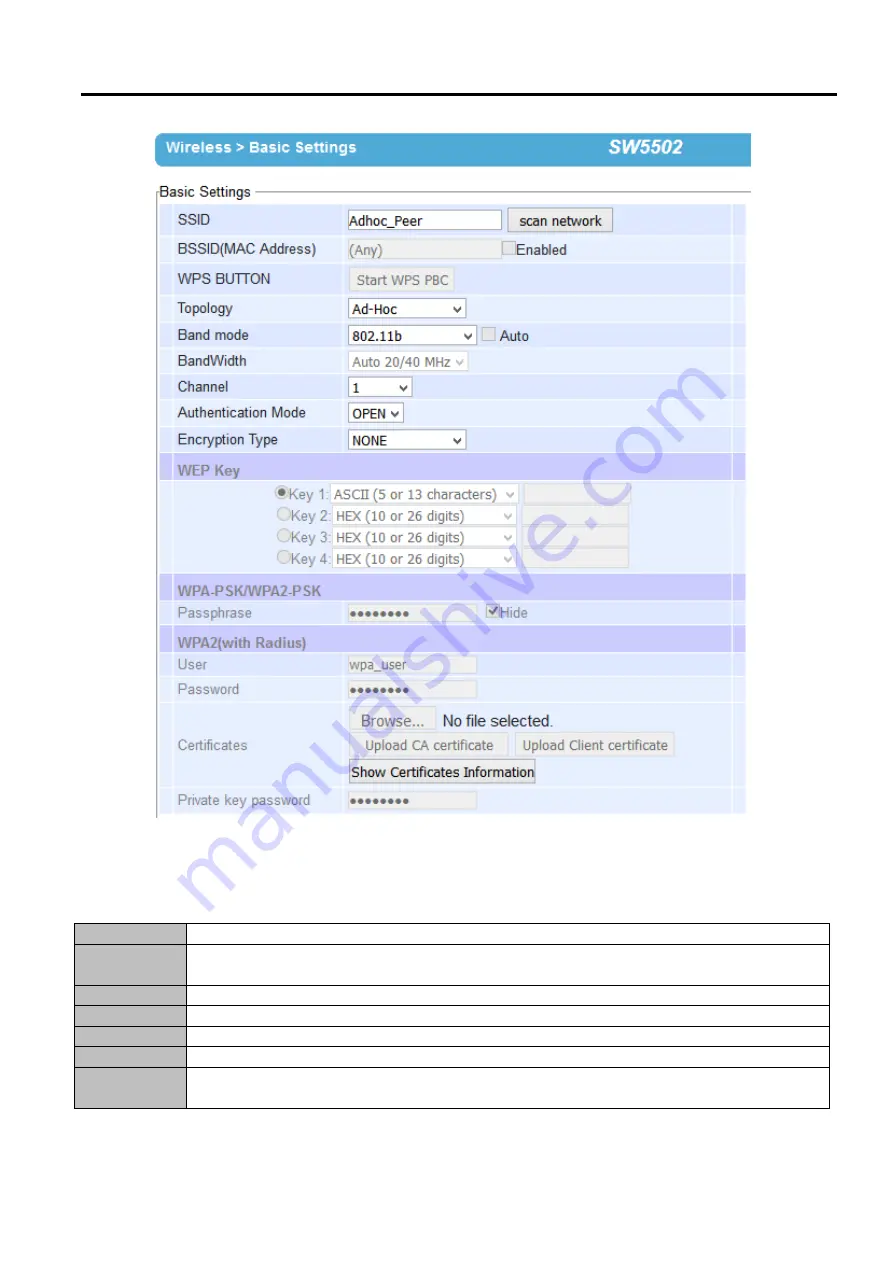
Wireless 

Ad

-

Hoc 

Peer 

Settings 

for 

SW550X 


Table 5

.

3  Summary of Parameter Settings for Wireless Ad

-

Hoc Peer with


WEP Security


Topology 

Adhoc 

Band Mode 

802

.

11b 

(

alternatively you could use 802

.

11a which is less affected by interference

)

, it provides 

better wireless sensitivity with lower maximum rate at 11Mbps

.


Tx Rate 

Auto 

Channel 

1; we recommend using 1, 6, or 11 

(

for 2

.

4 GHz

).


Authentication  Open 
Encryption 

WEP 

WEP Key 

For 64

-

bit encryption, enter 5 ASCII value or 10 Hexadecimal digits

For 128

-

bit encryption, enter 

13 ASCII value or 26 Hexadecimal digits

Use 128

-

bit when possible

.


Summary of Contents for SW5501

Page 1: ...SW5501 SW5502 Wireless Serial Server User Manual V 1 4 SW5501 SW5502 Wireless Serial Server User Manual V1 4 April 20th 2017 Atop Technologies Inc...

Page 2: ...ation For example click on any item listed in the Table of Contents to go to that page General Description User Guide Published by Atop Technologies Inc 2F No 146 Sec 1 Tung Hsing Rd 30261 Chupei City...

Page 3: ...and prosecution All rights including rights created by patent grant or registration of a utility model or design are reserved Disclaimer We have checked the contents of this manual for agreement with...

Page 4: ...y Default Settings 19 4 Configuration and setup 20 4 1 Change basic settings with Device Management Utility 20 4 2 Advanced configuration via Web Interface 25 4 2 1 Operation Mode 27 4 2 2 Overview 30...

Page 5: ...int TCP Pair Connections 77 5 3 Wireless Topology 78 5 3 1 Configure SW550X as a Wireless Ad Hoc Peer 78 5 3 2 Configure SW550X as a Wireless Client in the Infrastructure mode PSK 80 5 3 3 Click 2 Go...

Page 6: ...Figure 4 7 Pull down Menu of Configuration and Network 23 Figure 4 8 Pop up Windows of Network Setting 23 Figure 4 9 Authorization for Change 24 Figure 4 10 Waiting Notification for Restarting Device...

Page 7: ...P Client Link Mode 66 Figure 5 6 Connection Settings for TCP Client Link Mode 66 Figure 5 7 TCP Client Link Mode Settings under COM 1 Page 67 Figure 5 8 An Example of UDP Link Mode 68 Figure 5 9 Conne...

Page 8: ...ttings for UDP Link Mode 76 Table 5 2 An Example of Multi Point Pair Connection s Parameter Settings for TCP Link Mode 77 Table 5 3 Summary of Parameter Settings for Wireless Ad Hoc Peer with WEP Secu...

Page 9: ...m tw or www atoponline com 1 3 Supported Platform This manual is designed for the SW550X Industrial Wireless Serial Device Server Series and that model only 1 4 Warranty Period Atop provides a 5 year...

Page 10: ...for the frequency range 5 15 to 5 25 GHz to reduce the potential for harmful interference to co channel mobile satellite systems FCC Radiation Exposure Statement This equipment complies with FCC radi...

Page 11: ...ls for Wireless Telecommunications Systems with basic restrictions or reference levels related to Human Exposure to Radio Frequency Electromagnetic Fields from 300 MHz to 40 GHz The minimum separation...

Page 12: ...2 4GHz and 5GHz bands It acts as a server for serial devices that are connected to its ports in order to transparently connect to other devices in the wireless network or can be reached by other wirel...

Page 13: ...ference in 2 4 GHz ISM band with other wireless devices Certified wireless equipment by FCC United States ETSI Europe and NCC Taiwan Dual antennas offer better wireless coverage and reduce wireless bl...

Page 14: ...ation Guide Warranty Card is included Mounting Kit 1 DIN Rail Kit Already mounted on the device Note Please notify your sales representative if any of the above items is missing or damaged in any form...

Page 15: ...th serial isolation SW5502 1P1SW550200001G 2 port Industrial Wireless Serial Device Server DB9 SW5502 TB 1P1SW5502TB001G 2 port Industrial Wireless Serial Device Server TB5 SW5502 Sis 1P1SW5502SIS01G...

Page 16: ...the RS 485 network range is shorter than 100 meters the termination resistors are not required by setting the DIP switch to termination off Otherwise it may be necessary to insert termination resistor...

Page 17: ...ount of SW550X 3 5 Serial Pin Assignments 3 5 1 D Sub9 DB9 Pin RS 232 Full Duplex RS 422 4 Wire RS 485 Full Duplex 2 Wire RS 485 Half Duplex 1 DCD N A N A 2 RXD TXD N A reserved 3 TXD RXD DATA 4 DTR N...

Page 18: ...is a screw close to the power terminal block and then the 3 Pin power terminal block on the power panel in Figure 3 5 A recommended power adapter such as US315 1212 power adapter listed in Table 3 2...

Page 19: ...1 254 Other relevant factory default settings are summarized below Table 3 5 SW550X Series Factory Default Settings Parameter Default Values Security User Name admin Password default Serial COM1 RS 23...

Page 20: ...d not see your SW550X device on your network press Rescan icon first icon on the icon bar A list of devices including your SW550X device currently connected to the network will be shown in the window...

Page 21: ...OK to accept the notification and return to the Device Management s window In this case please change the IP address of your PC so that it has the same subnet as the SW550X Then re select and double c...

Page 22: ...Device Management Utility s interface Note Advanced settings are not possible via Another way of doing this is by selecting the SW550X device and then choosing the Config by browser icon from the fort...

Page 23: ...ick OK button the system will prompt you for a credential to authorize the changes That is it will ask you for the Username and the Password as shown in Figure 4 9 A pop up window as shown in Figure 4...

Page 24: ...SW5501 SW5502 Wireless Serial Server User Manual Configuration and setup Figure 4 9 Authorization for Change Figure 4 10 Waiting Notification for Restarting Device...

Page 25: ...device is connected to the network it can be configured by using any web browser An authentication request will appear as shown below when the user uses a web browser to configure the SW550X Series I...

Page 26: ...e left side of the screen a menu tree is listed with all available modes and options as shown Figure 4 13 On the right side of the screen the contents of each mode option will be displayed in a graphi...

Page 27: ...a connection from WLAN to LAN or vice versa This Operation Mode page is the welcome screen for the SW550X Series There are two operation modes to choose from 1 Wireless Client 2 AP Client In Wireless...

Page 28: ...e you can click Apply button to apply the setting and reboot the SW550X device Note that after clicking the Apply button the user will briefly see the same pop up window as in above and after a few se...

Page 29: ...SW5501 SW5502 Wireless Serial Server User Manual Configuration and setup Figure 4 17 AP Client Operation Mode Setting...

Page 30: ...Page of an SW550X Device Information under the Device Information box displays the Model Name the Device Name Kernel Version and AP Version of the SW550X device Note that the default Device Name is th...

Page 31: ...in this section called Wireless Status submenu under the System Status menu The current information is summarized below Please remember to always keep a note of your preferred setting The Current Inf...

Page 32: ...s the radio Channel number the Authentication mode such as Open WPA PSK WPA2 PSK WPA2 PEAP WPA2 EAP TLS WPA2 EAP TTLS the Encryption standards such as None WEP AES or TKIP or a combination of TKIP AES...

Page 33: ...ver The first configurable option under the Network Settings is Gratuitous ARP Address Resolution Protocol This option enables SW550X device to periodically send out an ARP response automatically to n...

Page 34: ...to be configured into different subnets The user must choose which interface that should be the Default Gateway by selecting the corresponding radio buttons between WLAN and LAN as shown in the scree...

Page 35: ...V3 XX each wireless profile can be directly set from the profile webpage Users no longer need to set wireless profile through the Basic Setting see next subsection When the Wireless Profile is enabled...

Page 36: ...of the SSID or profile on the list When the color of the Name is green the profile is connected When the color of the Name is orange the profile is connecting When the color of the Name is grey the p...

Page 37: ...SW5501 SW5502 Wireless Serial Server User Manual Configuration and setup Figure 4 26 Wireless Profile Page...

Page 38: ...When Wireless Profile is disabled the Basic Settings webpage can be used The default settings in Basic Settings page can be in two Topology modes Infrastructure Mode or Ad Hoc Mode The user will have...

Page 39: ...Profile is Disabled After the user finished setting the Basic Settings as shown above please click the Save Apply button to save the new wireless configuration on the SW550X and allow the configurati...

Page 40: ...e when the Wireless Profiles is enabled Band Mode This option allows user to select the radio frequency band which are supported by IEEE 802 11b 802 11b g 802 11b g n 802 11a and 802 11a n standards I...

Page 41: ...reless information of surrounding access points in the device s coverage area Please be patient as this process might take up to 10 seconds Once it has finished scanning names and basic properties of...

Page 42: ...eless Advanced Settings Page when Wireless Profile is Disabled and Topology is set to infrastucture Radio Off When this option is enabled this allows the user to turn off the wireless interface comple...

Page 43: ...r should ensure that SW550X can establish the connection with its target device first STP The Spanning Tree Protocol is only available in the AP Client mode Enable this option if STP is enabled in the...

Page 44: ...are given in the Chapter Error eference source not found Chapter this section will only focus on the Serial Settings only Figure below shows an example of the COM 1 Port Settings where the upper part...

Page 45: ...er of Stop Bits can be either 1 bit or 2 bits Flow Control The user can choose among None No Flow Control RTS CTS Hardware Flow Control or Xon Xoff Software Flow Control If Xon Xoff is selected the Xo...

Page 46: ...application layer for some specific inactivity period i e no exchanged packets The default value is 3 600 seconds The maximum value is 36 000 seconds Disabling this option means that SW550X would nev...

Page 47: ...t the serial data in its buffer when the specified time interval has reached and no more serial data comes in The default value is calculated automatically based on the baud rate If the automatic valu...

Page 48: ...ct on the Transparent Mode Please see the discussion about Request Respond Mode versus Transparent Mode later When TCP data is received a request from network and passed to serial device side the SW55...

Page 49: ...n be viewed by third party SNMP software Figure 4 36 SNMP Alert Settings Page SW550X provides three basic SNMP fields which are System Contact usually used to specify the device s contact information...

Page 50: ...These alerts are useful for security control or security monitoring of the SW550X device Cold Start This event occurs when there is a power interruption Warm Start This event occurs when the device r...

Page 51: ...Protocol SMTP Server requires a user authentication you must check the SMTP server authentication required box in the Authentication option After enabling this option you can fill in the Username and...

Page 52: ...for system events and report to an external Syslog server if necessary Figure below shows the System Log Settings page under the Log Settings menu Description of each option is as follows Figure 4 39...

Page 53: ...5K bytes Log Data Contents if this option is enabled the COM logging function will log the content s data that is being transmitted and received in raw bytes If this option is disabled COM logging fun...

Page 54: ...s that the user can specify for the log to be transferred After finish configuring the COM Log Settings please click on Save Apply button to keep the change that you have made and to apply your settin...

Page 55: ...four lines were set to log data s content The letter R refers to Received data while letter T refers to Transmitted data The number in the bracket is the length of the data in Bytes Each record of the...

Page 56: ...ally a Time Zone can be selected as well from the drop down list Daylight Saving Time Setting is enabled when Enable Daylight Saving Time box is checked When it is enabled the user can select the deta...

Page 57: ...first one is via Hypertext Transfer Protocol HTTP and the other is via Hypertext Transfer Protocol Secure HTTPS For enhanced security it is recommended to use the encrypted HTTPS protocol Note that HT...

Page 58: ...rt itself In some cases you might require to re configure your SW550X device To restore your backup configuration from a file please see the procedure in the next subsection Figure 4 45 Firmware Upgra...

Page 59: ...ist is used to filter the MAC addresses that can have access to the Web management interface or Web UI When Management List is enabled only the MAC addresses entered in the list of allowed MAC address...

Page 60: ...I of SW550X has an interface to call Ping which is a network diagnostic utility for testing reachability You can use the Ping function to determine whether SW550X can reach the gateway or other device...

Page 61: ...indow with a message Please wait for a while will be displayed with a countdown number in seconds If a restoration to the factory default settings is needed please check the Reset box before clicking...

Page 62: ...ted in the following sections Figure below show the Link Mode options for COM 1 port which can be found on COM 1 page under Serial menu of Web UI See details on Serial Settings in Chapter 4 5 above Fi...

Page 63: ...de under the COM 1 page There are additional connection settings that can be configured as shown in Figure below By selecting the TCP Server Link Mode a TCP Client program on a remote host computer sh...

Page 64: ...e TCP Server section you will find the following options Application There are 4 different communication applications to choose from here RAW There is no protocol on this mode which means that the dat...

Page 65: ...nts that can be connected to the serial device on this COM port Response Behavior This option specifies how SW550X will proceed or behave when it receives requests from remote connected hosts in which...

Page 66: ...r the connection is established data can be transmitted between a serial device connected to the COM port of SW550X and a remote host computer in both directions This also applies to Virtual COM appli...

Page 67: ...ction you will find the following options Application Only three communication applications are available here RAW Virtual COM and Pair Connection Slave in which their definitions are the same as desc...

Page 68: ...ing the Link Mode please scroll down to the bottom of the page and click on Save Apply button to save all the changes that you have made 5 1 3 Link Mode Configure SW550X in UDP Since User Datagram Pro...

Page 69: ...does not guarantee data delivery It is recommended to utilize UDP only with cyclic polling protocols where each request is repeated and independent such as Modbus Protocol Please follow the following...

Page 70: ...specify the range of IP addresses and port number that will be communicating with SW550X The user can define the Begin and End IP Addresses here Four groups of range of IP addresses are allowed Pleas...

Page 71: ...tualization of IP to COM is all done in the system driver transparently Figure below shows SW550X in TCP Server mode with Virtual COM enabled Please follow the following steps to enable Virtual COM ap...

Page 72: ...in TCP Client Link Mode Figure below shows a configuration of Virtual COM application in TCP Client Link Mode It is usually easier to use Virtual COM in the TCP Client Link Mode if SW550X uses dynamic...

Page 73: ...to install Virtual COM in the serial devices However the pair connection application does require two SW550Xs to work in pair One would be the Pair Connection Master and the other would be the Pair Co...

Page 74: ...he Destination IP address and the Destination Port number for Destination 1 and optionally Destination 2 that match to the settings of Pair Connection Master another SW550X device s IP and port number...

Page 75: ...Mode while four other SW550Xs are serially connected to one or two Modbus Slaves and configured as Pair Connection Slaves in UDP Link Mode Note that all SW550X devices are communicated over the same w...

Page 76: ...tening Port Destination IP Destination Port SW5501 Master COM1 10 0 50 100 UDP 5000 10 0 50 200 10 0 50 203 5000 10 0 50 200 10 0 50 201 5001 SW5502 Slave 1 COM1 10 0 50 200 UDP 5000 10 0 50 100 5000...

Page 77: ...erfaces of these devices are connected without SW550X However the TCP Server is limited to a maximum of four connections If there are four serial devices and they don t use flow control pins with RS 2...

Page 78: ...led wireless client In Infrastructure mode each wireless node cannot communicate directly with each other They must communicate via the access point only We can configure SW550X as a wireless ad hoc p...

Page 79: ...Mode 802 11b alternatively you could use 802 11a which is less affected by interference it provides better wireless sensitivity with lower maximum rate at 11Mbps Tx Rate Auto Channel 1 we recommend u...

Page 80: ...To configure SW550X as a Wireless Client in infrastructure mode with WPA2 PSK authentication mode and AES encryption please click on Basic Settings page under the Wireless menu and follow steps in Pa...

Page 81: ...SW5501 SW5502 Wireless Serial Server User Manual Link modes and Applications Table 5 4 Figure 5 20 Wireless Client with WPA2 PSK Security Settings for SW550X...

Page 82: ...fined by the Access Point Encryption As defined by the Access Point WPA2 PSK passphrase 8 63 characters Attention We recommend using WPA2 PSK authentication with AES encryption as it is the most secur...

Page 83: ...steps in Paragraph 4 2 1 above Figure below shows an example of a wireless client in infrastructure mode with this authentication mode enabled as summarized in Table 5 5 Figure 5 21 Wireless Client wi...

Page 84: ...Virtual COM VCOM Application is enabled This will allow the Virtual COM port in the Windows Linux system to access SW550X s COM ports Please note that Virtual COM Application can only be enabled in TC...

Page 85: ...onal computer PC while there can be several Virtual COM ports such as COM 3 4 5 and so on In SW550X case the TCP IP network can be either wired network such as Ethernet or wireless network such as Wi...

Page 86: ...er allows up to 256 Virtual COM ports in a single PC Selection of COM port number can be allowed in the range from COM1 to COM4096 Note that COM ports that are already occupied by the system or other...

Page 87: ...ual COM in TCP Server Link Mode in SW550X For a detail of Link Mode configuration with Virtual COM please refer to the previous chapter starting from Section 5 1 above on Link Mode configurations Figu...

Page 88: ...g system The user may want to select a range of multiple COM ports to be used as Virtual COM ports by entering the range of COM port in the text box below the list After selecting the virtual COM port...

Page 89: ...e server i e SW550X is running in TCP Server Link Mode recommended the Serial IP utility on the host computer should be configured as the TCP Client connecting to the serial device server Enable Conne...

Page 90: ...al COM to automatically restore failed connections with the serial device server in case of unstable network connections 5 To test the Virtual COM connection you can click the Configuration Wizard but...

Page 91: ...SW5501 SW5502 Wireless Serial Server User Manual VCOM installation and troubleshooting Figure 6 9 Configuration Wizard Window for COM 1...

Page 92: ...em with the connection there will be error s or warning s reported in the Status and Log text boxes The possible correction or trouble shooting hint for each exception is given in each case If the sta...

Page 93: ...the serial device server Figure 6 11 Error of Client not licensed for this server If the status reports with a check with a message Telnet Protocol Detected and an exclamation mark with a message Clie...

Page 94: ...Serial IP utility software is not enabled Please follow the step in Paragraph 6 2 3 above for enabling the user credentials option and entering the username and the password Figure 6 13 VCOM Authentic...

Page 95: ...rver i e SW550X is not enabled Please enable the VCOM Authentication option on the SW550X by setting a new and non blank administrator s Username and Password for SW550X as described in Paragraph 4 9...

Page 96: ...e Serial IP tray icon and click on Port Monitor to open the Port Monitor Click on the Port Monitor button in the Serial IP Control Panel s window 6 4 2 Activity Panel The Activity panel provides a rea...

Page 97: ...tly opened by an application The TR DR and CD indicators appear only if the COM Port Control protocol is being used or if the COM port options are enabled 6 4 3 Trace Panel The Trace panel provides a...

Page 98: ...s being captured For large applications this feature provides a way to focus on ports of interest among all those being captured o Buffer Size This menu allows the change on the amount of RAM being us...

Page 99: ...provided as follows Extend Server Connection When enabled this option maintains the TCP connection for specified amount of time after COM port is closed The default time value is 8000 milliseconds Att...

Page 100: ...network connections made through a proxy server which may be controlling access to external networks such as the Internet from a private network that lacks transparent IP based routing such as Networ...

Page 101: ...x 90mm DIN Rail Wall mount optional kit 7 1 3 LED Indicators Table 7 3 Descriptions of LED Status Indicators Name Color Status Description COM Green Blinking Data is transmitting on the serial port Of...

Page 102: ...th 20 40 Poor Signal Strength 40 60 Fair Signal Strength 60 80 Good Signal Strength 80 94 Excellent Signal Strength 95 100 7 1 5 Dip Switch SW5501 Table 7 5 Dip Switch Functions of SW5501 COM Dip Func...

Page 103: ...5Ghz United States FCC 2412 2462 20Mhz 2422 2452 40Mhz 5180 5240 5745 5825 20Mhz 5190 5230 5755 5795 40Mhz Europe ETSI 2412 2472 20Mhz 2422 2462 40Mhz 5180 5240 20Mhz 5190 5230 40Mhz Taiwan NCC 2412...

Page 104: ...m MCS 3 11 15dBm MCS 4 12 15dBm MCS 5 13 15dBm MCS 6 14 14dBm MCS 7 15 802 11n 5GHz HT20 15dBm MCS 0 8 15dBm MCS 1 9 15dBm MCS 2 10 15dBm MCS 3 11 15dBm MCS 4 12 11 14dBm MCS 5 13 9 12dBm MCS 6 14 7 1...

Page 105: ...77 90 80 MCS3 74 87 77 MCS4 70 84 73 MCS5 66 79 69 MCS6 65 78 68 MCS7 64 76 67 802 11a n HT40 MCS0 79 92 82 MCS1 76 90 79 MCS2 74 87 77 MCS3 71 84 74 MCS4 67 80 70 MCS5 63 76 66 MCS6 62 74 65 MCS7 61...

Page 106: ...3 V1 7 1 2012 06 EMF 47 CFR FCC Part 2 Subpart J section 2 1091 EN 62311 2008 and EN 50385 2002 Table 7 13 Conformed Electrical Standards Test Item Value Level IEC61000 4 2 ESD Contact Discharge 8KV 4...

Page 107: ...IEC 60068 2 6 MTBF 20 years TBD RoHS Yes Maritime N A 7 2 Software Specifications Table 7 14 Software Specifications Configuration Browser IE8 Firefox 6 and Chrome 13 Telnet Device Management Atop s W...

Page 108: ...her solutions Obtain and setup a TFTP server on your PC Make sure that the PC s network settings are set properly according to the default setting in the above table Rename the firmware image that you...

Page 109: ...Reimbursement Customers must always obtain an authorized RMA number from us before shipping the goods to be repaired When in normal use a sold product shall be replaced with a new one within 3 months...

Page 110: ...nsington Terrace Kensington Rd Bangalore 560008 India Tel 91 80 4920 6363 E mail Abhishek S atop in ATOP INDONESIA BRANCH Jopson Li Branch Director Wisma Lampung Jl No 40 Tomang Raya Jakarta Barat 114...

Reviews: