background image

9

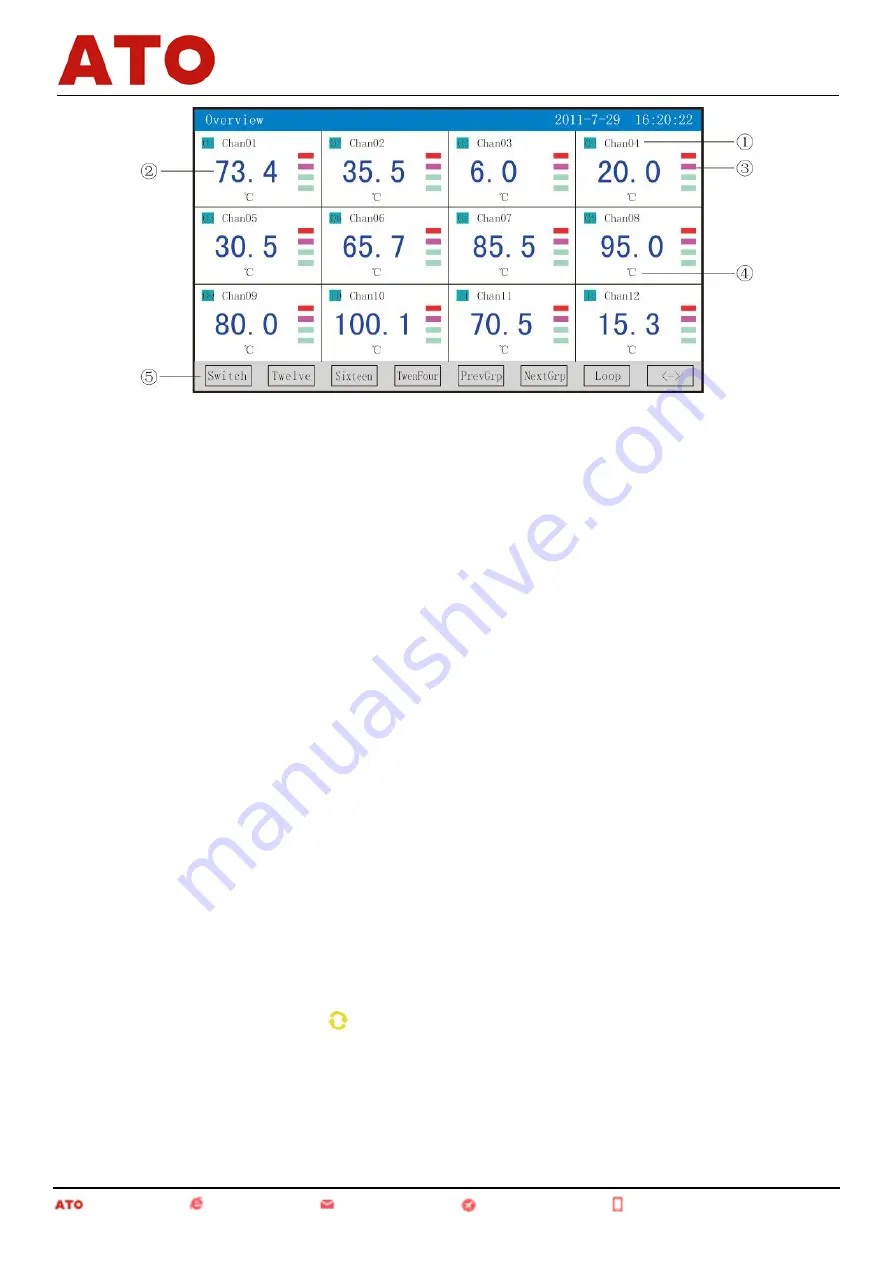
: Channel name: It means the corresponding project bit number of each channel and can be set. (Please

refer to 4.12.4.1 Input Method of Channel Bit Number for the setting method.)

: Data of quantities: They are the current data of quantities of such channel.

: Indication of the ultralimit alarm: From the upper to the bottom, the squares represent the ultralimit alarm

marks of ultimate upper limit, upper limit, lower limit and ultimate lower limit respectively; grey means there is
no alarm function; green means not to conduct alarm; red/pink means to conduct alarm.

: Unit: Data unit of such channel is displayed and can be set. (Please refer to 4.12.4.2 Input Method of

Channel Unit for the setting method.)

: Operation keys:

Press the "Switch" key to switch to other displays
Press the "

〈—〉

" key to switch the channels of the display menus, where the channels include 2, 4, 6, 12, 16

and 24

Press the "2 channels" key to simultaneously display the channel bit numbers, data of quantities, the states of

alarm and the engineering units of 2 channels

Press the "4 channels" key to simultaneously display the channel bit numbers, data of quantities, the states of

alarm and the engineering units of 4 channels

Press the "6 channels" key to simultaneously display the channel bit numbers, data of quantities, the states of

alarm and the engineering units of 6 channels

Press the "12 channels" key to simultaneously display the channel bit numbers, data of quantities, the states

of alarm and the engineering units of 12 channels

Press the "16 channels" key to simultaneously display the channel bit numbers, data of quantities, the states

of alarm and the engineering units of the 16 channels

Press the "24 channels" key to simultaneously display the channel bit numbers, data of quantities, the states

of alarm and the engineering units of the 24 channels

Press the "Previous group" key to check the previous digital display combination
Press the "Latter group" key to check the latter digital display combination
Press the "Cycling" key and the " " cycling icon will be displayed on the menu, and the next digital display

combination will be automatically switched according to the cycling interval set in the display configuration.

4.6 Historical Curve Menu

This menu can be set according to the curve combination, and is for simultaneously displaying the curves of

historical data of six channels (the curve precision is 0.5% ± 1 word).

Automation       www.ato.com      [email protected]     Global Shipping      +1 800-585-1519 (Toll-free)

Paperless Recorder

Summary of Contents for ATO-PLR-CH48

Page 1: ...Paperless Recorder PAPERLESS RECORDER USER MANUAL SKU ATO PLR CH48 Automation www ato com sales ato com Global Shipping 1 800 585 1519 Toll free...

Page 2: ...nts with backup function 13 4 11 Menu for power down recording 14 4 12 Menu for Configuration 15 4 12 1 System Configuration 16 4 12 2 Recording Configuration 17 4 12 3 Displaying Configuration 18 4 1...

Page 3: ...communication interface 1 200 57 600 bps baud rate able to be set standard MODBUS RTU communication protocol is adopted the communication distance of RS 485 can be as long as 1 kilometer the communic...

Page 4: ...melling of peculiar smell abnormal noise sent out by the instrument etc please cut off the power supply immediately and contact the supplier or our company timely To ensure the instrument can operate...

Page 5: ...C approximately Please do not install the instrument at the following places Please choose the places with small temperature change and approximate to the normal temperature 23 to install the instrume...

Page 6: ...ment Installment method is as shown on the right figure Two sides of the instrument are fixed by four installing supports 2 Refer to the right figure for the installment figure Wiring diagram of the i...

Page 7: ...nu digital display menu historical curve menu alarm list menu file list menu menu for printing menu for backup menu for power down recording and menu of configuration parameters The Switch key is used...

Page 8: ...the associated channels into a curve combination according to their own demands so as to facilitate the comparison of data between channel groups Scale The percentile scale of the curves is displayed...

Page 9: ...d If the upper limit alarm mark turns pink it means ultralimit alarm is conducted If the ultimate lower limit alarm mark turns pink it means ultralimit alarm is conducted If the ultimate lower limit a...

Page 10: ...the engineering units of 4 channels Press the 6 channels key to simultaneously display the channel bit numbers data of quantities the states of alarm and the engineering units of 6 channels Press the...

Page 11: ...ease refer to 4 12 4 2 Input Method of Channel Unit for the setting method Indication of the ultralimit alarm From the upper to the bottom the squares represent the ultralimit alarm marks of ultimate...

Page 12: ...o the right it means the current states of 1 18 limit relays respectively green means the relay contact is off while red means the relay contact is closed Operation keys Press the Switch key to switch...

Page 13: ...ng Progress bar of storage capacity Note It appears when the recording mode in the recording configuration is non cycling Operation keys Press the Switch key to switch to other displays Press the Up k...

Page 14: ...ct the places the cursor staying by pressing the OK key and then exit from the display by pressing the OK key Press the Down key to move up the cursor and correct the places the cursor staying by pres...

Page 15: ...f the instruments and the SD card ports are on the left side of the instruments The USB flash disks or the SD cards can be inserted into the instrument after opening the operation covers for data back...

Page 16: ...herwise the corresponding icon will be displayed in the status display column Operation keys Press the Switch key to switch to other displays Press the Up key to move up the cursor and correct the pla...

Page 17: ...tion Operation keys Press the Switch key to switch to other displays Press the Up key to check the power down record list upward Press the Down key to check the power down record list downward Press t...

Page 18: ...Starting time the starting time of the timed printing can be set Alarm printing turn on and turn off are optional Data clear all the data stored in the instrument including historical data alarm list...

Page 19: ...rding is carried out by creating new files after the power is on Before power down the recording is continued following the files created before power down the data during the outage period is showed...

Page 20: ...up concludes 6 curves and there are 10 curve groups available that users can choose any one based on their demands The selected curve group will be displayed on the real time curve menu Start the curv...

Page 21: ...mit of the recorded data with the setting range among 9999 19999 The number of the decimal point places of each channel can be confirmed by modifying the place of the decimal point of the upper limit...

Page 22: ...guration time will be greatly reduced if the configurations of several channels are the same 4 12 4 1 Introduction of the Input Method of the Bit Number of the Channel Configuration This instrument ad...

Page 23: ...and the d will be displayed in the Pinyin group filed 4 Press the Left Right and Up keys to move the cursor to choose the characters a 5 Press Choose key and the a will be displayed in the Pinyin grou...

Page 24: ...he bit number input III Lowercase letter input method menu Input lowercase letter a 1 Press Ok key to enter the input method menu 2 Press Cursor key to move the cursor to the input method field 3 Pres...

Page 25: ...to choose 1 9 Press Choose key to input the character 0 1 that will be displayed in the input field 10 Press Finish key to exit from the input method to finish the bit number input V Special Character...

Page 26: ...Press the Left Right and Up keys to move the cursor to choose the characters in need Press Cursor key to move the cursor to the input method field to switch the input method Press Delete key to delete...

Page 27: ...thod Menu Input capital letter A 1 Press Ok key to enter the input method menu 2 Press Cursor key to move the cursor to the input method field 3 Press the Left and Right keys to move the cursor 4 Move...

Page 28: ...inputting special unit by pressing Cursor key 5 Press Choose key to input the that will be displayed in the input field 6 Press Finish key to exit from the input method to finish the unit input 4 12 5...

Page 29: ...display instrument data setting graph generation save record and report printing By use of our software for management of the principal computer it can also conduct real time collection of data and c...

Page 30: ...ead only Float Read only n 2 n 1 Measured value of channel n Float Read only n channel number Float Read only 59 116 Measured value of channel 59 Float Read only 60 118 Measured value of channel 60 Fl...

Page 31: ...nt Short Read write The communication data are the values 10 times larger than the adjusted values For example If the cold side adjusted value is 1 0 then the communication datum is 10 4 4 Device addr...

Page 32: ...strument and use ASCII code to indicate the Chinese characters in the bit numbers and units 16 16 The 3rd and 4th characters of the bit number Short Read write 17 17 The 5th and 6th characters of the...

Page 33: ...6 42 Output channel number Char Write only Range 0 11 Note 3 37 43 Input channel Char Read write Value range 0 59 corresponding to channels 1 60 Note 1 38 44 Output type Char Read write 0 6 respective...

Page 34: ...ead write 0 Non cycling 1 cycling 53 63 Recording interval Char Read write 0 8 respectively correspond to 1 second 4 minutes 54 64 Record type Char Read write 0 3 respectively correspond to real time...

Page 35: ...termine the group to which the parameters belonging Therefore to read the alarm parameters of an input channel the alarm type should be written first Note 3 Parameters of 12 transmitting channels shar...

Reviews: