background image


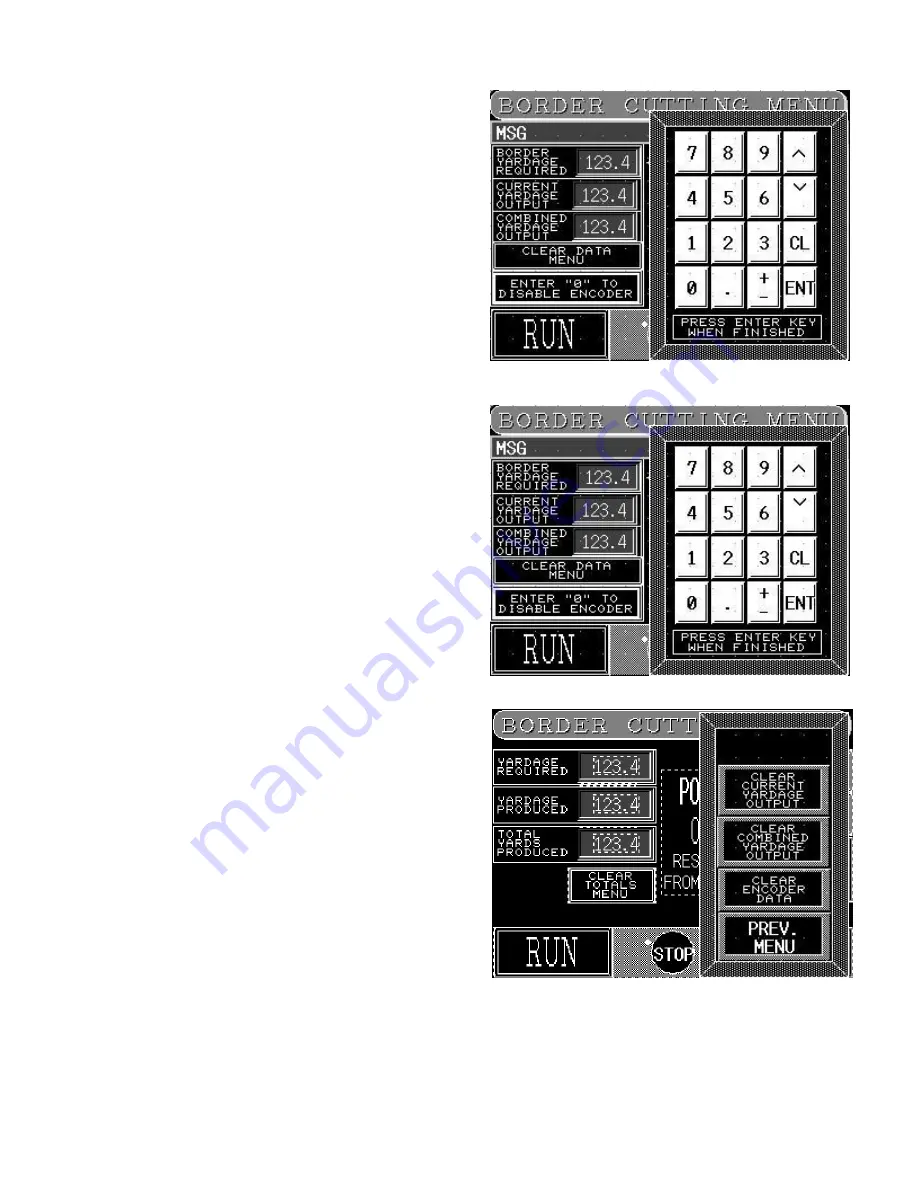
2.- BORDER QUANTITY PRODUCED 

This  is  the  number  of  preselected  border  lengths 
produced since this value was last cleared. 
 
 
After selecting a number field a number pad will come 
up.  Enter the desired number and select ENT to enter 
that number in the desired location.  


3- TOTAL BORDER OUTPUT  

This  is  the  total  number  of  border  lengths  produced 
since this value was last cleared. 
 
After selecting a number field a number pad will come 
up.  Enter the desired number and select ENT to enter 
that number in the desired location.  


4- CLEAR DATA MENU 

To erase the data on the 3 top screens. 
 
You will get 4 options:  


CLEAR BORDER QTY PRODUCED. 


CLEAR TOTAL BORDER OUTPUT. 


CLEAR ENCODER.


PREV. MENU.


From 

the 

library 

of: 

Diamond 

Needle 

Corp

Summary of Contents for 1393E

Page 1: ...a Attachment Company 362 Industrial Park Drive Lawrenceville GA 30046 770 963 7369 www atlatt com Technical Manual Parts Lists model1393E Revision 2 Updated Oct 8 2015 From the library of Diamond Needle Corp ...

Page 2: ...From the library of Diamond Needle Corp ...

Page 3: ...tion to any confidentiality and non disclosure obligations that currently exist between you and Atlanta Attachment Company your use of these materials serves as an acknowledgment of the confidential and proprietary nature of these materials and your duty not to make any unauthorized use or disclosure of these materials All materials contained herein are additionally protected by United States Copy...

Page 4: ...ndividual components 13 a Main Power 13 b Emergency Stop 13 c Touch Screen Control 13 d Table Lift Operation 14 e Panel Width Sensors 14 2 2 Touch Screen 15 Main Menu 15 2 2 1 Edge Blade Setup Adjustment Procedure 16 a Panel Cut Mode 18 b Border Cut Mode 23 c Position Trim Blades 27 d Maintenance Menu 30 e Panel Cut Batch 34 g Select Cut length 38 h Sharpen Blades 39 i Timer settings menu 40 j Con...

Page 5: ...ntenance 44 a Daily 44 b Weekly 44 c Monthly 44 3 SERVICE MANUAL 45 1 Pneumatic 45 1393E Panel Cutter Spare Parts Kit 46 XCut Drive Motor Parameters Menu INV1 48 Infeed Drive Motor Parameters Menu INV2 51 Assembly Drawings Parts Lists 55 From the library of Diamond Needle Corp ...

Page 6: ...ion Manual s for components made by other manufacturers The layout and installation diagram containing information for installation Intended Use Our machines are designed and built in line with the state of the art and the accepted safety rules However all machines may endanger the life and limb of their users and or third parties and be damaged or cause damage to other property particularly if th...

Page 7: ...is only carried out by reliable persons who have been appropriately trained for such work either within the company by our field staff or at our office and who have not only been duly appointed and authorized but are also fully familiar with the local regulations Work on the machine should only be carried out by skilled personnel under the management and supervision of a duly qualified engineer Th...

Page 8: ...achine or its mode of operation such as malfunctions faults or changes in the machine or tools appropriate steps must be taken immediately the machine switched off and a proper lockout tagout procedure followed The machine should be examined for obvious damage and defects at least once per shift Damage found shall be immediately remedied by a duly authorized person before resuming operation of mac...

Page 9: ...oever is essential for safe operation of the machine The floor should be level and clean without any waste The workplace should be well lit either by the general lighting or by local lights Emergency STOP The emergency STOP buttons bring all machine movements to a standstill Make sure you know exactly where they are located and how they work Try them out Always ensure easy access to the nearest em...

Page 10: ...ain without authorization In practice this may mean that the technician electrician and operator all attach their own padlock to the master switch simultaneously so that they can carry out their work safely Locking extension plates should be available for multiple locks if required The primary purpose for a lockout tagout procedure is to protect workers from injury caused by unexpected energizing ...

Page 11: ...machine or assemblies in a crate ensure that the ropes or arms of a forklift truck are positioned as close to the edge of the crate as possible The center of gravity is not necessarily in the middle of the crate Note the accident prevention regulations safety instructions and local regulations governing transport of the machine and its assemblies Only use suitable transport vehicles hoisting gear ...

Page 12: ...agents Use lint free rags Retighten all screw connections that have to be loosened for the maintenance and repair work Any safety mechanisms that have to be dismantled for setting up maintenance or repair purposes must be refitted and checked immediately after completing the work Maintenance Care Adjustment The activities and intervals specified in the Instruction Manual for carrying out adjustmen...

Page 13: ... electrical power supply The electrical equipment of our machines must be checked at regular intervals and any defects found must be remedied immediately If it is necessary to carry out work on live parts a second person should be on hand to operate the emergency OFF switch or master switch with voltage release in the event of an emergency The working area should be cordoned off and marked by a wa...

Page 14: ...this equipment It is also the owner s responsibility to make certain that the operator is a qualified and physically able individual properly trained in the operation of this equipment Specific safety warning decals are located on the equipment near the immediate areas of potential hazards These decals should not be removed or obliterated Replace them if they become non readable ALWAYS keep safety...

Page 15: ... all the functions and safety concerns of the unit before operating 1 1 Parts and Components 1 Main Power 5 Right Edge cut 9 Width Sensors 2 Touch Screen 6 Left Edge cut 10 Drive Rod 3 Control Panel 7 Slitter knife 11 Winder 4 Cross cut 8 Panel Table 12 Border Roll 1 2 3 4 5 6 12 7 11 8 9 10 From the library of Diamond Needle Corp ...

Page 16: ...1 2 Technical Data Foot Print From the library of Diamond Needle Corp ...

Page 17: ...tely to your supervisor Document the damage and provide details and photographs 4 Install the rollers onto the frame and be sure they can rotate freely 5 Install the back safety guard onto the frame 6 Adjoin the inner and outer board and install onto the frame adjust them to in one plane 7 Install the front safety guard shield onto the frame 8 Install the left and right protective shield onto the ...

Page 18: ...gency Stop There are red push buttons located in 4 places around the machine After pushing it the machine will be disconnected from the energy source You will need to turn the knob 1 8 revolution before reactivating the power c Touch Screen Control 1 Emergency Stop This button serves the same function as the other 3 red E Stop push buttons located on each of the four corners of the machine 2 Power...

Page 19: ...screens Panel Mode Border Mode Maint Menus e Panel Width Sensors These sensors are what determine the width of the panel being cut The top sensor is for Twins the 2nd for Fulls The 3rd for Queens The 4th for Cal Kings and the bottom for Kings These sensors are only active when in the Panel mode with the table in the UP position The scale next to the sensors is the actual width of the panel being c...

Page 20: ... screen and you will be transfer to the following sub menu PANEL MODE BORDER MODE MANUAL MODE SELECT CUT LENGTH POSITION TRIM BLADES SELECT CUT SENSOR MAINTENANCE MENU SHARPEN BLADES CONTROL POWER START POWER ON OFF INDICATOR CONTROL POWER OFF LOAD MATERIAL IN FEED ROLLER From the library of Diamond Needle Corp ...

Page 21: ...n menu Select Blade Position Set a Left Offset value to 5 00 127mm and Cut Length value to 85 00 2159mm 3 Press the Blade Position button As soon as the edge trim blades are at the LEFT and RIGHT home position proximity switches press the E Stop button YOU WILL HAVE ONLY A FEW SECONDS TO HIT THE E STOP If the trim blades come off the proximity switches then retry again From the library of Diamond ...

Page 22: ...n needed to get 90 5 2300mm and repeat Steps 3 5 until the distance between the blades measure 90 5 2300mm 6 Once Step 5 is completed return to the Blade Position menu and confirm your settings from Step 2 are still 5 00 127mm and 85 0 2159mm If these values have changed please reset to 5 00 127mm and 85 0 2300mm 7 Press the Blade Position button and measure the distance between the blades to conf...

Page 23: ...Technical Manual Parts Lists a Panel Cut Mode cuchCC6 1 2 Only on machine with Batch Mode Function From the library of Diamond Needle Corp ...

Page 24: ...L Press CONTINUE TO PANEL MODE PANEL CUTTING MENU 1 PANEL QUANTITY REQUIRED Enter the number of panels to cut Machine will stop automatically when that number is reached After selecting a number field a number pad will come up Enter the desired number and select ENT to enter that number in the desired location From the library of Diamond Needle Corp ...

Page 25: ...nce the total output number was last cleared After selecting a number field a number pad will come up Enter the desired number and select ENT to enter that number in the desired location 4 CLEAR DATA MENU To erase the data on the 3 top screens You will get 3 options CLEAR PANEL QTY PRODUCED CLEAR TOTAL PANEL OUTPUT PREV MENU 5 ACTIVE CUT SENSOR Refers to the sensors located on the cutting table Th...

Page 26: ...olumns STANDARD for normal thickness PLUSH for thick panels PILLOW TOP for extra thick panels The highlighted fields are the ones active as this time 6 1 CHANGE CUT SIZE SETTINGS after pressing this field the screen STANDARD PANEL CUT SIZES is shown You will get all the actual dimensions of the panels cut sizes From the library of Diamond Needle Corp ...

Page 27: ...NU to exit the screen 6 2 CANCEL SIZE CHANGE return to the original values 6 3 ACCEPT SIZE CHANGE record any change made on dimensions 7 FINISH PANEL allows operator to finish the panel that is presently in the machine 8 JOG BLADE allows the operator to jog both side trim blades equally in either direction to allow for shifting of the quilted material without changing the dimension 9 MAIN MENU Ret...

Page 28: ...b Border Cut Mode From the library of Diamond Needle Corp ...

Page 29: ...fter pressing BORDER CUT MODE from the MAIN MENU you will arrive to the BORDER CUTTING MENU 1 BORDER QUANTITY SET pressing the number field you will get a keyboard were you can change the numbers of pieces to be produced It is important to note that the machine will do a cross cut at the desired length of border To deactivate the measuring function set the quantity to zero From the library of Diam...

Page 30: ...location 3 TOTAL BORDER OUTPUT This is the total number of border lengths produced since this value was last cleared After selecting a number field a number pad will come up Enter the desired number and select ENT to enter that number in the desired location 4 CLEAR DATA MENU To erase the data on the 3 top screens You will get 4 options CLEAR BORDER QTY PRODUCED CLEAR TOTAL BORDER OUTPUT CLEAR ENC...

Page 31: ...FINISH When the operator is finished adjusting the blades he she will have to reset the power on button in the Main Menu to re energize the panel Once the power is on press Border Mode In the Border Mode select Blade Adjust Finish and the material will reverse feed until the dancer bar returns to the middle position Note if it is necessary to feed more material through to get back to where the sli...

Page 32: ...c Position Trim Blades From the library of Diamond Needle Corp ...

Page 33: ...be set After selecting a number field a number pad will come up Enter the desired number and select ENT to enter that number in the desired location 2 PANEL LENGTH This sets the actual length of the panel to be cut the distance between the two trim knives After selecting a number field a number pad will come up Enter the desired number and select ENT to enter that number in the desired location Fr...

Page 34: ...l be highlighted 6 POSITION TRIM BLADES When the desired changes have been entered move the Position Off selector on the panel to Position and push Position Trim Blades The blades will now readjust to the new setting 7 CONTROL POWER START If the power was shut off for whatever reasons this will need to be pressed to restore control panel power 8 MAIN MENU Return to main Menu From the library of Di...

Page 35: ...Technical Manual Parts Lists d Maintenance Menu From the library of Diamond Needle Corp ...

Page 36: ...ROLL CLOSE The main IN FEED pressure rollers will close 7 OUT FEED ROLL OPEN The pressure roller at the back of the machine will rise 8 OUT FEED ROLL CLOSE The pressure roller at the back of machine will drop 9 JOG OUT FEED ROLL The lower OUT FEED roller will turn in the normal direction of movement 10 JOG WINDER The windup roller motor will activate 11 SLITTER ROLL DOWN The slitter bypass roller ...

Page 37: ...Technical Manual Parts Lists 14 1 PLC INPUTS 14 2 PLC OUPUTS From the library of Diamond Needle Corp ...

Page 38: ... BLADES FORWARD 15 4 ROTATE X CUT BLADES REVERSE 15 5 MOVE TRIM BLADES LEFT 15 6 MOVE TRIM BLADES RIGHT 15 7 MOVE X CUT BLADE LEFT 15 8 MOVE X CUT BLADE RIGHT 15 9 IO MONITOR 16 0 TIMER SETTING MENU 16 1 MAINT MENU PAGE 1 16 2 MENU Return to the Main Menu From the library of Diamond Needle Corp ...

Page 39: ...Technical Manual Parts Lists e Panel Cut Batch 1 NUMBER FIELDS 2 BATCH DATA MENU From the library of Diamond Needle Corp ...

Page 40: ...2 1 VIEW DATA MENU 3 CROP OUT CUT MENU 4 CUT SIZE ADJUST MENU 5 MAIN MENU 6 RUN 7 WITH LENGTH PRODUCE 8 STOP From the library of Diamond Needle Corp ...

Page 41: ...Technical Manual Parts Lists f Manual Mode From the library of Diamond Needle Corp ...

Page 42: ...der winder motor will turn 5 JOG CUT BORDER WITH WINDER The material will feed and side trim with winder motor turning 6 CYCLE STOP Interrupt selected cycle 7 CYCLE MANUAL X CUT Performs one cross cut cycle 8 JOG IN FEED ROLLER AND WINDER Will advance material without trimming while the windup motor turns 9 EYE SELECTED Shows which cut sensor is active 10 CUT SENSOR DISABLE Disables cut sensor 11 ...

Page 43: ...RD PANEL CUT SIZES is shown You will get all the actual dimensions the panels sizes To change dimensions press on top of the number and modify the values 1 1 EDIT PLUSH SETTINGS To change the rest of the sizes 1 2 EDIT PILLOW TOP SETTINGS to change the rest of the sizes 1 3 RETURN TO CUT LENGTH MENU to exit the screen 2 CANCEL SIZE CHANGE Return to the original values without accepting the changes...

Page 44: ... SHARPEN RIGHT BLADE This will turn on the right trim knife motor and activate the sharpener for the predetermined time 3 SHARPEN X CUT BLADE 4 SHARPEN SLITTER BLADE 5 SHARPEN TIME 6 SHARPEN CYCLE STOP 7 TURN ON TRIM MOTORS 8 TURN ON XCUT MOTOR 9 MOVE XCUT TO L SIDE 10 TURN ON SLITTER MOTOR 11 BACK From the library of Diamond Needle Corp ...

Page 45: ...he activation trimming of the automatic grease system OPTIONAL EQUIP 2 SHARPENER RUN TIME 3 OUT FEED RUN TIME 4 SET SYSTEM CLOCK Press any of the field and change values on the Keypad Press enter Key when finish 5 MENU Return to Main Menu From the library of Diamond Needle Corp ...

Page 46: ... a Button l Control power off Press this button to de energize all the control power to the machine PLEASE NOTE THIS IS NOT THE SAME AS THE MAIN POWER m Load Material in feed roller Press LOAD MATERIAL IN FEED on the Main Menu roller and you will get 3 options OPEN IN FEED ROLLER CLOSE IN FEED ROLLER PREV MENU Return to the Main menu From the library of Diamond Needle Corp ...

Page 47: ...n Power switch is on the ON position b Press the ON button on the Control Panel Machine will show Atlanta Attachment logo and will power ON B Load the material a With the machine ON Press LOAD MATERIAL IN FEED on the Main Menu b Press OPEN INFEED ROLLER c Open the safety doors You will be able to load material thought the machine Follow the picture for a correct loading of the material From the li...

Page 48: ...antity dimensions etc f Press RUN ATTENTION Never leaves the machine unattended d Border Cutting a Carefully adjust manually the cutting blades to the right border width b Set the table Lift switch to down and install the re winder shaft b Make sure machine is loaded with material and all doors are close c Press CONTROL POWER START from the Main Menu Screen d Press BORDER MODE on the same screen e...

Page 49: ...om Right Left Trim blade bearing rails and belts 4 Clean panel width sensors 5 Check for any areas of wear or potential problems c Monthly 1 Thoroughly clean machine inside and out 2 Check condition of all drive belts 3 Check security of all blades 4 Check setting of blade sharpening stones 5 Clean threads from around all shafts and rollers 6 Clean cabinet cooling fan and filter 7 Check condition ...

Page 50: ...re of the clutch Determine how tight the roll will be winder Factory adjustment 30 psi b Main air regulator Determine the pressure for the whole machine Factory adjustment 90 psi c Blade Sharpeners Control the reassure of the blade sharpeners Factory adjustment 30 psi d Infeed Roll regulator Control de pressure of the top in feed roll Factory adjustment 20 to 40 psi A B C D From the library of Dia...

Page 51: ...E4V21008 VALVE 1 4 PORTED 24VDC 3 2 BBGER205 25 BEARING BALL 25MM B CLAMP 4 2 CJ2090200 BLADE TRIM XCUT 280MM OD 5 2 CJ21100900 BLADE SLITTER 205MM OD 6 1 EEMC12B11 CONTACTOR IEC 230VAC 7 1 EEMC32A22 CONTACTOR IEC 230VAC 8 1 EENI5Q18AN6X LIMIT SW SENSOR 9 1 EERM699V3011 RELAY REPLACEMENT From the library of Diamond Needle Corp ...

Page 52: ...wn buttons When the desired setting is found press the mode button to store the new value This will store the new value and exit the program mode To change another parameter value press the mode key again and repeat the procedure In the event the controller has not been pre programmed by AAC the default password from the factory is 225 Every SCL SCM Series drive has an Electronic Programming Modul...

Page 53: ...CURRENT LIMIT 08 AUTO SPEED 09 REVERSE 10 NONE 01 06 10 TB 13A FUNCTION SELECT NONE 01 0 10 VDC 02 4 20 mA 03 PRESET SPEED 1 04 START FORWARD 05 RUN REVERSE 06 START REVERSE 07 EXTERNAL FAULT 08 INVERSE EXT FAULT 09 AUXILARY STOP 10 ACCEL DECEL 2 11 NONE 01 06 11 TB 13B FUNCTION SELECT NONE 01 0 10 VDC 02 4 20 mA 03 PRESET SPEED 2 04 DECREASE FREQ 05 START FORWARD 06 JOG FORWARD 07 JOG REVERSE 08 ...

Page 54: ...CL 50 0 Hz SCM 60 0 Hz 80 25 CURRENT LIMIT 30 180 180 150 26 MOTOR OVERLOAD 30 100 100 27 BASE FREQUENCY 25 0 500 Hz SCL 50 0 Hz SCM 60 0 Hz 60 28 FIXED BOOST 0 0 30 0 1 0 20 29 ACCEL BOOST 0 0 20 0 0 0 30 SLIP COMPENSATION 0 0 5 0 0 00 31 PRESET SPEED 0 0 MAXIMUM FREQUENCY 0 0 Hz 70 32 PRESET SPEED 0 0 MAXIMUM FREQUENCY 0 0 Hz 35 33 37 0 0 0 0 38 SKIP BANDWIDTH 0 0 10 Hz 0 0 Hz 39 SPEED SCALING 0...

Page 55: ...T HISTORY VIEW ONLY N A 51 SOFTWARE CODE VIEW ONLY N A 52 DC BUS VOLTAGE VIEW ONLY N A 53 MOTOR VOLTAGE VIEW ONLY N A 54 LOAD VOLTAGE VIEW ONLY N A 55 0 10 VDC INPUT VIEW ONLY N A 56 4 20mA INPUT VIEW ONLY N A 57 TB STRIP STATUS VIEW ONLY N A 58 KEYPAD STATUS VIEW ONLY N A PASSWORD IS SET TO 000 WHICH DISABLES THE PASSWORD FUNCTION From the library of Diamond Needle Corp ...

Page 56: ... 08 AUTO SPEED 09 REVERSE 10 NONE 01 06 10 TB 13A FUNCTION SELECT NONE 01 0 10 VDC 02 4 20 mA 03 PRESET SPEED 1 04 START FORWARD 05 RUN REVERSE 06 START REVERSE 07 EXTERNAL FAULT 08 INVERSE EXT FAULT 09 AUXILARY STOP 10 ACCEL DECEL 2 11 NONE 01 06 11 TB 13B FUNCTION SELECT NONE 01 0 10 VDC 02 4 20 mA 03 PRESET SPEED 2 04 DECREASE FREQ 05 START FORWARD 06 JOG FORWARD 07 JOG REVERSE 08 EXTERNAL FAUL...

Page 57: ...UENCY 240 Hz SCL 50 0 Hz SCM 60 0 Hz 80 25 CURRENT LIMIT 30 180 180 150 26 MOTOR OVERLOAD 30 100 100 27 BASE FREQUENCY 25 0 500 Hz SCL 50 0 Hz SCM 60 0 Hz 60 28 FIXED BOOST 0 0 30 0 1 0 20 29 ACCEL BOOST 0 0 20 0 0 0 30 SLIP COMPENSATION 0 0 5 0 0 00 31 PRESET SPEED 0 0 MAXIMUM FREQUENCY 0 0 Hz 60 32 PRESET SPEED 0 0 MAXIMUM FREQUENCY 0 0 Hz 35 33 37 0 0 0 0 38 SKIP BANDWIDTH 0 0 10 Hz 0 0 Hz 39 S...

Page 58: ... ONLY N A 51 SOFTWARE CODE VIEW ONLY N A 52 DC BUS VOLTAGE VIEW ONLY N A 53 MOTOR VOLTAGE VIEW ONLY N A 54 LOAD VOLTAGE VIEW ONLY N A 55 0 10 VDC INPUT VIEW ONLY N A 56 4 20mA INPUT VIEW ONLY N A 57 TB STRIP STATUS VIEW ONLY N A 58 KEYPAD STATUS VIEW ONLY N A PASSWORD IS SET TO 000 WHICH DISABLES THE PASSWORD FUNCTION From the library of Diamond Needle Corp ...

Page 59: ...Technical Manual Parts Lists From the library of Diamond Needle Corp ...

Page 60: ...any confidentiality and non disclosure obligations that currently exist between you and Atlanta Attachment Company your use of these materials serves as an acknowledgment of the confidential and proprietary nature of these materials and your duty not to make any unauthorized use or disclosure of these materials From the library of Diamond Needle Corp ...

Reviews: