1 0
1 0
1 0
1 0
1 0
Q u i c k i n s t a l l a t i o n g u i d e
Q u i c k i n s t a l l a t i o n g u i d e
Q u i c k i n s t a l l a t i o n g u i d e
Q u i c k i n s t a l l a t i o n g u i d e
Q u i c k i n s t a l l a t i o n g u i d e
English
4.
F o r S A T A H D D
F o r S A T A H D D
F o r S A T A H D D
F o r S A T A H D D
F o r S A T A H D D: Connect the
SATA signal and power plugs to
the connectors at the back of
the drive.
For IDE HDD
For IDE HDD
For IDE HDD
For IDE HDD
For IDE HDD: Connect the IDE
and power plugs to the connectors
at the back of the drive.
S A T A
S A T A
S A T A
S A T A
S A T A
I D E
I D E
I D E
I D E
I D E
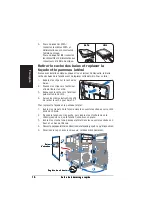
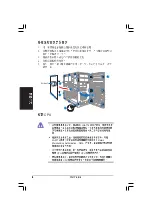
Removing the bay covers and reinstalling
the front panel assembly and side cover
If you installed an optical and/or floppy disk drive, remove the bay cover(s)
on the front panel assembly before reinstalling it to the chassis. To do this:
1.
Locate the bay cover locks.
2.
Press the locks outward to
release the bay cover.
3.
Push the bay cover inward, then
set it aside.
4.
Follow the same instructions to
remove the 3.5” drive bay cover.
A i r d u c t
A i r d u c t
A i r d u c t
A i r d u c t
A i r d u c t
To reinstall the front panel assembly and side cover:
1.
Insert the front panel assembly hinge-like tabs to the holes on the
right side of the chassis.
2.
Swing the front panel assembly to the left, then insert the hooks to
the chassis until the front panel assembly fits in place.
3.
Insert the six side cover hooks into the chassis tab holes .
4.
Push the side cover to the direction of the front panel until it fits in place.
5.
Secure the cover with two screws you removed earlier.
2
2
2
2
2
1
1
1
1
1
3
3
3
3
3
2
2
2
2
2
5
5
5
5
5
5
5
5
5
5
1
1
1
1
1
1
1
1
1
1
2
2
2
2
2
2
2
2
2
2
4
4
4
4
4
C h a s s i s t a b h o l e s
C h a s s i s t a b h o l e s
C h a s s i s t a b h o l e s
C h a s s i s t a b h o l e s
C h a s s i s t a b h o l e s
Summary of Contents for V2-PH1
Page 1: ...English Vintage2 PH1 Barebone System Quick Installation Guide ...
Page 11: ...Français Vintage2 PH1 Système barebone Guide de démarrage rapide ...
Page 21: ...Vintage2 PH1 ...
Page 25: ...5 5 5 5 5 1 2 CPU 4 CPU 3 A B A B ...
Page 26: ...6 6 6 6 6 5 CPU CPU CPU 7 6 CPU A B ...
Page 28: ...8 8 8 8 8 1 2 3 4 2 1 3 4 1 2 3 4 DDR DIMM ...
Page 29: ...9 9 9 9 9 1 2 5 25 3 4 A IDE B C 3 3 2 1 2 3 4 A B 3 3 2 A B A C B 1 2 3 3 3 2 ...
Page 31: ...Vintage2 PH1 ...
Page 35: ...5 5 5 5 5 1 2 CPU 4 CPU 3 A B A B ...
Page 36: ...6 6 6 6 6 5 CPU CPU CPU 7 6 CPU A B ...
Page 38: ...8 8 8 8 8 1 2 3 4 2 1 3 4 1 2 3 4 DDR DIMM ...
Page 39: ...9 9 9 9 9 1 2 5 25 3 4 A IDE B C 3 3 2 1 2 3 4 A B 3 3 2 A B A C B 1 2 3 3 3 2 ...
Page 41: ...Vintage2 PH1 ...
Page 42: ...2 2 2 2 2 REAR S P K LINE IN FRONT MIC IN SIDE S P K C T R BASS ...
Page 44: ...4 4 4 4 4 ...
Page 45: ...5 5 5 5 5 A A A A A B B B B B 3 3 3 3 3 O O A A A A A B B B B B ...
Page 46: ...6 6 6 6 6 A A A A A B B B B B ...
Page 47: ...7 7 7 7 7 A A A A A A A A A A B B B B B B B B B B 1 1 1 1 1 1 1 1 1 1 A B B A ...
Page 48: ...8 8 8 8 8 1 1 1 1 1 2 2 2 2 2 3 3 3 3 3 4 4 4 4 4 ...
Page 49: ...9 9 9 9 9 3 3 2 3 3 2 3 3 2 C C C C C B B B B B A A A A A B B B B B A A A A A ...
Page 51: ...䚐ạ㛨 䚐ạ㛨 䚐ạ㛨 Vintage2 PH1 㙆 㙆 ΦΚΔΜ 昪獞 儆決姢 ΦΚΔΜ 昪獞 儆決姢 ...
Page 61: ...Türkçe Vintage2 PH1 Barebone Sistemleri H zl Kurulum K lavuzu ...


