


7
7
7
7
7
Q u i c k i n s t a l l a t i o n g u i d e
Q u i c k i n s t a l l a t i o n g u i d e
Q u i c k i n s t a l l a t i o n g u i d e
Q u i c k i n s t a l l a t i o n g u i d e
Q u i c k i n s t a l l a t i o n g u i d e
English
Installing the CPU fan and heatsink assembly
The Intel
®
Pentium
®
4/Intel
®
Pentium
®
D LGA775 processor requires a
specially designed heatsink and fan assembly to ensure optimum thermal
condition and performance.
•
When you buy a boxed Intel
®
Pentium
®
4 processor, the package
includes the CPU fan and heatsink assembly. If you buy a CPU
separately, make sure that you use only Intel
®
-certified
multi-directional heatsink and fan.
•
Your Intel
®
Pentium
®
4 LGA775 heatsink and fan assembly comes in
a push-pin design and requires no tool to install.
If you purchased a separate CPU heatsink and fan assembly, make sure
that a Thermal Interface Material is properly applied to the CPU heatsink
or CPU before you install the heatsink and fan assembly.
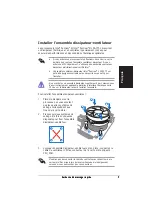
To install the CPU heatsink and fan:
1.
Place the heatsink on top of the
installed CPU, making sure that
the four fasteners match the
holes on the motherboard.
3.
When the fan and heatsink assembly is in place, connect the CPU fan
cable to the connector on the motherboard.
A
B
B
2.
Push down two fasteners at a
time in a diagonal sequence to
secure the heatsink and fan
assembly in place.
Do not forget to connect the CPU fan connector! Hardware monitoring
errors can occur if you fail to plug this connector.
A
A
A
A
A
A
A
A
A
A
B
B
B
B
B
B
B
B
B
B
1
1
1
1
1
1
1
1
1
1
A
Summary of Contents for V2-PH1
Page 1: ...English Vintage2 PH1 Barebone System Quick Installation Guide ...
Page 11: ...Français Vintage2 PH1 Système barebone Guide de démarrage rapide ...
Page 21: ...Vintage2 PH1 ...
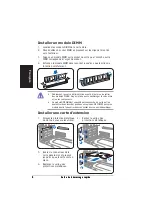
Page 25: ...5 5 5 5 5 1 2 CPU 4 CPU 3 A B A B ...
Page 26: ...6 6 6 6 6 5 CPU CPU CPU 7 6 CPU A B ...
Page 28: ...8 8 8 8 8 1 2 3 4 2 1 3 4 1 2 3 4 DDR DIMM ...
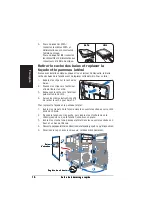
Page 29: ...9 9 9 9 9 1 2 5 25 3 4 A IDE B C 3 3 2 1 2 3 4 A B 3 3 2 A B A C B 1 2 3 3 3 2 ...
Page 31: ...Vintage2 PH1 ...
Page 35: ...5 5 5 5 5 1 2 CPU 4 CPU 3 A B A B ...
Page 36: ...6 6 6 6 6 5 CPU CPU CPU 7 6 CPU A B ...
Page 38: ...8 8 8 8 8 1 2 3 4 2 1 3 4 1 2 3 4 DDR DIMM ...
Page 39: ...9 9 9 9 9 1 2 5 25 3 4 A IDE B C 3 3 2 1 2 3 4 A B 3 3 2 A B A C B 1 2 3 3 3 2 ...
Page 41: ...Vintage2 PH1 ...
Page 42: ...2 2 2 2 2 REAR S P K LINE IN FRONT MIC IN SIDE S P K C T R BASS ...
Page 44: ...4 4 4 4 4 ...
Page 45: ...5 5 5 5 5 A A A A A B B B B B 3 3 3 3 3 O O A A A A A B B B B B ...
Page 46: ...6 6 6 6 6 A A A A A B B B B B ...
Page 47: ...7 7 7 7 7 A A A A A A A A A A B B B B B B B B B B 1 1 1 1 1 1 1 1 1 1 A B B A ...
Page 48: ...8 8 8 8 8 1 1 1 1 1 2 2 2 2 2 3 3 3 3 3 4 4 4 4 4 ...
Page 49: ...9 9 9 9 9 3 3 2 3 3 2 3 3 2 C C C C C B B B B B A A A A A B B B B B A A A A A ...
Page 51: ...䚐ạ㛨 䚐ạ㛨 䚐ạ㛨 Vintage2 PH1 㙆 㙆 ΦΚΔΜ 昪獞 儆決姢 ΦΚΔΜ 昪獞 儆決姢 ...
Page 61: ...Türkçe Vintage2 PH1 Barebone Sistemleri H zl Kurulum K lavuzu ...


