


6
6
6
6
6
Q u i c k i n s t a l l a t i o n g u i d e
Q u i c k i n s t a l l a t i o n g u i d e
Q u i c k i n s t a l l a t i o n g u i d e
Q u i c k i n s t a l l a t i o n g u i d e
Q u i c k i n s t a l l a t i o n g u i d e
English
G o l d
G o l d
G o l d
G o l d
G o l d
t r i a n g l e
t r i a n g l e
t r i a n g l e
t r i a n g l e
t r i a n g l e
m a r k
m a r k
m a r k
m a r k
m a r k
A l i g n m e n t k e y
A l i g n m e n t k e y
A l i g n m e n t k e y
A l i g n m e n t k e y
A l i g n m e n t k e y
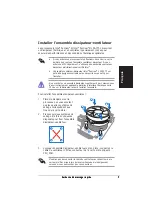
7.
Close the load plate (A), then
push the load lever (B) until it
snaps into the retention tab.
5.
Position the CPU over the
socket, making sure that the
gold triangle is on the
bottom-left corner of the
socket then fit the socket
alignment key into the CPU
notch.
A
A
A
A
A
B
B
B
B
B
6.
Apply Thermal Interface Material
on the CPU before reinstalling
the heatsink and fan assembly.
D O N O T
D O N O T
D O N O T
D O N O T
D O N O T eat the Thermal
Interface Material. If it gets
into your eyes or touches
your skin, make sure to wash
it off immediately, and seek
professional medical help.
C P U n o t c h
C P U n o t c h
C P U n o t c h
C P U n o t c h
C P U n o t c h
Summary of Contents for V2-PH1
Page 1: ...English Vintage2 PH1 Barebone System Quick Installation Guide ...
Page 11: ...Français Vintage2 PH1 Système barebone Guide de démarrage rapide ...
Page 21: ...Vintage2 PH1 ...
Page 25: ...5 5 5 5 5 1 2 CPU 4 CPU 3 A B A B ...
Page 26: ...6 6 6 6 6 5 CPU CPU CPU 7 6 CPU A B ...
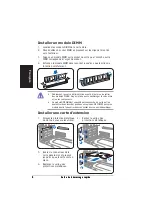
Page 28: ...8 8 8 8 8 1 2 3 4 2 1 3 4 1 2 3 4 DDR DIMM ...
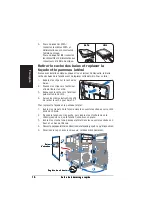
Page 29: ...9 9 9 9 9 1 2 5 25 3 4 A IDE B C 3 3 2 1 2 3 4 A B 3 3 2 A B A C B 1 2 3 3 3 2 ...
Page 31: ...Vintage2 PH1 ...
Page 35: ...5 5 5 5 5 1 2 CPU 4 CPU 3 A B A B ...
Page 36: ...6 6 6 6 6 5 CPU CPU CPU 7 6 CPU A B ...
Page 38: ...8 8 8 8 8 1 2 3 4 2 1 3 4 1 2 3 4 DDR DIMM ...
Page 39: ...9 9 9 9 9 1 2 5 25 3 4 A IDE B C 3 3 2 1 2 3 4 A B 3 3 2 A B A C B 1 2 3 3 3 2 ...
Page 41: ...Vintage2 PH1 ...
Page 42: ...2 2 2 2 2 REAR S P K LINE IN FRONT MIC IN SIDE S P K C T R BASS ...
Page 44: ...4 4 4 4 4 ...
Page 45: ...5 5 5 5 5 A A A A A B B B B B 3 3 3 3 3 O O A A A A A B B B B B ...
Page 46: ...6 6 6 6 6 A A A A A B B B B B ...
Page 47: ...7 7 7 7 7 A A A A A A A A A A B B B B B B B B B B 1 1 1 1 1 1 1 1 1 1 A B B A ...
Page 48: ...8 8 8 8 8 1 1 1 1 1 2 2 2 2 2 3 3 3 3 3 4 4 4 4 4 ...
Page 49: ...9 9 9 9 9 3 3 2 3 3 2 3 3 2 C C C C C B B B B B A A A A A B B B B B A A A A A ...
Page 51: ...䚐ạ㛨 䚐ạ㛨 䚐ạ㛨 Vintage2 PH1 㙆 㙆 ΦΚΔΜ 昪獞 儆決姢 ΦΚΔΜ 昪獞 儆決姢 ...
Page 61: ...Türkçe Vintage2 PH1 Barebone Sistemleri H zl Kurulum K lavuzu ...


