


Chapter 3: Installation options
3-2
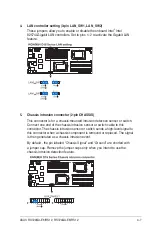
3.1
Installing friction rail kit items
Your friction rail kit package contains:
•
Two pairs of rack rails (for the rack)
•
Nut-and-bolt type screws and one pair of server latches
Nuts and screws
Front rack rails
Rear rack rails
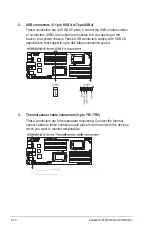
3.1.1
Attaching the fixing latches to the server
Refer to the figures below for the locations to attach the two fixing latches to the
two sides of the server with four screws.
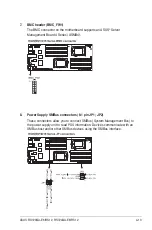
1. Remove the two screws on the side of the server chassis.
2. Secure the fixing latch with the two screws you removed in step 1.
3. Repeat step 1 to 2 to secure another fixing latch to the other side of the
server.
2
1
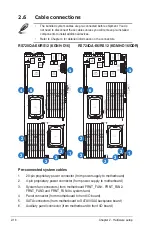
Summary of Contents for RS720QA-E6/RS12
Page 1: ...2U Rackmount Server RS720QA E6 RS12 RS724QA E6 RS12 User Guide ...
Page 20: ...Chapter 1 Product introduction 1 10 ...
Page 44: ...Chapter 2 Hardware setup 2 24 ...
Page 50: ...4 2 Chapter 4 Motherboard information 4 1 Motherboard layouts KGNH D16 For RS720QA E6 RS12 ...
Page 51: ...ASUS RS720QA E6 RS12 RS724QA E6 RS12 4 3 KGMH D16 QDR For RS724QA E6 RS12 ...
Page 118: ...6 14 Chapter 6 RAID configuration ...


