


ASUS P8B WS
3-3
Main
Ai Tweaker
Advanced
Monitor
Boot
Tool
Exit
Version 2.00.1201. Copyright (C) 2011 American Megatrends, Inc.
[X.M.P.] When XMP is enabled BLCK
frequency, CPU ratio and memory
parameters will be auto optimized.
→←
: Select Screen
↑↓
: Select Item
Enter: Select
+/-: Change Opt.
F1: General Help
F2: Previous Values
F5: Optimized Defaults
F10: Save ESC: Exit
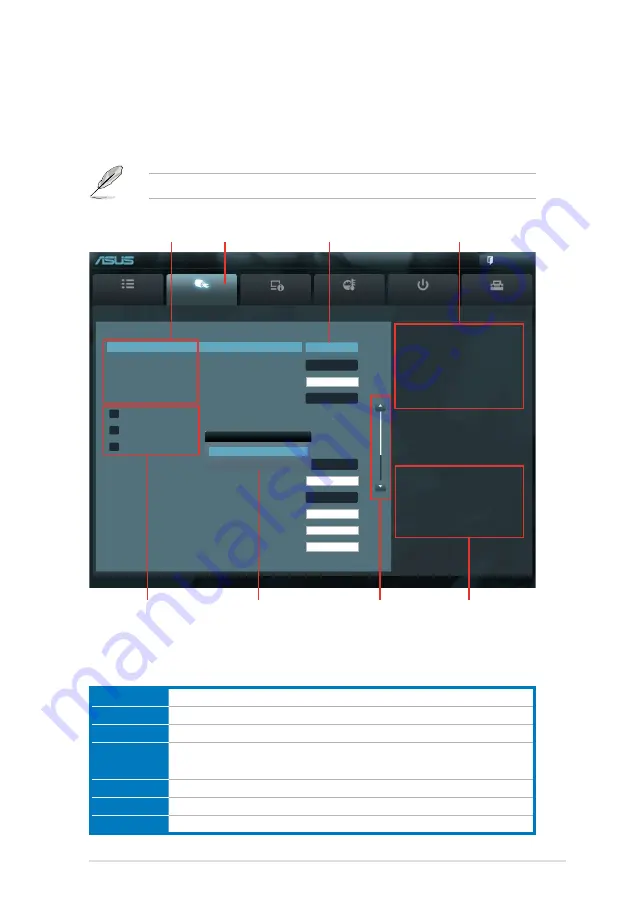
EFI BIOS Utility - Advanced Mode
3.2.2
Advanced Mode
The Advanced Mode provides advanced options for experienced end-users to
configure the BIOS settings. The figure below shows an example of the Advanced
Mode. Refer to the following sections for the detailed configurations.
To access the EZ Mode, click
Exit
, then select
ASUS EZ Mode
.
Menu bar
The menu bar on top of the screen has the following main items:
Main
For changing the basic system configuration
Ai Tweaker
For changing the overclocking settings
Advanced
For changing the advanced system settings
Monitor
For displaying the system temperature, power status, and changing the
fan settings.
Boot
For changing the system boot configuration
Tool
For configuring options for special functions
Exit
For selecting the exit options and loading default settings
Navigation keys
General
help
Menu bar
Submenu item
Configuration
fields
Menu
items
Scroll bar
Pop-up window
Ai Overclock Tuner
Auto
Manual
Target DRAM Speed : 1066MHz
Ai Overclock Tuner
Auto
Memory Frequency
Auto
iGPU Max. Frequency
Auto
EPU Power Saving Mode
Disabled
> GPU Boost
> DRAM Timing Control
> CPU Power Management
CPU Offset Mode Sign
+
CPU Voltage
1.165V
Auto
iGPU Offset Mode Sign
+
iGPU Voltage
Auto
DRAM Voltage
1.550V
Auto
VCCIO Voltage
1.050V
Auto
Summary of Contents for P8B WS
Page 1: ...Motherboard P8B WS ...
Page 14: ...xiv ...
Page 24: ...1 8 Chapter 1 Product Introduction ...
Page 57: ...A B 1 2 3 2 3 2 CPU installation ASUS P8B WS 2 31 ...
Page 58: ...C B A 5 6 4 2 32 Chapter 2 Hardware information ...
Page 61: ...1 2 3 To remove a DIMM 2 3 4 DIMM installation B A ASUS P8B WS 2 35 ...
Page 63: ...DO NOT overtighten the screws Doing so can damage the motherboard 3 ASUS P8B WS 2 37 ...
Page 64: ...2 3 6 ATX Power connection 1 2 OR 2 38 Chapter 2 Hardware information ...
Page 65: ...2 3 7 SATA device connection 2 OR 1 ASUS P8B WS 2 39 ...
Page 71: ...Connect to 5 1 channel Speakers Connect to 7 1 channel Speakers ASUS P8B WS 2 45 ...
Page 74: ...2 48 Chapter 2 Hardware information ...
Page 138: ...4 20 Chapter 4 Software support ...