background image

Configuring the Unit via its Web Interface

System

ENC 1202 

Version 1.0 Page 

22

4.4  System

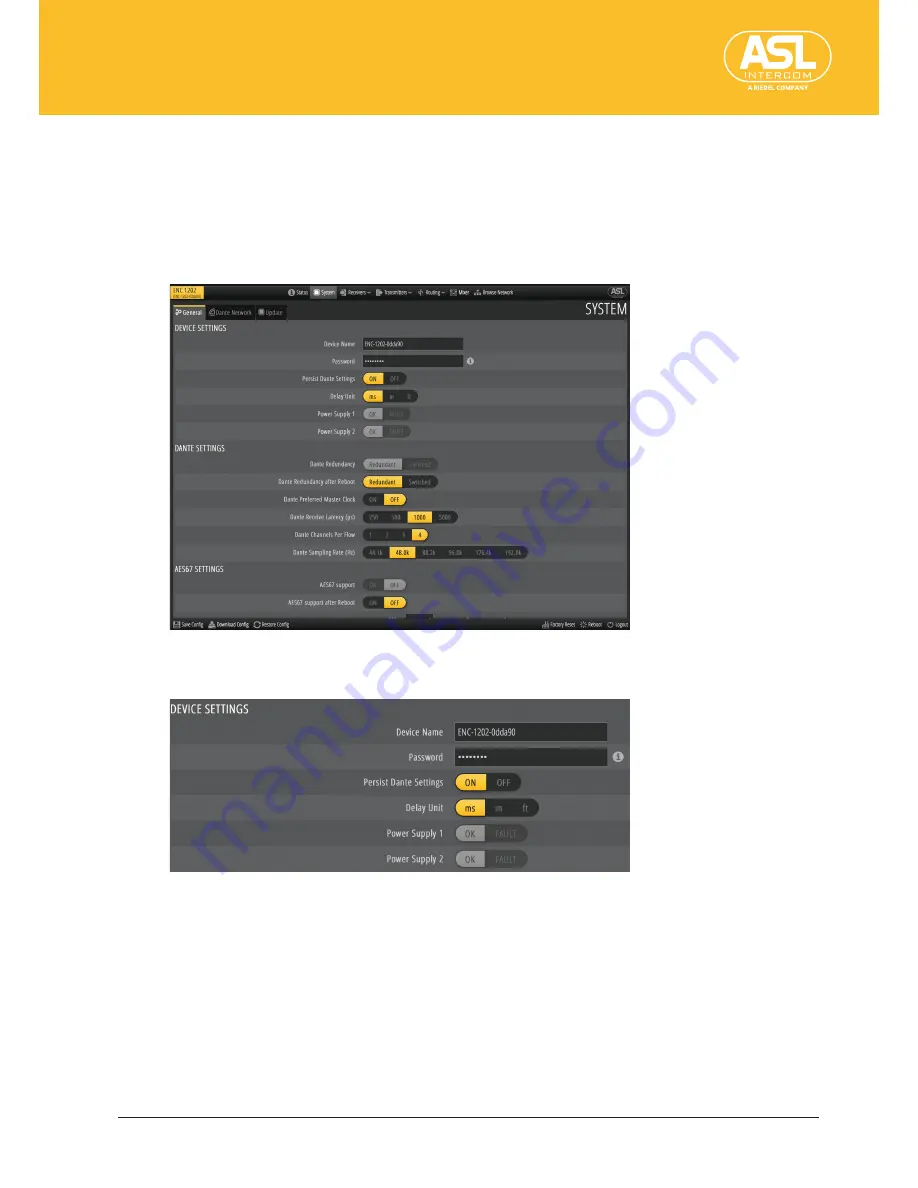
Click [System] on the navigation bar to display the following page. As its name implies, 

this page allows you to edit system-related parameters.  

There are 3 sections that can be selected using the tabs below the menu bar: General, 

Dante Network and Updates.

4.4.1  System > General

DEVICE SETTINGS

This is where you can edit global parameters related to the unit itself.

Device Name

This parameter helps users to identify the current ENC 1202 on a larger network.  

The device name also doubles as the unit’s host name. 

Note:

•  To access the ENC 1202’s web interface remotely using your browser, remember to add “.local” 

(or search domain) to the name shown here.

By default, the name is “ENC-1202-XXXXXX”, where “XXXXXX” refers to the last six alphanu-

meric characters of the MAC address (see “The ENC 1202’s address”, p. 11). In addition 

to changing the name here, you can specify it using the free Dante Controller software.

Summary of Contents for ENCHORUS ENC 1202

Page 1: ...Operating Instructions ENCHORUS ENC 1202 Version 1 0 ...

Page 2: ... the design mark ASL Intercom BV reserves the right to take legal action in the event of infringements The contents of this document the illustrations and the technical specifications are subject to change without prior notice Any product or service names mentioned in this document are trademarks of the respective manufacturers and are hereby acknowledged ASL Intercom BV Zonnebaan 42 3542 EG Utrec...

Page 3: ...ics 15 4 2 Function Bar 16 4 2 1 Left Part of the Function Bar 16 4 2 2 Right Part of the Function Bar 17 4 3 Status 19 4 4 System 22 4 4 1 System General 22 4 4 2 System Dante Network 26 4 4 3 System Update 28 4 5 Receivers Inputs 29 4 5 1 Receivers Inputs General 29 4 5 2 Receivers Inputs Metering 32 4 5 3 Receivers Inputs Labels 32 4 6 Transmitters Outputs 34 4 6 1 Transmitters Outputs General ...

Page 4: ...ENC 1202 Version 1 0 Page 4 Table of Contents 6 Enchorus ENC 1202 Specifications 49 6 1 Block Diagram 50 6 2 Pin Wiring 51 7 Index 52 ...

Page 5: ... Features The ENC 1202 provides the following features 8x balanced XLR line outputs 4x line inputs 1x RJ45 Inputs and outputs electronically balanced Configuration via a built in web interface 8x Dante inputs and outputs 2x Dante LAN ports switched or redundant mode Redundant power supply 8x built in 16 in 2 mixers Built in audio matrix Equalizers on all physical inputs and outputs Low cut 12 18 2...

Page 6: ... the event of a defect for which ASL can be held accountable the manufacturer has the right to repair or replace the unit at his own discretion Claims regarding material or legal defects shall be null and void if they can be attributed to the fact that the user failed to heed the instructions set out in this document applicable laws and or other instructions issued by ASL This product is supplied ...

Page 7: ...R open remove the unit s enclosure Do not allow any objects to penetrate the unit through the air vents Immediately turn the power off and remove the power cord if the device produces smoke or an unusual smell Always grasp only the plug on the power cord when plugging into or unplugging from an outlet or this unit ONLY use this unit in a dry environment swiftly wipe away any liquid that spills on ...

Page 8: ... the sides to allow the air to circulate freely Never cover the device or its air vents Heat build up inside the unit needs to be avoided at all cost The heat may damage the device and cause a fire Never place this unit in the vicinity of flammable material flammable liquids etc Never place this unit on the floor without its rubber bumpers Whenever possible place the unit on a heat resistant surfa...

Page 9: ...g Up 3 1 ENC 1202 Panels Front Panel 1 1 8 XLR connectors Line Outputs 1 8 Rear Panel 2 3 4 6 5 7 8 2 PRIMARY Dante port 3 SECONDARY Dante port 4 RJ45 port Line In 1 4 5 Cooling fan Never obstruct this area 6 POWER 1 connector 7 POWER 2 connector 8 Grounding screw ...

Page 10: ...le devices Connect the ENC 1202 s PRIMARY port to a router switch of the first audio network Connect the ENC 1202 s SECONDARY port to a router switch of the second audio net work Be sure to connect the PRIMARY and SECONDARY Dante ports to two separate net works that are completely isolated from each other Only then will Dante be able to automatically switch to the SECONDARY port if an error occurs...

Page 11: ...02 is configured to automatically request IP addresses for both Dante ports via DHCP If you already know the IP address enter it into the browser s address bar and press the ENTER key on the computer keyboard 192 168 1 34 this is only an example As an alternative you can enter the ENC 1202 s host name into your browser s address bar The host name looks something like this ENC 1202 XXXXXX local XXX...

Page 12: ...yed If Dante Controller fails to display the IP address of a connected ENC series device pro ceed as follows 1 Leave Dante Controller running 2 Disconnect the ENC 1202 from the wall outlet to switch it off 3 Reconnect the ENC 1202 to a wall outlet 4 Click Dante Controller s Device Info tab and wait 15 seconds The ENC 1202 s IP address is displayed in Dante Controller s list 5 Assign a static IP ad...

Page 13: ...tribution 9 16 Audio signal distribution 17 24 Expandable Mixer Out audio signal for the press Fixed Installation and Power Amp Rack The Enchorus ENC 1202 provides a Delay function for each of the 8 line outputs with a delay time of up to 2 7 seconds So does the ENC 1101 for its AES3 outputs This can be used to correct timing differences just before the power amplifiers without the need for an add...

Page 14: ...to prepare the desired mix for the left and right channels respectively That signal could be transmitted to a second Enchorus ENC 1101 or ENC 1202 via Dante to feed additional outputs This allows you to feed the entire power amp rack via Dante reducing the cable count to just a single CAT 5 or two for a redundant setup ...

Page 15: ...ation bar shows the model and device names The main menu is located at the center of the navigation bar To select a menu item or a submenu move the mouse towards the desired entry Clicking the desired menu item opens the related menu or function 2 Work area The work area displays detailed information about the selected menu item In many instances the work area is divided into several tabs Click on...

Page 16: ...e uploaded to another ENC 1202 unit see Restore Config 1 Click the Download Config button A dialog is displayed allowing you to specify where the configuration file should be stored 2 Select Save file and click Ok 3 Specify where you want to save the file if the location isn t selected by default The xml version of your configuration is downloaded Restore Config To transmit an xml configuration fi...

Page 17: ...before initializing it 1 Click Factory Reset to open the following window 2 Click OK to confirm this command or Cancel if you don t want to proceed If you confirm the ENC 1202 reboots and restores the factory settings Reboot If for some reason the ENC 1202 needs to be restarted click Reboot If you do the fol lowing confirmation dialog is displayed Click OK to confirm this command or Cancel if you ...

Page 18: ... password to something else using the Password p 23 parameter If you think a password is unnecessary for your application you can erase the current one If you do Login and Logout are no longer displayed To protect the ENC 1202 from tampering and restore the Login and Logout buttons simply specify a password again ...

Page 19: ...ferent panes LAN 1 LAN 2 Status In the top right corner you can check the status of the two Dante ports The following color coding system is used to display the status of these two RJ45 ports 1G Both LEDs and the label are displayed in green The port runs at 1 gigabit in full duplex mode 100 The left LED and the text are displayed in orange the right LED lights green The port runs at 100 megabits ...

Page 20: ...eter Uptime Indicates for how long the unit has been running without interruption Temperature Power Supply Indicates the temperature of the power supply Temperature CPU Indicates the temperature of the central processing unit VERSIONS The Versions section lists the software firmware and hardware versions Dante Model ID The ENC 1202 s model ID is 105 Dante Software The Brooklyn II module s firmware...

Page 21: ...ure All configuration files you save specify the XML version number they use Configuration files are upward compatible so there should be no problem with newer xml versions Hardware The ENC 1202 s hardware revision number DANTE NETWORK PRIMARY and DANTE NETWORK SECONDARY The Dante Network Primary and Dante Network Secondary sections display informa tion about the two Dante networks The values show...

Page 22: ...ere you can edit global parameters related to the unit itself Device Name This parameter helps users to identify the current ENC 1202 on a larger network The device name also doubles as the unit s host name Note To access the ENC 1202 s web interface remotely using your browser remember to add local or search domain to the name shown here By default the name is ENC 1202 XXXXXX where XXXXXX refers ...

Page 23: ...k View window to open the Device View click Device Con fig and Clear Config to reset the ENC 1202 You also need to reboot it Note that resetting the ENC 1202 causes it to load the factory default settings Persist Dante Settings Set Persist Dante Settings to OFF if you want the ENC 1202 to automatically save edits made via Dante using Dante Controller for instance Such changes will overwrite the in...

Page 24: ...the physical configuration of your network tends to change or if some devices are not available on a permanent basis specifying a device that you know will always be there may be a safer bet though If you want the ENC 1202 to act as the master clock source set this parameter to ON Note If two or more devices on the network are defined as Preferred Masters the one with the lowest MAC address will p...

Page 25: ...GS AES67 support AES67 is a standard for audio over IP interoperability Devices in AES67 mode are able to transmit and receive AES67 multicast flows to from non Dante AES67 enabled devices Between Dante devices Dante s native audio transport protocol is used even when AES67 is enabled for both devices This is where you can check whether the ENC 1202 s AES67 mode is active or not This can be set wi...

Page 26: ...port s clock is standing by See Dante Preferred Master Clock p 24 if you want the ENC 1202 to act as master Tx util Indicates the bandwidth used for transmitting data in kbit s Rx util Indicates the bandwidth used for receiving data in kbit s DHCP Active Displays the status of the IP address The desired setting needs to be selected with the next parameter OFF Static The ENC 1202 uses a fixed IP ad...

Page 27: ... check and modify the standard Gateway setting A default gateway in computer networking is the node that is assumed to know how to forward packets to other networks Typically in a TCP IP network nodes such as servers workstations and network devices each have a defined default route setting pointing to the default gate way This specifies where to send packets for IP addresses for which they can de...

Page 28: ...ww asl inter com 2 Click the Select ENCHORUS update file button at the left A dialog window is displayed 3 Select the update file 4 Click Upload Update The software is updated and the ENC 1202 reboots If a software update also requires an updated firmware version this is mentioned explicitly on the relevant www asl inter com downloads html page In that case use Select ENCHORUS firmware file and th...

Page 29: ... functions are displayed on an orange background Mute Clicking Mute orange will switch that channel off Phase Clicking Phase orange will invert the signal phase 180 EQ All of the ENC 1202 s physical inputs are equipped with an equalizer This is where you can activate it orange or switch it off See EQ p 30 for a detailed discussion of the equalizer Edit EQ Edit EQ is always displayed in orange Clic...

Page 30: ...r this parameter is 15dBu 24dBu Hold down the Shift key while double clicking the fader to reset the fader to 0dBu Double click the fader to set it to the minimum value Peak Level The Peak Level L and Peak Level R meters show the peak levels of the left and right channels The audio signal s current level is displayed in orange on a scale between dBFS corre sponds to 126dBFS and 0dBFS EQ The ENC 12...

Page 31: ... the frequencies above the cutoff frequency are boosted or cut Low shelf With this filter type the frequencies below the cutoff frequency are boosted or cut Low pass With this filter type all frequencies above the cutoff frequency are attenuated This filter has a fixed slope Peak In Peak mode sometimes also called bell all 3 knob icons are available This filter type boosts or cuts the frequency ra...

Page 32: ...ew the levels 126dBFS 0dBFS of the corresponding input chan nels The levels of the Line inputs can be changed using Trim p 29 4 5 3 Receivers Inputs Labels By default all input channels have names based on their types like 01 DANTE RX for the first Dante input This pane allows you to assign more meaningful names The channels are grouped by type and displayed on separate tabs Be sure to check wheth...

Page 33: ... its Web Interface Receivers Inputs ENC 1202 Version 1 0 Page 33 Label The text field displays the channel s current name To edit a label click the field enter the desired name and press the ENTER key on the computer keyboard ...

Page 34: ... Signal Source R display the audio sources for that output Sources can be assigned under I O p 40 Options Click the buttons in this row to activate or switch off the corresponding functions Active functions are displayed on an orange background Mute Clicking Mute orange will switch that channel off EQ All of the ENC 1202 s physical outputs are equipped with an equalizer Edit EQ Edit EQ is always d...

Page 35: ...ld down the Shift key while double clicking the fader to reset the fader to 0dBu Double click the fader to set it to the minimum value Delay The Delay fader allows you to set the desired signal delay 0 2 7 seconds or the equiva lent in meters or feet Peak Level The Peak Level L and Peak Level R meters show the peak levels of the left and right channels The audio signal s current level is displayed...

Page 36: ... first Dante output This pane allows you to assign more meaningful names The channels are grouped by type and displayed on separate tabs Be sure to check whether you have selected the correct tab before changing any labels Type Channel type and its number Label The text field displays the channel s current name To edit a label click the field enter the desired name and press the ENTER key on the c...

Page 37: ...o assign incoming RX Dante channels to outgoing TX Dante channels See I O p 40 for how to route signals originating from the ENC 1202 to Dante TX channels These settings can also be edited using Audinate s Dante Controller software Type and Label The channel number e g DANTE RX 01 and the associated label e g 01 DANTE RX If necessary the label can be changed using Label p 33 Subscription Subscript...

Page 38: ...the drop down menu an Apply button is displayed 3 Click the Apply button Clearing a Subscription To clear a subscription proceed as follows 1 Click the left plug symbol A confirmation window is displayed asking you whether you really want to clear the subscription 2 Click Ok Click Cancel if you have changed your mind The connection is cleared and erased Mute This allows you to mute the channel in ...

Page 39: ...tes an AES67 subscription STATIC A static configured flow indicates a multicast flow subscription NO TX The TX transmitting channel on the external device is not active UNRESOLVED The selected transmitting device is not visible on the network it may have been removed or turned off Flow To maximize the efficiency of the network Dante bundles groups of 4 individual connec tions into so called flows ...

Page 40: ...l p 36 parameter SOURCE This column displays 2 drop down menus where you can select the desired source for each output The first drop down menu allows you to narrow down the available source to the type you are looking for This filters the sources displayed in the second column according to types such as Mixer outputs The second drop down menu allows you to choose the desired channel among the sel...

Page 41: ...e The mixer s output level can be attenuated 91dB 0dB using the fader in steps of 0 5dB The value field to the right of the fader allows you to enter more precise values in steps of 0 1dB Peak Level The Peak Level L and Peak Level R meters show the current levels of the left and right channels The audio signal s current level is displayed in orange on a scale ranging from dBFS corresponds to 126dB...

Page 42: ... s stereo position When the fader is moved towards the center it automatically clicks into place at the dead center position You can also double click the fader to set it to the center 4 9 Browse Network This is where the ENC 1202 displays all Dante devices it discovered on the network There are three columns that display the manufacturers the model numbers and the device names For ENCHORUS series...

Page 43: ...ed You need to install a new ENCHORUS firmware version See Update p 28 Software Update Failed The software could not be updated Please try again If that doesn t work download the update file again Firmware Update Failed The firmware could not be updated Please try again If that doesn t work download the update file again Maybe you forgot to install the new software update beforehand ...

Page 44: ...XLR sockets for the four XLR line inputs assigned to an RJ45 socket on the unit itself Here is how to install it 1 RJ45 patch cable 2 Reinforcement brace 3 Long front blind 4 Short front blind 5 Connector unit with 4 XLR sockets and 2 countersunk head screws M4x8mm TX20 8 oval head screws 2 9x13mm TX10 1 Install component 5 in the long front blind 3 and tighten the eight oval head screws 2 Loosen ...

Page 45: ...etighten the two cylinder head screws on the right side of the ENC 1202 s rear panel 9 Using two countersunk head screws attach the diagonal reinforcement brace to the left side of the ENC 1202 s rear panel 10 Using two supplied countersunk head screws attach the reinforcement brace 2 to the right rear side of the long front blind 3 11 Connect the RJ45 patch cable 1 as shown in the illustration 12...

Page 46: ...inder head screws attach the connecting blind to the left edge of the ENCHORUS s rear panel The first ENCHORUS device is now ready Adding the Second ENCHORUS Device the right one in the rack 1 Loosen the four cylinder head screws at the front of the second ENCHORUS and remove them 2 Remove the rubber bumper from the ENCHORUS s front panel 3 Using two cylinder head screws attach the right front bli...

Page 47: ...he two cylinder head screws on the left side of the ENCHORUS s rear panel 8 Using two cylinder head screws secure the connecting blind affixed to the rear panel of the first ENCHORUS to the right side of the second ENCHORUS s rear panel Rear view of the assembled units 9 Install the assembly in the desired 19 rack ...

Page 48: ...Appendix EU Declaration of Conformity ENC 1202 Version 1 0 Page 48 5 3 EU Declaration of Conformity Amerikanische Declaration of Conformity ...

Page 49: ...equency response 0dBu Fs 48kHz 15dBu 20Hz 22kHz 20dBFS 100kΩ load 24dBu 20Hz 22kHz 20dBFS 100kΩ load Frequency response 0dBu Fs 96kHz 15dBu 20Hz 40kHz 20dBFS 100kΩ load 24dBu 20Hz 40kHz 20dBFS 100kΩ load Signal to noise ratio A weighted 15dBu 113 5dB 24dBu 119 5dB THD N 1dBFS 1kHz 100kΩ load BW 20Hz 20kHz 15dBu 102 5dB 0 00075 24dBu 98dB 0 0012 Interchannel crosstalk output to output 15dBu 109dBr ...

Page 50: ...C 15 65 Relative humidity 80 What s included ENC 1202 Power cable Operating Instructions Options The following optional items are available 19 1U rackmount kit for 1 device 19 1U rackmount kit for 2 devices Additional power cable 6 1 Block Diagram 1 2 3 4 5 6 7 8 9 10 11 12 13 14 15 16 L R L R L R L R L R L R L R L R Mixer 1 Mixer 2 Mixer 3 Mixer 4 Mixer 5 Mixer 6 Mixer 7 Mixer 8 RX RX 8 mixers 16...

Page 51: ...Enchorus ENC 1202 Specifications Pin Wiring ENC 1202 Version 1 0 Page 51 6 2 Pin Wiring EtherCon RJ45 Pin Wiring 2 3 1 1 8 2 3 1 2 3 1 2 3 1 ...

Page 52: ...screw 9 H High shelf 31 I I O 40 IP Address 27 L Labels 32 36 Latency 38 Level 42 Login 17 Logout 17 Low Cut 30 Low pass 31 Low shelf 31 M MAC Address 27 Mask 27 Master 26 Master Volume 41 Metering 32 35 Mixer 41 Mute 29 34 38 41 O Operation basics 15 Options 49 Options parameter 29 P Pan 42 Panel descriptions 9 Password 23 Peak 31 Level 30 35 41 Persist Dante Settings 23 Phase 29 Power Supply 23 ...

Page 53: ...ASL Intercom B V Zonnebaan 42 3542 EG Utrecht Netherlands E Mail info asl inter com www asl inter com ...

Reviews: