


19
IT
GB
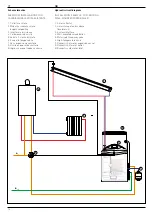
Connessioni centralina solare
Le operazioni da svolgere sono le seguenti:
1. aprile lo sportello frontale
2. svitare le viti per accedere alla scheda
(fi g. 3)
3. inserire i cavi utilizzando i passacavi
liberi
4. collegamento ad una caldaia di nuova
generazione:
utilizzare il connettore BUS collegando
il cavo rispettando la polarità:
T con T , B con Bus
5. collegamento ad una caldaia vecchia
generazione:
utilizzare il connettore
AUX1
6. collegamento della sonda collettore
utilizzare il connettore
S1
7. collegamento della sonda ritorno
riscaldamento (ove presente
nell’impianto) utilizzare il connettore
S4
8. collegamento della valvola deviatrice
(ove presente nell’impianto) utilizzare
il connettore
V1
rispettando la
polarizzazione
9. ruotare e fi ssare con le viti il supporto
della scheda
10. alimentare il modulo
11.
seguire le indicazioni per la
parametrizzazione della centralina
3.
Solar control unit connections
The following steps must be performed:
1. Open the front cover.
2. Loosen the screws to access the P.C.B.
(fi g. 3).
3. Insert the cables, using the free cable
clips.
4. Connection to a new generation boiler:
use the BUS connector by connecting
the cable and observing the poles:
T with T, B with Bus.
5. Connection to an old style boiler:
use
connector
AUX1
.
6. Connection of the collector sensor: use
connector
S1
.
7. Connection of the heating return sensor
(where present in the system): use
connector
S4
.
8. Connection of the diverter valve (where
present in the system): use connector
V1
and observe the polarity.
9. Twist and secure the P.C.B. support
using the screws.
10. Power up the module.
11. Observe the instructions for control unit
parameterisation.
Summary of Contents for 3023637
Page 38: ...38 IT GB ...
Page 39: ...39 IT GB ...


