background image

16

Linearis N+

5.3.10 

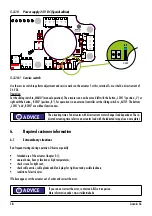
Power supply 24 V DC (Special edition)

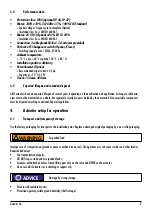
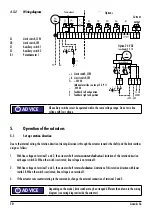
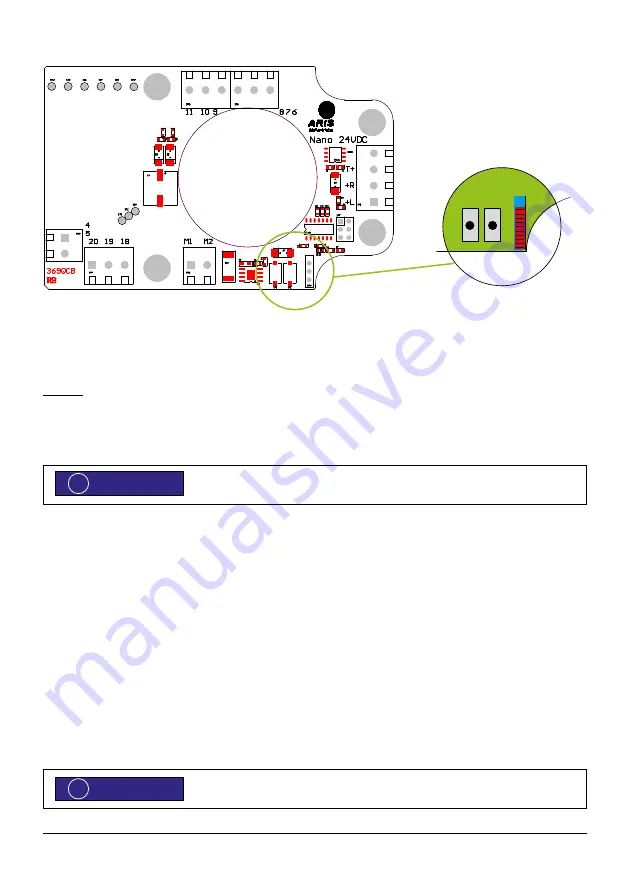
5.3.10.1  Service switch

Use the service switch to perform adjustment and service works on the actuator. For this, terminal T+ must hold a direct current of 
24 V DC.
Operation:
Set the sliding switch to „MANU“ (manual operation). The actuator can now be moved left with the button „L SW1“ (position „L“) or 
right with the button „R SW2“ (position „R“). For operation via an external controller set the sliding switch to „AUTO“. The buttons 
„L SW1“ and „R SW2“ are without function now.

The actuating time of an actuator with direct current motor changes load dependant. The in-
dicated actuating time refers to an actuator load with the indicated torque (see name plate).

6. 

Required customer information

6.1 

Extraordinary situations

Run frequent testings during operation. Observe especially:

• 

Intended use of the actuator (chapter 3.1);

• 

unusual noise, heavy vibration or high temperatures;

• 

check screws for tight seat;

• 

check cable entries, cable glands and blank plugs for tight seat and possible leakness;

• 

condition of electric wires.

If failure appear, set the actuator out of order and correct the error.

If you can not correct the error, contact an ARIS service person.
More information under: www.stellantriebe.de

SW1 SW2

 R

AUTO

MANU

ADVICE

!

ADVICE

!
Summary of Contents for Linearis N+

Page 1: ...Original declaration of incorporation with manual for ARIS Damper actuator Linearis N LIN 1538EN01 Stellantriebe incl manual for ARIS Microprocessor Controller PMR Nano ...

Page 2: ...t up limit switches Self adjusting switch cam 11 Optional modules and extra features 11 Potentiometer 11 Potentiometer with approval acc to DIN EN 12067 2 TÜV Poti 11 Additional limit switches Self adjusting switch cam 13 2 wire current output 4 20 mA 13 Mechanical position indicator 14 Service switch 230 V AC only 14 Heating resistant 230 V AC only 14 Single wire control 230 V AC only 15 Parallel...

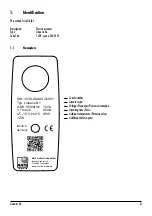
Page 3: ...rial number Actuator type Voltage Frequency Power consumption Actuating time Force Ambient temperature Protection class Additional built in parts ARIS Stellantriebe GmbH Rotter Viehtrift 9 D 53842 Troisdorf www stellantriebe de SNr 1539 XXXXX 01001 Typ Linearis N 230V 50 60 Hz 12VA 1 7 mm s 600 N UT 15 C 60 C IP65 1ZW Made in Germany Stellantriebe ...

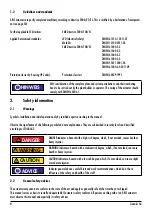
Page 4: ...nitial operation only by certified experts according to the manual Observe the significance of the following symbol and note explanations They are subdevided in security levels and classified according to ISO 3864 2 DANGER indicates a hazard with a high risk degree which if not avoided causes death or heavy injuries WARNING indicates a hazard with a medium risk degree which if not avoided can caus...

Page 5: ...mospheres Temperatures below 15 C or over 60 C optional 80 C Underground environments Near open fires Under water Operating elevators 3 2 Safe and accurate use ARIS actuators are factory checked prior to delivery The final functional testing must be performed within the total system by qualified technical personnel The ARIS company assumes no liability for possible manufacturing errors and resulti...

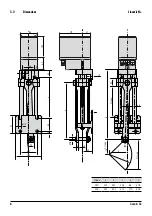
Page 6: ...mensions Linearis N 100 150 50 45 x 63 60 Tensor CL 102 63 86 112 41 Nano 80 125 91 13 65 a 35 13 c Stroke b 13 6 40 50 16 e 7 10 Stroke 30 56 38 Stroke d 68 Stroke a b c d e 150 201 341 106 85 278 300 351 491 212 170 428 ...

Page 7: ...n and application No longer usable actu ators must not be dismantled as a whole but seperately recycled in parts divided by their materials Non recyclable components must be disposed according to national disposal regulations 4 Actuator setup for operation 4 1 Transport and temporary storage Use the factory packaging for transport to the installation point Replace a damaged original packaging by a...

Page 8: ...uator permanent overload and blocking leads to actuator damages spark suppressor capacitor can effect the rotation stability of the actuators and may cause damages use only ARIS original spare parts Consider prior to attachment of couplings Do not turn the thread spindle by force the attachment to the valve or a solid underground is made by the pre assembled brackets bearing blocks Driver connecti...

Page 9: ...ctuator as follows Connect the ground wire of the electric supply to the appropriate protective earth terminal Connect the neutral N to terminal 1 Follow the steps under Set up rotation direction S 10 during connection of the actuator Always refer to the wiring diagram located inside the actuator Check before you close the circuit for the first time Is the actuator undamaged on the outside Is the ...

Page 10: ...mitation of this rotation direction with upper switch SL When the switch is activated line voltage is on terminal 4 2 With line voltage on terminal 1 and 3 the actuator shaft rotates clockwise Limitation of this rotation direction with lower switch SR When the switch is activated line voltage is on terminal 5 3 If the actuator runs counterrotating to the commands change the external connection of ...

Page 11: ...als 18 19 and 20 according to the desired requirements voltage 50V see page 10 Use only separate shielded wires Adjustment Set up limit switch before adjusting the potentiometer P Approach both end positions electrically see chapter 5 2 Observe travel and potentiometer solution Do not overrun the ordered travel to avoid damage to the friction clutch R by permanent override Potentiometer P adjusts ...

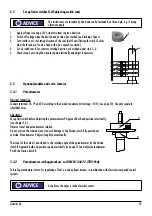
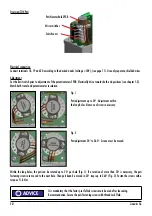
Page 12: ...e poti can be rotated up to 20 per hole Fig 1 If a rotation of more than 20 is necessary the poti fastening screws are moved to the next hole Then poti kann be moved in 20 steps up to 360 Fig 2 Fasten the screws with a torque of 1 8 Nm It is mandatory that the factory set TufLok screws must be used after loosening Recommendation Secure the poti fastening screws with thread lock fluid ADVICE Poti N...

Page 13: ...cessary 5 3 4 2 wire current output 4 20 mA Electrical connection Connect terminal 54 and 55 according to the wiring diagram see page 10 Use separate shielded wire with minimum diameter of 0 5 mm and a max length of 1000 m Setup Operate the current output via buttons 4 and 20 Assigning arbitrary positions for 4 mA and 20 mA is possible at any time The lower and upper current limit 4 20 mA is progr...

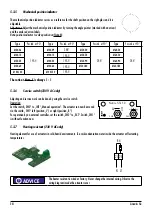
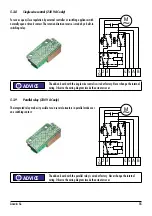
Page 14: ...M 50 180 M 60 180 M 30 120 M 40 120 193 5 The ratio at Nano S is always 1 1 5 3 6 Service switch 230 V AC only Adjusting and service work can be done by using the service switch Operation Set the switch SW2 to INT Manual operation The actuator can now be moved via the switch SW1 left position L or right position R For operation by an external controller set the switch SW2 to EXT Switch SW1 is with...

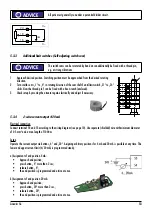
Page 15: ... single wire control is wired at factory Never change the internal wiring Observe the wiring diagram insode the actuator cover 5 3 9 Parallel relay 230 V AC only The integrated relay makes it possible to run several actuators in parallel mode over one switching contact The add on board with the parallel relay is wired at factory Never change the internal wiring Observe the wiring diagram insode th...

Page 16: ...e of an actuator with direct current motor changes load dependant The in dicated actuating time refers to an actuator load with the indicated torque see name plate 6 Required customer information 6 1 Extraordinary situations Run frequent testings during operation Observe especially Intended use of the actuator chapter 3 1 unusual noise heavy vibration or high temperatures check screws for tight se...

Page 17: ...o have a lifetime lubrication and are generally maintenance free Dismount all additional parts valve or rods before exchanging the drive head Dismount the drive head only under a load free condition Linear unit We recommend a visible and functional actuator check during plant service work but at least once a year 7 2 Accessories No special tools are required for installation The required hex wrenc...

Page 18: ...ARIS Stellantriebe GmbH Tel 49 2241 25186 0 Rotter Viehtrift 9 Fax 49 2241 25186 99 53842 Troisdorf Germany aris stellantriebe de www stellantriebe de Stellantriebe Subject to technical changes ...

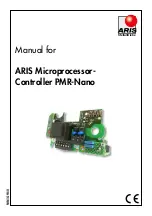
Page 19: ...Manual for ARIS Microprocessor Controller PMR Nano PMRN1429EN01 Stellantriebe ...

Page 20: ...n 19 Operating controls and indicators 20 Setting up stop positions and potentiometer 20 Programming 21 Technical data 25 Declaration of incorporation 26 ARIS Stellantriebe GmbH Rotter Viehtrift 9 Tel 49 2241 25186 0 aris stellantriebe de 53842 Troisdorf Fax 49 2241 25186 99 www stellantriebe de ...

Page 21: ...e measures shall be implemented in accordance with VDE Association of German Electrotechnical Engineers and EVU Electricity Board regulations In particular VDE Regulation 0105 Working on Live Components shall be followed For electrical installation make sure to follow the enclosed wiring diagram Supply lines to microprocessor controller and actuator must meet the conductor cross section as specifi...

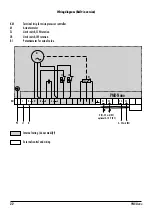
Page 22: ...controller M Actuator motor SL Limit switch CCW rotation SR Limit switch CW rotation R1 Potentiometer for actual value Internal wiring do not modify External control and wiring L N N B B A A 51 52 54 55 1 M PE L1 N SL SR PMR Nano KM R1 1kΩ 0 4 20 mA DC optional 0 10 V DC 0 20 mA DC ...

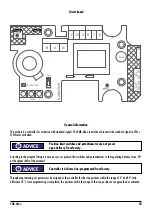
Page 23: ...cessary to set position limit switches and potentiometer to the regulating distance max 90 at the output shaft of the actuator Controller is delivered un programmed from factory Through programming set points must be assigned to the controller for the stop positions within the range of 0 and 90 min difference 18 Once programming is completed the positions within the range of the stop positions are...

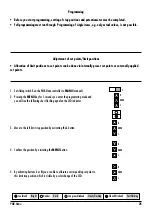
Page 24: ...the actuator with button R to the desired right CW stop position 3 Set the respective control cam R for the position limit switch SR in the sense of rotation of the control camshaft so that switch SR is activated 4 Move the actuator with button L to the desired left CCW stop position 5 Set the respective control cam L for the position limit switch SL in the sense of rotation of the control camshaf...

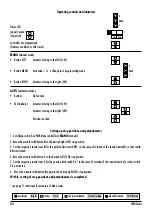
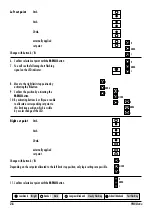
Page 25: ...itch S on the PMR Nano controller to MANU manual 2 Pressing the MENU key for 5 seconds you enter the programming mode and you will see the following short flashing signal on the LED indicator 3 Move to the left limit stop position by activating the L button 4 Confirm the position by activating the MENU button 5 By activating buttons L or R you are able to allocate a corresponding set point to this...

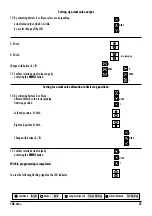
Page 26: ... activating buttons L or R you are able to allocate a corresponding set point to this limit stop position which is visible by a color change of the LED Right set point 0mA 4mA 20mA externally applied set point Change with button L R Depending on the set point allocated to the left limit stop position only logic settings are possible 11 Confirm selected set point with the MENU button L MENU R L MEN...

Page 27: ...ion to limit stop positions 14 By activating buttons L or R you allocate 0 4 mA to the corresponding limit stop position Left end position 0 4mA Right end position 0 4mA Change with buttons L R 15 Confirm selected actual value by activating the MENU button With it programming is completed You see the following flashing signal on the LED indicator Leuchtend Bright Dunkel Dark Langsam blinkend Slowl...

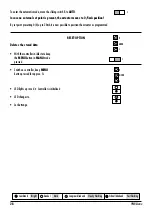
Page 28: ...ible to position the actuator as programmed RESET OPTION Deletes the stored data With the controller in idle state keep the MENU button in MANU mode pressed Switch on controller keep MENU button pressed for approx 5s LED lights up in red Controller is initialized LED changes to Let button go Leuchtend Bright Dunkel Dark Langsam blinkend Slowly flashing Schnell blinkend Fast flashing S L MENU R L M...

Page 29: ...late Set point input 0 4 to20 mA DC Burden 250 Ω Overload protection 630 mA Reverse battery protection up to 630 mA ESD protection input filter resolution 10 bit Actual value output Optional limits between 0 and 20 mA DC Current source max burden 500 Ω Resolution 10 bit Subject to technical changes ...

Page 30: ...chnical documents according to annex VII part B have been created For reasonable requests these documents can be sent electronically to the responsible authorities Regarding the outgoing electrical hazards of the partly completed machinery the safety objectives of directive 2006 95 EC Low Voltage Directive are complied with in accordance with Annex I No 1 5 1 of Directive 2006 42 EC Applied harmon...

Page 31: ......

Page 32: ...ARIS Stellantriebe GmbH Tel 49 2241 25186 0 Rotter Viehtrift 9 Fax 49 2241 25186 99 53842 Troisdorf Germany aris stellantriebe de www stellantriebe de Stellantriebe ...

Reviews: