Installation and Service Manual – Under-the-Counter Point of Use 5 Stage Reverse Osmosis System with Booster Pump
Copyright © 2014 Applied Membranes, Inc.
All Rights Reserved.
Page 5
System Mounting
Determine whether mounting the system to the wall is necessary or desired. This can be optional.
Dry wall anchors and screws may be necessary (not included with the system).
1. Mark screw locations at the desired positions. Use the two holes on the back of the RO System
mounting bracket for marker guides.
2. Screw the screws into the mounting wall on the marked positions. Use an anchoring device
appropriate for the type of material you are screwing into.
3. Hang the purification system onto the screws by the holes on the back of the unit.
Fittings and Tubing:
Compression fittings are used throughout the system. To ensure an optimal seal, tubing should be cut with the
end square. An angled cut or distortion of the tubing will not provide an efficient seal and may cause leaks.
Determine the length of tubing needed for each connection and cut each segment of tubing to the appropriate
length.
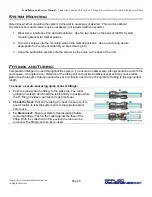
To ensure a secure seal using quick connect fittings:
Push the tubing into the fitting, to the pipe stop. The collet
(gripper) has teeth which hold the tubing firmly in position while
the 'O' Ring provides a permanent leak proof seal.
Check the Seal:
Pull on the tubing to check it is secure. It is
good practice to test the system prior to leaving site and/or
before use.
To Disconnect:
Ensure system is depressurized before
removing fittings. Push in the collet against the face of the
fitting. With the collet held in this position the tube can be
removed. The fitting can then be re-used.


