


Mobile Digital Video Recorder
39
Text-In
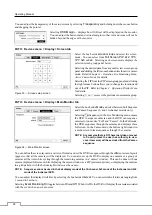
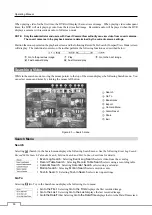
PATH: Event menu > Text-In > Settings tab
Figure 52 — Text-In Settings screen.
The DVR can be set to react to text input from devices such
as ATMs (Automated Teller Machines) and POS (Point of
Sale; i.e., cash registers). This screen allows you to configure
the DVR for each text-in device.
Select the box under the
Setup
heading. Selecting the
Setup
heading changes all the parameters excluding Port settings
of all the text input channels.
NOTE: The system performance might be affected when
a large quantity of text inputs are detected from
several channels at the same time.
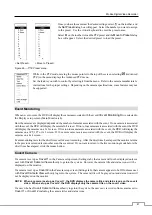
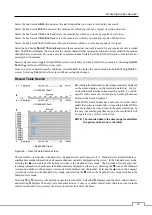
Figure 53 — Text-In Device screen.
Select the box beside
Port
, and select from None, RS232 1,
RS232 2, RS485, USB-Serial (1~8) and LAN (1~16).
NOTE: When If you have set the Port as None, you will not
be able to make any changes to the screen.
NOTE:
When using the USB to serial text-in device, do
NOT remove the USB cable from the port while the
system is running.
NOTE:
Text-in data might be lost when the text-in buffer
is filled by simultaneous text-in transactions from
all 16 LAN channels.
Select
Setup…
and configure RS232 1, RS232, RS485, USB-
Serial or LAN ports by using the ATM or POS manufacturer’s
recommended settings.
Select the box beside
Text-In Product
, and select your device from the list.
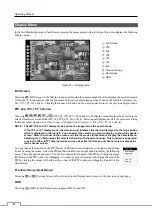
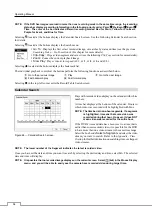
NOTE: The following description is for a Generic Text Device. The screen changes for different types of text
input devices, and there will be different parameter boxes for you to enter information.
Select the box beside
Transaction Start
, and enter the Transaction Start string by using the virtual keyboard. Refer
to the device manufacturer’s documentation for the text string that the device first sends when a transaction starts.
If you want the DVR to react to any character sent from the text input device, you will want to turn On
Any Character.
Select
Any Character
to toggle between On and Off.
NOTE: If
Any Character is turned On, you will not be able to enter any text in the Transaction Start box.
Select the box beside
Transaction End
, and enter the Transaction End string by using the virtual keyboard to. Refer
to the device manufacturer’s documentation for the text string that the device sends when a transaction ends.
Select the
more line(s)
box, and select the number of additional lines of text that you want the DVR to record. You
can choose from 0 to 10.
Select the box beside
Line Delimiter
, and enter the character(s) that the device uses to indicate the end of a line by
using the virtual keyboard to. Special characters can be created using ^ and a capital letter; e.g., ^J for NL (New Line),
^M for CR (Carriage Return). Refer to the device manufacturer’s documentation for Line Delimiter character(s).
Select the box beside
Ignore String
, and enter any strings of text that you want the DVR to ignore by using the virtual
keyboard to. Refer to the device manufacturer’s documentation for text strings that the device sends during transactions,
so you will know which ones you do not want recorded.
Summary of Contents for MRH Series
Page 2: ......
Page 16: ...Operating Manual 8 ...
Page 71: ...Mobile Digital Video Recorder 63 Map of Screens ...