NATIX™
Chapter 5 : USING FRAME STORE AND LOGO INSERTION (continued)
PAGE 27
5-1. USING LOGO INSERTION WITH THE REMOTE CONTROL SOFTWARE (continued)
5-1-5. EXAMPLE OF LOGO INSERTION
Figure 22
Logo
source
Video source
Video source with inserted logo.
(white border = logo area)
(logo made with luma key)
5-2. USING FRAME STORE WITH THE REMOTE CONTROL SOFTWARE
This function allows memorizing up to 3 frames (images) in order to display it at any time during the show.
IMPORTANT
: The output format used when displaying the frame should be the same that the output format used during
the frame storing.
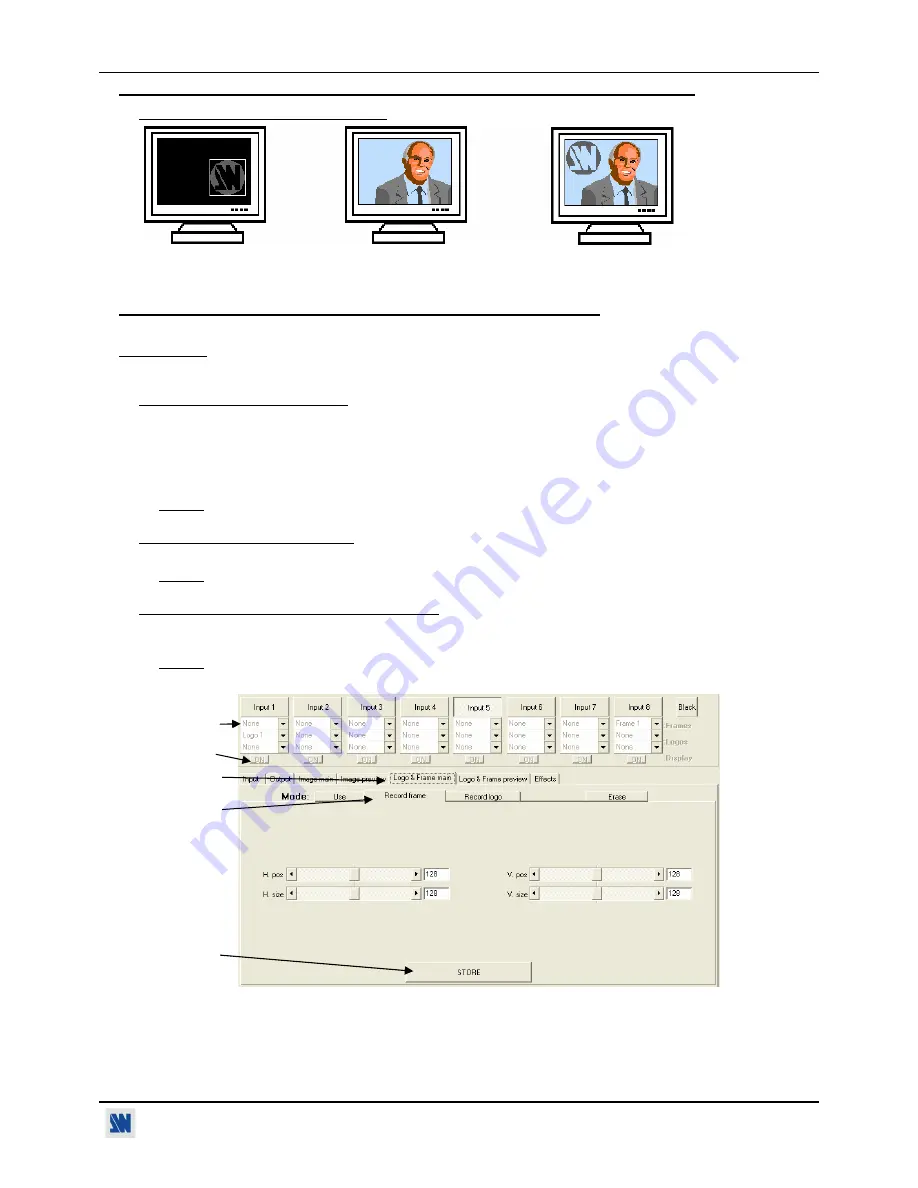
5-2-1. HOW TO STORE A FRAME
c
Click on the
Logo & Frame out 1
tab to record the frame from the output 1 or click on the
Logo & Frame out 2
tab to record the frame from the output 2.
d
Then click on the
Record frame
tab: the device displays a white rectangle corresponding to the frame selection area
onto the output. If necessary adjust the position and size of the frame area with the
position & size
functions.
e
Click on
STORE
to store the frame into a memory. The memorization starts and will take about 2 minutes.
NOTE:
For motion picture, you can use the FREEZE function, before doing the memorization.
5-2-2. HOW TO ASSIGN A FRAME
f
In the assignment table, assign a frame to the needed inputs.
NOTE:
To remove the frame of an input, select
none
in the corresponding window.
5-2-3. HOW TO DISPLAY ON or OFF the FRAME
g
To display OFF or ON the assigned frame of an input, click on the
display
button of the corresponding input to
change the status (ON or OFF). The frame appears onto the output, instead of the source connected to this input.
NOTE:
When displaying ON or OFF a frame, this one appears/disappears with a fade effect. You can adjust the
duration of the fade effect with the
Frame fade duration
function of the
Control
menu.
Figure 23
c
d
f
e
g


