background image

Page 2

terminal and earth ground.

•  Measure a known voltage first to make sure that the Product operates correctly.

•  Use the correct terminals, function, and range for measurements.

•  Do not use test leads if they are damaged. Examine the test leads for damaged 

insulation, exposed metal, or if the wear indicator shows. Check test lead continuity.

•  Do not touch the probes to a voltage source when the test leads are connected to the 

current terminals.

•  Do not use test leads if they are damaged. Examine the test leads for damaged 

insulation and measure a known voltage.

•  Remove the batteries if the equipment planned to be stored for long period or if stored 

in temperatures above 50 °C. If the batteries are not removed, battery leakage can 

damage the Product. 

•  Personal injury or damage to the equipment can occur if you attempt to make a 

measurement with a lead in an incorrect terminal.

•  A "

 Warning

" statement identifies hazardous conditions and actions that could 

cause bodily harm or death.

•  A “

 Caution

” statement identifies conditions and actions that could damage the 

equipment or the object under test.

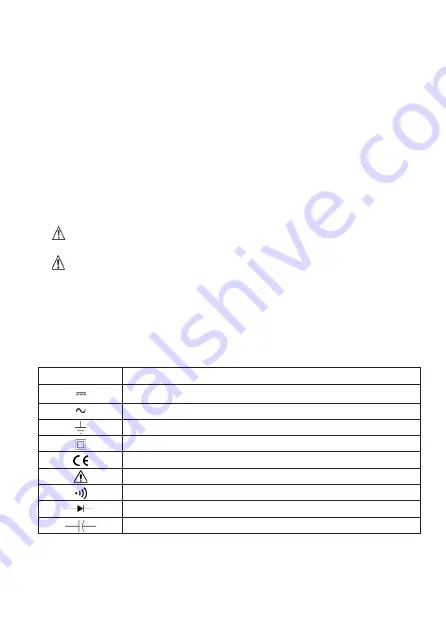
SYMBOLS

Symbol

Meaning

Direct Current
Alternating Current

Earth ground

Double insulated

Conforms to European Union directives.

Risk of Danger

Continuity test or continuity beeper tone

Diode
Capacitance

Summary of Contents for 769

Page 1: ...nt reverse backlit LCD Autoranging Frequency counter to 10MHz Capacitance measurement Fused 10A input Temperature mode C F Test socket LED lights Continuity and diode test Internal rechargeable lithiu...

Page 2: ...electrical sources Live wire detection Input Jack Indicators to remind users to plug in the correct jacks Frequency Measurement and Temperature Measurement Vertical Alignment Display which provide la...

Page 3: ...suring DC Current 9 D Measuring AC Current 10 E Measuring Resistance 11 F Continuity Test 12 G Diode Test 13 H Measuring Temperature 14 I Measuring Frequency 14 J Measuring Capacitance 15 K Detecting...

Page 4: ...of the lowest rated individual component of a Product probe or accessory Avoid to use the equipment in the environment with strong magnetic fields strong electrostatic fields and strong RF fields Com...

Page 5: ...nown voltage Remove the batteries if the equipment planned to be stored for long period or if stored in temperatures above 50 C If the batteries are not removed battery leakage can damage the Product...

Page 6: ...ations such as distribution panels feeders and short branch circuits and lighting systems in large buildings CAT IV IEC Overvoltage Category IV CAT IV equipment is designed to protect against transien...

Page 7: ...Compartmen QGXFWLYH KDUJLQJ 3RVLWLRQ NCV Sensor Flashlight Holster Display KDUJLQJ QGLFDWRUV 3XVK XWWRQV CHARGER STRUCTURE 1 USB port 2 Indicator Error is happened 3 Indicator Charging DISPLAY 1 2 3...

Page 8: ...m Megaohm Hz kHz MHz Hertz unit of frequency Kilohertz Megahertz F nF F mF Farad unit of capacitance Nanofarad Microfarad Millifarad 6 ain display digits input is out of range Meter is ready for NCV d...

Page 9: ...e relative mode Remark REL will be displayed when relative mode is on The measured value will be stored when relative mode is switch on Display of relative mode Actual measuring value stored value At...

Page 10: ...ction between the testing leads and the circuit under test and remove testing leads away from the input terminals of the Meter after measurement Tips The Meter have input jack indicators to advise the...

Page 11: ...nown voltage befre using the instrument on an unknown circuit To avoid electric shock fire personal injury or damages to the Meter from electric shock please do not attempt to measure voltages higher...

Page 12: ...ging C MEASURING DC CURRENT Warning If the fuse burns out during measurement the Meter may be damaged or the operator himsel f may be hurt To avoid possible damage to the Meter or to the equipment und...

Page 13: ...old down the same button to return to auto ranging D MEASURING AC CURRENT Warning If the fuse burns out during measurement the Meter may be damaged or the operator himsel f may be hurt To avoid possib...

Page 14: ...to AC mode 5 Open the circuit path to be tested and connect the testleads to the break of the circuit 6 The measured value shows on the display 7 If needed press to switch to manual ranging press agai...

Page 15: ...ch the probe tips together and read the resistance of the leads If necessary you can use the relative REL mode to automatically subtract this value The measured value of a resistor in a circuit is oft...

Page 16: ...h 60V DC or 30V rms AC Use the diode test to check diodes transistors and other semiconductor devices The diode test sends a current through the semicondutor junction then measure the voltage drop acr...

Page 17: ...C F range 3 Press to switch to select C mode press one more to switch to F mode 4 Connect the testleads across with the object being measured 5 The measured value shows on the display Note The include...

Page 18: ...e the dc voltage function to confirm that the capacitor is discharged To ensure accuracy the Meter inside is discharged against the tested capacitor This process will be quite slow Set up to measure C...

Page 19: ...V Live range 3 Insert the red probe to the AC power socket 4 or will be displayed which indicate power is present More number of means the power is more strong L NON CONTACT VOLTAGE DETECTION Warning...

Page 20: ...nd the number of will also increase when higher voltage is detected M RELATIVE MODE Selecting relative mode causes the Meter to zero the display and store the present reading as the reference for subs...

Page 21: ...UT JACK INDICATOR Build in LED indicators surrounding the input jacks corresponding to the function selected will be automatically switched on to advise users to plug in the testleads SLEEP MODE The e...

Page 22: ...1 year after calibration at operating temperatures of 23 C 5 C with relative humidity 75 Accuracy specifications take the form of of Reading Counts Function Range Resolution Accuracy of Reading Count...

Page 23: ...10A 0 01A 3 5 10A 1000V fuse Remarks Display true RMS value Frequency Response Resistance 600 0 1 0 8 5 1000V 6k 1 60k 10 600k 100 6M 1k 60M 10k 1 5 5 Remarks Open circuit voltage approximate Continui...

Page 24: ...1MHz 0 001MHz 10MHz 0 01MHz Sensitivity 1kHz 200mVp p 1kHz 3Vp p Capacitance 6nF 0 001nF 5 5 1000V 60nF 0 01nF 4 5 600nF 0 1nF 6 F 0 001 F 60 F 0 01 F 600 F 0 1 F 6mF 0 001mF 5 5 60mF 0 01mF MAINTENA...

Page 25: ...ely by using the charger provided and connect as following figure if the battery indicator is on Set up to charge REPLACE FUSES Warning To avoid electrical shock or arc blast or personal injury or dam...

Page 26: ...g the equipment NEVER submerge them in water DO NOT use abrasive cleaners they will damage the case Wipe the case with a damp cloth and mild detergent Do not use abrasives or solvents Dirt or moisture...

Reviews: