background image


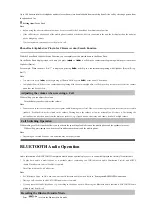
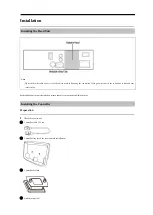
Used for bracket (reverse mold) installation or direct installation on the dashboard.   


Light shield (used for installation with bracket) 


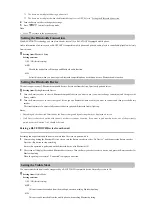
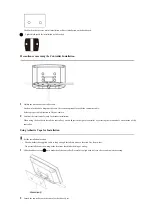
Precautions concerning the Controller Installation 


1

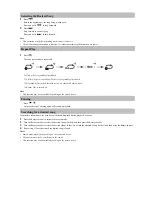
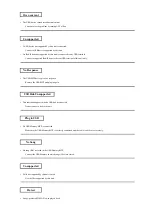
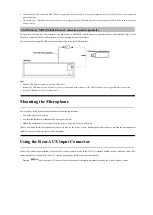
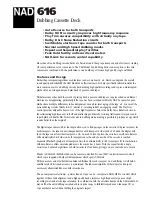
    Adjust the direction of controller cable.   

As shown in the above diagram, there are 3 directions optional for backside controller cable.   

Select a proper cable direction to fit your vehicle.   

2

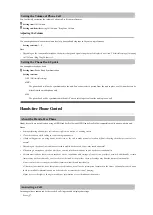
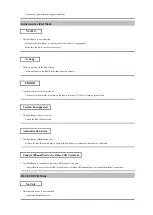
    Confirm the location hole (only for bracket installation)


When using the bracket to install the controller, you can adjust the height of controller by selecting the location hole on backside of the 

controller.   

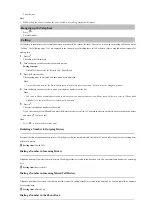
Using Adhesive Tape for Installation   


Set the installation location.


•  Check whether the supplied cable is long enough. Install this unit at a location free from water.   

Do not install the unit or wiring at the locations that hinder driving or airbag.   

1

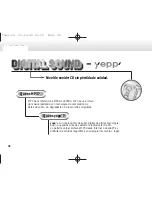
    Affix the adhesive tape 


onto backside of the controller. Be careful to align with holes in the second raw on the casing. 


2

    Attach the controller onto the console or dashboard, etc.   

Summary of Contents for UTX-A09

Page 1: ...ance California 90501 U S A Phone 1 800 ALPINE 1 1 800 257 4631 ALPINE ELECTRONICS OF U K LTD Alpine House Fletchamstead Highway Coventry CV4 9TW U K www alpine co uk ALPINE ELECTRONICS DE ESPAÑA S A Portal de Gamarra 36 Pabellón 32 01013 Vitoria Alava APDO 133 Spain Phone 945 283588 ALPINE ELECTRONICS OFAUSTRALIA PTY LTD 161 165 Princes Highway Hallam Victoria 3803 Australia Phone 03 8787 1200 AL...

Page 2: ...VOLT NEGATIVE GROUND Check with your dealer if you are not sure Failure to do so may result in fire etc KEEP SMALL OBJECTS SUCH AS BATTERIES OUT OF THE REACH OF CHILDREN Swallowing them may result in serious injury If swallowed consult a physician immediately USE THE CORRECT AMPERE RATING WHEN REPLACING FUSES Failure to do so may result in fire or electric shock DO NOT BLOCK VENTS OR RADIATOR PANE...

Page 3: ...c can be displayed However some particular characters may not be correctly displayed On Handling USB Memory CAUTION Alpine accepts no responsibility for lost data etc even if data etc is lost while using this product To prevent malfunction or damage note the following points Read the USB Memory Owner s Manual thoroughly Do not touch the terminals by hand or metal Do not subject USB Memory to exces...

Page 4: ...f such marks by Alpine Electronics Inc is under license The products with High Resolution nark comply with the benchmark defined by Japan Audio Society The use of High Resolution mark has been authorized by Japan Audio Society MPEG Layer 3 audio coding technology licensed from Fraunhofer IIS and Thomson Supply of this product only conveys a license for private noncommercial use and does not convey...

Page 5: ...avigation prompts ALPINE Direct Only appreciate the high quality music brought by UTX A09 Note When the source is AUX it cannot switch to AUX Mix Mode Before using this function make sure the audio output of vehicle sound system is correctly connected to AUX IN of the unit For details please read Connection Source Selection Press to change the source FM AM USB 1 iPod 2 AUX Bluetooth Audio 3 FM 1 W...

Page 6: ...ptional Alpine steering wheel controller connector For details please contact your authorized Alpine dealer Radio Listening to Radio 1 Press to select FM or AM mode 2 Press to select TUNER mode AUTO SEEK automatic mode MANUAL SEEK manual mode Note The initial mode is automatic mode Automatic mode Automatically search TUNER Manual mode Manually tune the frequency level by level manual tuning 3 Pres...

Page 7: ...lect Presetting Stations Automatically and press the Rotary encoder The tuner will automatically seek and store 12 or 6 for AM band strong stations in the selected band They will be stored into preset buttons in ascending order of frequency Tuning to Preset Stations 1 Press the Rotary encoder in FM or AM mode 2 Turn the Rotary encoder to select a preset station in the memory list 3 Press the Rotar...

Page 8: ...orted characters will be replaced with when displayed Repeat Play 1 Press The song is played back repeatedly 1 Only a track file is repeatedly played back 2 Only files in a folder are repeatedly played back it works after searching by folder 3 Repeat Play is turned off 2 To cancel Repeat Play turn off this function by following the above procedure Searching for a desired Song A USB memory can cont...

Page 9: ...V is an audio file format developed by Microsoft Corporation and conforms to RIFF Resource Interchange File Format file specification It is used to store audio information resources of the Windows platform and is widely supported by Windows platform and its applications The WAV format supports various compression algorithms such as MSADPCM and CCITT A LAW It supports multiple audio bits sampling r...

Page 10: ... kHz 176 4 kHz 96 kHz 88 2 kHz 48 kHz 44 1 kHz 32 kHz 24 kHz 22 05 kHz 16 kHz 12 kHz 11 025 kHz 8 kHz Quantized bit 8 bit 16 bit 24 bit Depending on the sampling rates the device may not play back correctly The playback time may not be correctly displayed when a VBR Variable Bit Rate recorded file is played back in the USB mode Playing back MP3 WMA AAC WAV FLAC APE MP3 WMA AAC WAV FLAC APE files a...

Page 11: ...Ds use a sampling rate of 44 1 kHz so the sound is sampled recorded 44 100 times per second The higher the sampling rate the higher the sound quality but also the larger the volume of data Encoding Converting music CDs WAVE AIFF files and other sound files into the specified audio compression format Tag Song information such as track titles artist names album names etc written into MP3 WMA AAC WAV...

Page 12: ...annot be performed when the unit is set as ALPINE Direct mode For more information refer to Setting AUX Mix Mode 7 This item cannot be adjusted in the AM mode 8 The setting items vary depending on Crossover Setup For more information refer to About the Crossover 4 Turn the Rotary encoder to change the setting or proceed to the next level and then press the Rotary encoder 5 Press to disable the set...

Page 13: ...ETS will become invalid Adjusting the Level Setting content 7 to 7 Initial setting 0 Note Settings exceeding the frequency of adjacent bands are not available While adjusting the Parametric Equalizer you should consider the frequency response of the connected speakers Adjusting the Parametric Equalizer displays the screen to customize the EQ PRESETS settings Setting Subwoofer Turning Subwoofer ON ...

Page 14: ...ailable for AM radio Adjusting the Time Correction Before performing the following procedures refer to About Time Correction 1 After selecting Adjusting the Time Correction from the Sound Setting mode turn the Rotary encoder to select the speaker or time correction unit option to be adjusted and then press the Rotary encoder FRONT L FRONT R REAR L REAR R LEFT SUBWOOFER RIGHT SUBWOOFER Adjustment c...

Page 15: ...e Setting contents FLAT 6 12 dB oct In the 3 way mode HIGH does not correspond to FLAT Note The initial setting of active 2 way mode is FLAT and the initial setting of active 3 way mode is 12 Adjusting the Level Setting contents 12dB 0dB Initial setting 0 DEFEAT Setting When DEFEAT is turned on the sound effect related settings such as EQ PRESETS will become invalid Turning DEFEAT off can return t...

Page 16: ...E and CROSSOVER SETUP Press and hold for at least 2 seconds to store the debugged sound parameters in Customized Setup Recalling Stored Sound Setting Parameters After selecting Dealer Setup or Customized Setup press to recall the debugged sound setting parameters Note The stored contents will not be deleted even when you reset the unit or disconnect the battery About Time Correction The distance b...

Page 17: ...the farthest speaker Time correction eliminates the differences in the time required for the sound to reach the listening position The time of the front left speaker is corrected by 5 1 ms so that its sound reaches the listening position at the same time as the sound of other speakers Example 2 All Seats Adjust the time correction level of each speaker to almost the same level 1 Sit in the listeni...

Page 18: ...4 17 1 7 57 8 22 8 18 1 8 61 2 24 1 19 1 9 64 6 25 5 20 2 0 68 0 26 8 21 2 1 71 4 28 1 22 2 2 74 8 29 5 23 2 3 78 2 30 8 24 2 4 81 6 32 2 25 2 5 85 0 33 5 26 2 6 88 4 34 8 27 2 7 91 8 36 2 28 2 8 95 2 37 5 29 2 9 98 6 38 9 30 3 0 102 0 40 2 31 3 1 105 4 41 5 32 3 2 108 8 42 9 33 3 3 112 2 44 2 34 3 4 115 6 45 6 35 3 5 119 0 46 9 36 3 6 122 4 48 2 37 3 7 125 8 49 6 ...

Page 19: ...5 7 50 5 0 170 0 67 0 51 5 1 173 4 68 3 52 5 2 176 8 69 7 53 5 3 180 2 71 0 54 5 4 183 6 72 4 55 5 5 187 0 73 7 56 5 6 190 4 75 0 57 5 7 193 8 76 4 58 5 8 197 2 77 7 59 5 9 200 6 79 1 60 6 0 204 0 80 4 61 6 1 207 4 81 7 62 6 2 210 8 83 1 63 6 3 214 2 84 4 64 6 4 217 6 85 8 65 6 5 221 0 87 1 66 6 6 224 4 88 4 67 6 7 227 8 89 8 68 6 8 231 2 91 1 69 6 9 234 6 92 5 70 7 0 238 0 93 8 71 7 1 241 4 95 1 ...

Page 20: ...requencies delivered to the outputs Each channel is controlled independently Thus each speaker pair can be driven by the frequencies for which they have been optimally designed The crossover adjusts the HPF high pass filter or LPF low pass filter of each band and also the slope how fast the filter rolls off the highs or lows Adjustments should be made according to the reproduction characteristics ...

Page 21: ... change of one octave The higher the slope value the steeper the slope becomes Adjust the slope to FLAT to bypass the HP or LP filters Do not use a tweeter without the HPF on or set to a low frequency as it may cause damage to the speaker due to the low frequency content You cannot adjust the crossover frequency higher than the HPF or lower than the LPF Adjustment should be made according to the r...

Page 22: ...select active 3 way mode or active 2 way mode 3 Press to determine the selected content by following the screen prompts When the setting finishes the system will restart automatically About active crossover mode Frequency range is divided between highs for front rear speakers and lows for the Subwoofer Active 2 way mode Frequency range is divided between highs mediums for front speakers and lows f...

Page 23: ...For details see Alpine TuneIt Connecting Device Note The application programme and related specifications and data may be deleted or terminated without notice Some Alpine TuneIt App functions may not be available if the Smartphone is not in a service area or receives no signal Adjusting the sound via the Smartphone After setting the above procedure you can adjust the unit s sound function on the S...

Page 24: ...de Note Pressing returns to the previous SETUP mode Normal setting Select Normal from the SETUP menu in Step 2 Setting Display Language You may choose Chinese or English display as you like Setting item Language Setting Setting contents Simplified Chinese Initial setting English Dimmer Control Set the Dimmer control to AUTO to decrease the illumination brightness of the unit with the head lights o...

Page 25: ...n Setting item DEMO MODE Setting contents OFF Initial setting ON Note To turn off the demonstration mode set it to OFF Information about the Unit Here you can confirm the information such as BU version of the unit Select About to review the following information BU Version Gerda Version Bluetooth Address Name of the Unit Restoring Factory Settings After setting Restoring Factory Settings all setti...

Page 26: ...Secure Simple Pairing 2 1 Turn the Rotary encoder when the pairing prompt appears on screen Press the button if you want to refuse pairing For Bluetooth compatible device without SSP Secure Simple Pairing 2 2 Input the PIN code 0000 in a Bluetooth compatible device Note The PIN code is fixed as 0000 3 If the pairing was successful Connected is displayed for a few seconds The head unit then returns...

Page 27: ...uetooth Audio or both you want to connect and then press the Rotary encoder The status indicator of a successfully connected device phone Bluetooth Audio lights up Notes Depending on the connected Smartphone the battery charge and signal strength may be displayed on screen If all 3 devices have been paired with the unit a 4th device cannot be paired If you want to pair another device one of the pr...

Page 28: ...th this unit Notes Avoid performing a hands free call in heavy traffic or on narrow or winding streets Close the windows while calling to reduce background noise If both calling parties are using hands free devices or the call is made at a noisy location difficulty hearing the other person s voice is normal Depending on telephone line conditions or certain mobile devices used voices may sound unna...

Page 29: ...use Phone book alphabet search function to search a name or number from Phone Book For details refer to Phone Book Alphabet or Pinyin for Chinese version Search Function 5 Press The selected telephone number will be called If you select a name from Phone Book press the Rotary encoder to confirm it Then turn the Rotary encoder to choose the desired number and press to place a call Note Press to ret...

Page 30: ...coder to adjust the volume Note You may need to increase volume from your regular audio listening source level However increasing the volume excessively may result in feedback Feedback is directly related to the volume Turning down the volume as low as acceptable will reduce it Positioning the microphone in a direction away from the main car speakers e g clipped on sun visor may also reduce feedba...

Page 31: ...Play is turned off Note This function may be unavailable depending on the paired device Pausing Press A playback stops Touching again will resume a playback Searching for a desired song Artist name album name etc may be searched and displayed during playback or pause 1 Press the Rotary encoder to activate the search mode 2 Turn the Rotary encoder to select the desired Group Folder and then press t...

Page 32: ...aying songs Stop using any application or telephone function and then resume audio playback on the device used About iPod iPhone models usable with this unit Confirmed devices specially made for iPod Correct function of earlier versions cannot be guaranteed iPod touch 6th generation Ver 11 0 3 Confirmed devices specially made for iPhone Correct function of earlier versions cannot be guaranteed iPh...

Page 33: ...iffers 1 Press the Rotary encoder to activate the search selection mode 2 Turn the Rotary encoder to select the Artist search mode and then press the Rotary encoder Playlist Artist Album Song Genre Composer Audiobook Podcast iTunes Radio 3 Turn the Rotary encoder to select the desired Artist and then press the Rotary encoder 4 Turn the Rotary encoder to select the desired Album and then press the ...

Page 34: ...antenna may not be of proper length Make sure the antenna is fully extended if broken replace the antenna with a new one Broadcast is noisy The antenna is not of proper length Extend the antenna fully replace it if it is broken The antenna is poorly grounded Make sure the antenna is grounded properly at its mounting location MP3 WMA AAC WAV FLAC APE MP3 WMA AAC WAV FLAC or APE cannot be played bac...

Page 35: ...response Remove the USB MTP and plug in again This indication appears when a USB hub is connected Do not connect a hub to the unit No USB Memory MTP is connected Make sure the USB Memory MTP is correctly connected and the cable is not bent excessively No song file is stored in the USB Memory MTP Connect the USB Memory in which songs files are stored A file not supported by this unit is used Use th...

Page 36: ...CC off on or turning power off on The iPod iPhone version is too low Update the iPod iPhone version The iPod iPhone authentication fails Remove the iPod iPhone and plug in again Replace the device if playback still cannot be performed The iPod iPhone is connected to the front USB terminal of this unit Connect iPod iPhone to the rear USB terminal only as the front USB terminal does not support iPod...

Page 37: ...played back Total number of songs in front and rear USB 10 000 MP3 Decoding MPEG AUDIO Layer 3 WMA Decoding Windows Media Audio AAC Decoding AAC LC format m4a file WAV Decoding Waveform sound file FLAC Decoding Free Lossless Audio Codec APE Decoding Monkey s audio BLUETOOTH SECTION BLUETOOTH version 4 0 GENERAL Power Requirement 14 4 V DC 11 16 V allowed Power Output 22 W 4 1 kHz 5 THD 4 Ω load 2c...

Page 38: ...ch precautions may result in fire DO NOT USE BOLTS OR NUTS IN THE BRAKE OR STEERING SYSTEMS TO MAKE GROUND CONNECTIONS Bolts or nuts used for the brake or steering systems or any other safety related system or tanks should NEVER be used for installations or ground connections Using such parts could disable control of the vehicle or cause fire etc KEEP SMALL OBJECTS SUCH AS BATTERIES OUT OF THE REA...

Page 39: ...dust that penetrates into this unit may result in product failure PRECAUTIONS Be sure to disconnect the cable from the battery post before installing your UTX A09 This will reduce any chance of damage to the unit in case of a short circuit Be sure to connect the color coded leads according to the diagram Incorrect connections may result in malfunction of the unit or damage to the vehicle s electri...

Page 40: ...on Doing so may cause heat to build up inside and may result in fire For details about the unit installation please consult your authorized Alpine dealer Installing the Controller Preparation 1 Check the accessories Controller cable 2 5 m Controller tray used for reverse mold installation Controller bracket Adhesive tape x2 ...

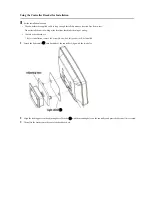
Page 41: ...ly for bracket installation When using the bracket to install the controller you can adjust the height of controller by selecting the location hole on backside of the controller Using Adhesive Tape for Installation Set the installation location Check whether the supplied cable is long enough Install this unit at a location free from water Do not install the unit or wiring at the locations that hin...

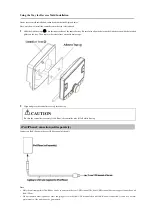
Page 42: ...ons that hinder driving or airbag Console or dashboard etc Before installation remove the assembly on which this product will be installed 1 Attach the light shield onto backside of the controller Align with the two holes 2 Align the locking posts on the adjusting base of bracket with the mounting holes on the controller and press the base until it is secured 3 Then affix the bracket onto the cons...

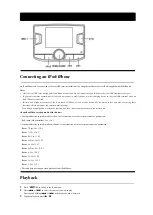
Page 43: ...e tape 2 Align and press the controller securely into the tray CAUTION Be sure the controller is securely fixed If not the controller may fall off while driving iPod iPhone Connection sold separately Connect an iPod iPhone to the rear USB terminal of the unit Note Only the unit compatible iPod iPhone can be connected to the rear USB terminal The front USB terminal does not support connection with ...

Page 44: ... no sound output from it or the USB Memory is not recognized after connection Keep the USB cable away from other cables Mounting the Microphone For the sake of safety mount the microphone at the following locations At a stable and secure location At a location that does not inhibit safely driving the vehicle Mount the microphone at a location where the driver s voice can easily be picked up Choose...

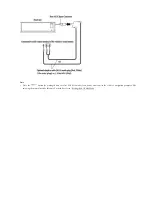
Page 45: ...ress the button for prolonged time to select AUX Mix mode if you do not want to miss the vehicle s navigation prompts while enjoying the music played by this unit For details refer to Setting the AUX Mix Mode ...

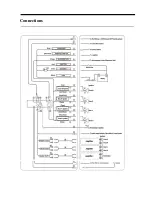
Page 46: ...Connections ...
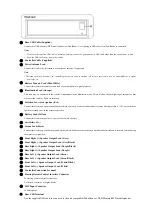
Page 47: ...r Lead Ignition Red Connect this lead to an open terminal on the vehicle s fuse box or another unused power source which provides 12V only when the ignition is turned on or in the accessory position Battery Lead Yellow Connect this lead to the positive post of the vehicle s battery Fuse Holder 15A Ground Lead Black Connect this lead to a good chassis ground on the vehicle Make sure the connection ...

Page 48: ...RCA Connector Red is on the right hand and white is on the left hand RCA Extension Cable sold separately Optical Output Terminal Connect to PXA H800 or other audio processor sold separately Antenna Receptacle Front USB Terminal Connect to USB Memory MTP mobile phone Note Do not connect charging devices to both front and rear USB terminals If you do so normal performance of the unit cannot be guara...

Reviews: