background image

24

-EN


Setting the External Digital Input (DIGITAL AUX)

When an ALPINE Ai-NET compatible digital audio processor
(PXA-H701) and a DVD player (DVE-5207) not compatible with
Ai-NET are connected, set DIGITAL AUX to ON to enjoy 5.1-channel 
surround sound.
You can change the D-AUX Name when DIGITAL AUX is set to ON. 
Press 

/ENTER

 when DIGITAL AUX is set to ON, and select 


D-AUX NAME by turning 

Double Action encoder 

(iDA-X313 only) 

or 

Rotary encoder

 (iDA-X311/iDA-X311RR only), then press 


/ENTER

.

Press 

 SOURCE

, and select the D-AUX mode, and adjust the 

volume, etc.

After input selection is completed, turn the ignition off and back on 
again. Setting of the optical digital input switch is completed.

Depending on the connected audio processor, DVD player sound 
may continue to be output, even though the source is changed to 
another one. If this occurs, set the DVD player’s power to OFF.

Setting the AUX+ Level (AUX IN GAIN)

After setting to ON in “Setting the AUX+ Mode”, this setting can be 
carried out.

Connecting to an External Amplifier (POWER IC)

When an external amplifier is connected, sound quality can be improved 
by stopping the power supply of the built-in amplifier. 

No sound is produced by the system when the POWER IC is set to 
OFF.

Demonstration

This unit has a Demonstration feature for the display.

To quit Demo mode, set to DEMO OFF.

DISPLAY is selected on the setup main menu in step 2.

Dimmer Control

Set the Dimmer control to AUTO to decrease the illumination 
brightness of the unit with the head lights of the vehicle ON. This mode 
is useful if you feel the unit’s backlighting is too bright at night.

Scroll Type Setting

Choose from two scrolling methods.
Select the type you prefer.

Scroll Setting (TEXT SCROLL)

You can set a scroll type such as song title or file name on the source 
screen. If the search mode screen displays fills with text, the display 
scrolls.

DIGITAL AUX ON / DIGITAL AUX OFF (Initial setting)

LOW (Initial setting) / HI

LOW:

Decreases the external input audio level.

HI:

Increases the external input audio level.

ON (Initial setting) / OFF

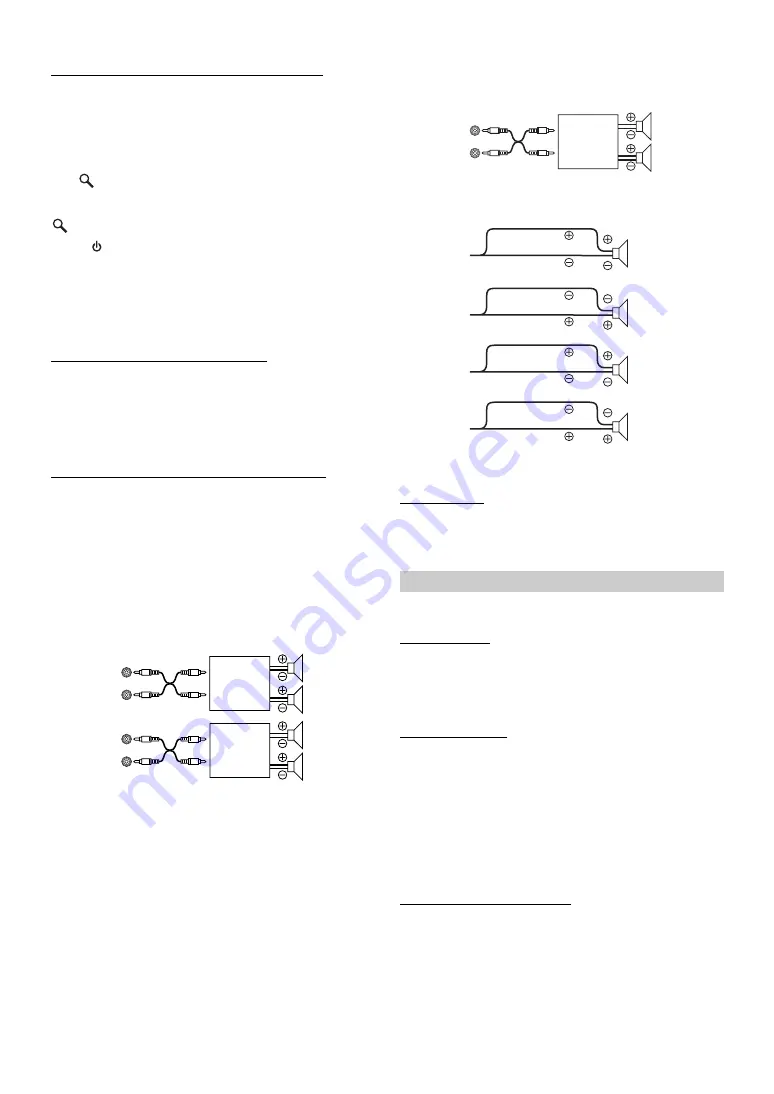
POWER IC OFF :

Use this mode when the front pre-amplifier of the 
unit is used to drive an external amplifier 
connected to the speakers. In this setting, the 
head unit’s internal amplifier has no output to 
drive speakers.

iDA-X313 :

Amplifier

Amplifier

Front


left

Front


right

Rear


left

Rear


right

Speakers

iDA-X311/iDA-X311RR :

POWER IC ON :

The speakers are driven by the built-in amplifier.

DEMO ON / DEMO OFF (Initial setting)

Display Setting

MANUAL / AUTO (Initial setting)

TYPE1 / TYPE2 (Initial setting)

TYPE1: 

The characters scroll from right to left, a single 
character at a time.

TYPE2: 

Words are built up from left to right, a single character 
at a time. When the display is filled, it is cleared and 
the remaining words are displayed the same way until 
all words of the title have been shown.

AUTO / MANUAL (Initial setting)

TEXT SCROLL AUTO :

Text information are scrolled 
automatically.

TEXT SCROLL MANUAL :

The first display scrolls text 
information one time only.

Amplifier

Rear


left

Front


right

Speakers

Speakers

SPEAKER 


RIGHT FRONT

Front


right

SPEAKER 
RIGHT REAR

Rear 


right

SPEAKER 
LEFT REAR

Rear 


left

SPEAKER 
LEFT FRONT

Front 


left

Summary of Contents for iDA-X311

Page 1: ...rega di leggere prima di utilizzare il attrezzatura ΕΓΧΕΙΡΙΔΙΟ ΧΡΗΣΤΗ Παρακαλούμε διαβάστε το πριν χρησιμοποιήσετε τη συσκευή ALPINE ELECTRONICS MARKETING INC 1 1 8 Nishi Gotanda Shinagawa ku Tokyo 141 0031 Japan Phone 03 5496 8231 ALPINE ELECTRONICS OF AMERICA INC 19145 Gramercy Place Torrance California 90501 U S A Phone 1 800 ALPINE 1 1 800 257 4631 ALPINE ELECTRONICS OF CANADA INC 777 Supertes...

Page 2: ......

Page 3: ... Function 12 Alphabet Skip Function iDA X313 only 12 Up Down Function 12 Search Position Memory 13 Random Play Shuffle M I X 13 Random Play Shuffle All 13 Repeat Play 13 Changing the Display 13 USB memory Portable audio player iDA X313 only Changer Optional BANK Function USB memory 14 Playback 14 Selecting a Disc Changer Optional 15 Multi Changer Selection Optional 15 Repeat Play 15 M I X Random P...

Page 4: ...g Adjusting Source Signal Levels 25 IMPRINT Operation Optional iDA X313 only Changing MultEQ mode 25 Adjusting Sound Setting in Manual Mode 26 USER PRESET 26 Storing the Audio Adjustment Level 26 Recalling the Audio Adjustment Level 26 Turning Media Xpander ON OFF 26 Equalizer Presets Factory s EQ FR EQ 26 Sound Field Adjustment 27 Adjusting the Parametric Equalizer Curve 27 Adjusting the Graphic ...

Page 5: ... authorized Alpine dealer or the nearest Alpine Service Centre for repairing DO NOT MIX NEW BATTERIES WITH OLD BATTERIES INSERT WITH THE CORRECT BATTERY POLARITY When inserting the batteries be sure to observe proper polarity and as instructed Rupture or chemical leakage from the battery may cause fire or personal injury PRECAUTIONS Product Cleaning Use a soft dry cloth for periodic cleaning of th...

Page 6: ...g on the settings of the Portable audio player type memory state or encoding software the unit may not play back or display properly If the Portable audio player has an MSC MTP setting set to MTP A Portable audio player in which data is stored by USB Mass Storage may not be playable on the unit Depending on the Portable audio player settings USB Mass Storage may be supported For setting refer to t...

Page 7: ...tion Press and turn the Double Action encoder to the left or right When you release the Double Action encoder the display changes Depending on the situation you can change an item or display If you press and turn the Double Action encoder to the left or right you can change items displays continuously Double Action Encoder Operation iDA X313 only Double Action encoder Double Action encoder Push ...

Page 8: ...ing 1 Insert the right side of the front panel into the main unit Align the groove on the front panel with the projections on the main unit 2 Push the left side of the front panel until it locks firmly into the main unit Before attaching the front panel make sure that there is no dirt or dust on the connector terminals and no foreign object between the front panel and the main unit Attach the fron...

Page 9: ...ation the current station will be cleared and replaced with the new station Presetting Stations Automatically 1 Press BAND TA repeatedly until the desired radio band is displayed 2 Press and hold TUNE A ME for at least 2 seconds The tuner will automatically seek and store 6 strong stations in the selected band They will be stored 1 to 6 in order of signal strength When the automatic memory has bee...

Page 10: ...al of the external audio processor 3 Turn the Double Action encoder iDA X313 only or Rotary encoder iDA X311 iDA X311RR only to select RDS REGIONAL and then press ENTER 4 Turn the Double Action encoder iDA X313 only or Rotary encoder iDA X311 iDA X311RR only to select ON or OFF In the OFF mode the unit automatically keeps receiving the related local RDS station 5 Press and hold for at least 2 seco...

Page 11: ... The TA mode will remain in the ON position to receive the next traffic information message If the volume level is changed while receiving traffic information the changed volume level will be memorized When traffic information is received next time the volume level will be automatically adjusted to the level memorized PTY Programme Type Tuning 1 Press FUNCTION SETUP so that the F indicator lights ...

Page 12: ...ve text information properly NO TEXT will be displayed iDA X313 iDA X311 iDA X311RR An iPhone iDA X313 only iPod can be connected to this unit When this unit is connected the controls on the iPod are not functional Depending on the unit iPhone iDA X313 only iPod connection can be made in two different ways Set AUX to OFF when an iPod is connected to iDA X311 iDA X311RR refer to Setting the AUX Mod...

Page 13: ...n your search as shown in the table below You can select your preferred search mode Refer to iPod Search Mode Setting page 25 For example Searching by Artist name The following example explains how an ARTISTS search is performed Another search mode can be used for the same operation although the hierarchy differs 1 Press ENTER to activate the Menu Select mode 2 Turn the Double Action encoder iDA X...

Page 14: ...e Double Action encoder to the right will jump 10 20 and 100 in ascending order Each turn of the Double Action encoder to the left will jump 100 90 and 10 in descending order Scroll bar display example if 50 is shown 1 Press FUNCTION SETUP to activate the percent selection mode 2 Turn the Rotary encoder to select a designated percent parameter and then press ENTER The percent skip function jumps t...

Page 15: ... iPhone iDA X313 only iPod randomly 1 Press ENTER The Menu Select screen is displayed 2 Press ENTER while selecting SHUFFLE ALL The indicator lights and the songs will be played back in random sequence To cancel set the Shuffle mode to OFF Refer to Random Play Shuffle M I X page 13 If SHUFFLE ALL is selected the selected ones which are being played back in the search mode are cancelled Repeat Play...

Page 16: ... beyond 1 000 songs perform the following operation to select a different bank 1 Press PRESET The BANK selection mode is displayed 2 Turn the Double Action encoder iDA X313 only or Rotary encoder iDA X311 iDA X311RR only Select the desired BANK You can scroll the page by pressing and turning the Double Action encoder iDA X313 only 3 Press ENTER Each operation can be performed in the selected bank ...

Page 17: ...ER mode 2 Press BAND TA to activate the CD Changer Selection mode The CD Changer Selection mode remains active for several seconds 3 Press BAND TA until the desired CD Changer appears on the display For further details about the external input AUX when using KCA 410C see Setting the AUX Mode V Link on page 23 Repeat Play 1 Press FUNCTION SETUP 2 Press ENTER The repeat mode is activated 3 Turn the ...

Page 18: ... Number Search is made during M I X play the M I X play mode will be cancelled Searching for a desired Song USB memory Portable audio player iDA X313 only A USB memory device Portable audio player can contain hundreds of songs By using file tag information and keeping these songs organized in playlists this unit s search functions will ease song searches Each music category has its own individual ...

Page 19: ...f no operation is performed for 60 seconds To search for files in the Folder Name Search mode press ENTER Files in the folder may be searched Press to exit Folder Name Search mode in step 3 in order to select File Name Search mode ROOT is displayed for the root folder which does not have folder name When Folder Name Search is made during M I X play the M I X play mode will be cancelled File Name S...

Page 20: ... and portable audio player The maximum number of characters is 64 64 byte for Changer Some characters may not be correctly displayed NO SUPPORT is displayed when text information is not compatible with this unit About MP3 WMA AAC What is MP3 MP3 whose official name is MPEG 1 Audio Layer 3 is a compression standard prescribed by the ISO the International Standardization Organization and MPEG which ...

Page 21: ...ending on the contents Playing back MP3 WMA AAC MP3 WMA AAC files are prepared and then written to USB memory Or synchronize an MP3 WMA file using Windows Media Player Ver 7 1 8 9 9 1 9 2 and then forward to the Portable audio player A USB memory device can hold up to 10 000 files 1 000 folders including Root Folders Playback may not be performed if a USB memory Portable audio player device exceed...

Page 22: ... the setting modes to modify See the applicable section below for details about the selected setting item For iDA X313 the following setting can be made only when the IMPRINT audio processor PXA H100 is not connected 1 Press and hold IMPRINT iDA X313 only or SOUND iDA X311 iDA X311RR only for at least 2 seconds to activate the Sound Setting selection mode 2 Turn the Double Action encoder iDA X313 ...

Page 23: ... X311 iDA X311RR only to select the desired treble level 7 7 and then press ENTER You can emphasize the treble level The adjustment can also be made by pressing IMPRINT iDA X313 only or SOUND iDA X311 iDA X311RR only Refer to Adjusting Subwoofer Level Bass Level Treble Level Balance Between Left and Right Fader Between Front and Rear Loudness Defeat page 20 Setting the Treble Centre Frequency Turn...

Page 24: ...only page 25 4 Displayed only when an external audio processor is connected 5 Displayed only when MX is set to ON and an external audio processor is connected or the IMPRINT audio processor is connected iDA X313 only 6 iDA X313 only 7 Displayed only when BT IN is OFF 8 The setting can be made only when AUX AUX is set to ON 9 Displayed only when DIGITAL AUX is set to ON 10 Displayed only when AUX i...

Page 25: ...e feedback with varying tones depending upon the button pressed Turning Mute Mode On Off INT MUTE If a device having the interrupt feature is connected audio will be automatically muted whenever the interrupt signal is received from the device When BLUETOOTH is set to ADPT INT MUTE cannot be set Refer to Setting the BLUETOOTH Connection page 23 When the BLUETOOTH INTERFACE KCE 400BT is connected s...

Page 26: ...h the head lights of the vehicle ON This mode is useful if you feel the unit s backlighting is too bright at night Scroll Type Setting Choose from two scrolling methods Select the type you prefer Scroll Setting TEXT SCROLL You can set a scroll type such as song title or file name on the source screen If the search mode screen displays fills with text the display scrolls DIGITAL AUX ON DIGITAL AUX ...

Page 27: ... PXA H100 sold separately is connected to this unit MultEQ and the following sound adjustment can be performed Changing MultEQ mode MultEQ developed by Audyssey Labs automatically corrects the audio for the listening environment The system is optimized for selected positions in the vehicle To accomplish this MultEQ must take measurements of the vehicles response characteristics For details on the ...

Page 28: ...ge 25 Storing the Audio Adjustment Level You can store up to 3 adjusted set contents on this unit All of the following adjusted set items are stored in a preset memory 1 Turn the Double Action encoder to select a preset number and press and hold ENTER for at least 2 seconds 2 Turn the Double Action encoder to select PROTECT YES NO and then press ENTER to store the adjusted contents PROTECT YES Ini...

Page 29: ... for 2 seconds Adjusting the Graphic Equalizer Curve You can modify the equalizer settings to create a response curve more appealing to your personal taste To adjust the graphic equalizer curve set the EQ mode to GRAPHIC EQ For details refer to Setting EQ mode page 29 1 After selecting EQ ADJ Graphic EQ from the Sound Field Adjustment mode turn the Double Action encoder to select the band adjustme...

Page 30: ... 3 2 Turn the Double Action encoder to adjust the output level Adjustable output level 12 to 0 dB Slope Adjustment 3 3 Turn the Double Action encoder to adjust the slope Adjustable slope FLAT 6 dB oct 12 dB oct 18 dB oct 24 dB oct FLAT can be set for the HIGH slope only when USER S is selected in Setting the Response Slope for the High Range Speaker TW Setup page 29 Depending on the response chara...

Page 31: ...oofer type STEREO Initial setting MONO Depending on the response characteristics of the speaker care should be taken when setting the response slope of the high range speaker to FLAT in 2 2ch 3WAY mode see Adjusting the Crossover Settings X OVER on page 28 as speaker damage may result MAKER S Initial setting USER S This setting gives you a choice of 5 band parametric or 7 band graphic equalizer PA...

Page 32: ...er creates a shift in the sounds image and frequency characteristics This is caused by the time delay between the sound reaching the listener s right versus the left ear To correct this this unit is able to delay the audio signal to the speakers closest to the listener This effectively creates a perception of increased distance for those speakers The listener can be placed at an equal distance bet...

Page 33: ... 67 6 7 227 8 89 8 17 1 7 57 8 22 8 68 6 8 231 2 91 1 18 1 8 61 2 24 1 69 6 9 234 6 92 5 19 1 9 64 6 25 5 70 7 0 238 0 93 8 20 2 0 68 0 26 8 71 7 1 241 4 95 1 21 2 1 71 4 28 1 72 7 2 244 8 96 5 22 2 2 74 8 29 5 73 7 3 248 2 97 8 23 2 3 78 2 30 8 74 7 4 251 6 99 2 24 2 4 81 6 32 2 75 7 5 255 0 100 5 25 2 5 85 0 33 5 76 7 6 258 4 101 8 26 2 6 88 4 34 8 77 7 7 261 8 103 2 27 2 7 91 8 36 2 78 7 8 265 ...

Page 34: ... off If connected following instructions the unit will not operate with the vehicle s ignition off Improper power lead Red and battery lead Yellow connections Check power lead and battery lead connections Blown fuse Check the fuse of the unit replace with the proper value if necessary Internal micro computer malfunctioned due to interference noise etc Press the RESET switch with a ball point pen o...

Page 35: ...on not being compatible with this unit Update the iPhone iPod Software Version to be compatible with this unit The iPod is not verified Try another iPod The iPod is not connected Make sure the iPod is correctly connected refer to Connections Make sure the cable is not bent excessively There are no songs in the iPod Download songs to the iPod and connect to this unit Communication error Turn the ig...

Page 36: ...nput that is supported on the unit Communication error Turn the ignition key off and then set to ON again Verify in the display after reconnecting the Portable audio player to the connection cable Caused by the Software Version not being compatible with this unit Update the Portable audio player Software Version The Portable audio player is not verified Change another Portable audio player Protect...

Page 37: ...FAT 12 16 32 MP3 Decoding MPEG 1 2 AUDIO Layer 3 WMA Decoding Windows Media Audio AAC Decoding AAC LC format m4a file Number of Channels 2 Channel Stereo Frequency Response 5 20 000 Hz 1 dB Total Harmonic Distortion 0 008 at 1 kHz Dynamic Range 95 dB at 1 kHz Signal to Noise Ratio 105 dB Channel Separation 85 dB at 1 kHz Frequency response may differ depending on the encoder software bit rate Powe...

Page 38: ... product to have the work done USE SPECIFIED ACCESSORY PARTS AND INSTALL THEM SECURELY Be sure to use only the specified accessory parts Use of other than designated parts may damage this unit internally or may not securely install the unit in place This may cause parts to become loose resulting in hazards or product failure ARRANGE THE WIRING SO IT IS NOT CRIMPED OR PINCHED BY A SHARP METAL EDGE ...

Page 39: ...e the mounting sleeve into the dashboard and fix it with the metal shackles Heat sink Detachable Front Panel Less than 35 Pressure Plates Dashboard This unit Mounting Sleeve Included Bracket Rubber Cap Included Hex Bolt Included 2 When your vehicle has the Bracket mount the long hex bolt onto the rear panel of the iDA X313 iDA X311 iDA X311RR and put the Rubber Cap on the hex bolt If your vehicle ...

Page 40: ...ng the lock case supplied with USB cable as shown below Remove USB memory Pull out USB memory squarely from the USB cable When removing USB memory pull it out straight If sound is not output or USB memory is not recognized even when USB memory is connected remove USB memory once then connect it again Change to a source other than the USB memory mode then remove the USB memory If the USB memory is ...

Page 41: ...N Black GND Blue POWER ANT DIMMER Orange BATTERY To iPod iDA X311 iDA X311RR only To USB memory portable audio player 2 iPhone 2 iPod Yellow Speakers Amplifier Sold Separately Rear left Front left Rear right Front right Subwoofers Amplifier Sold Separately iDA X313 iDA X311 iDA X311RR iDA X313 only Front or Subwoofer 3 To BLUETOOTH INTERFACE KCE 400BT sold separately or 1 The system switch is loca...

Page 42: ...bile phone an optional BLUETOOTH INTERFACE KCE 400BT connection is required For details on connection refer to the Owner s Manual of the BLUETOOTH INTERFACE KCE 400BT You can also connect this to an external device such as a portable player by using a conversion cable KCE 237B sold separately for building up the AUX IN Refer to Setting the AUX Mode page 23 Full Speed Connector iDA X311 iDA X311RR ...

Reviews: