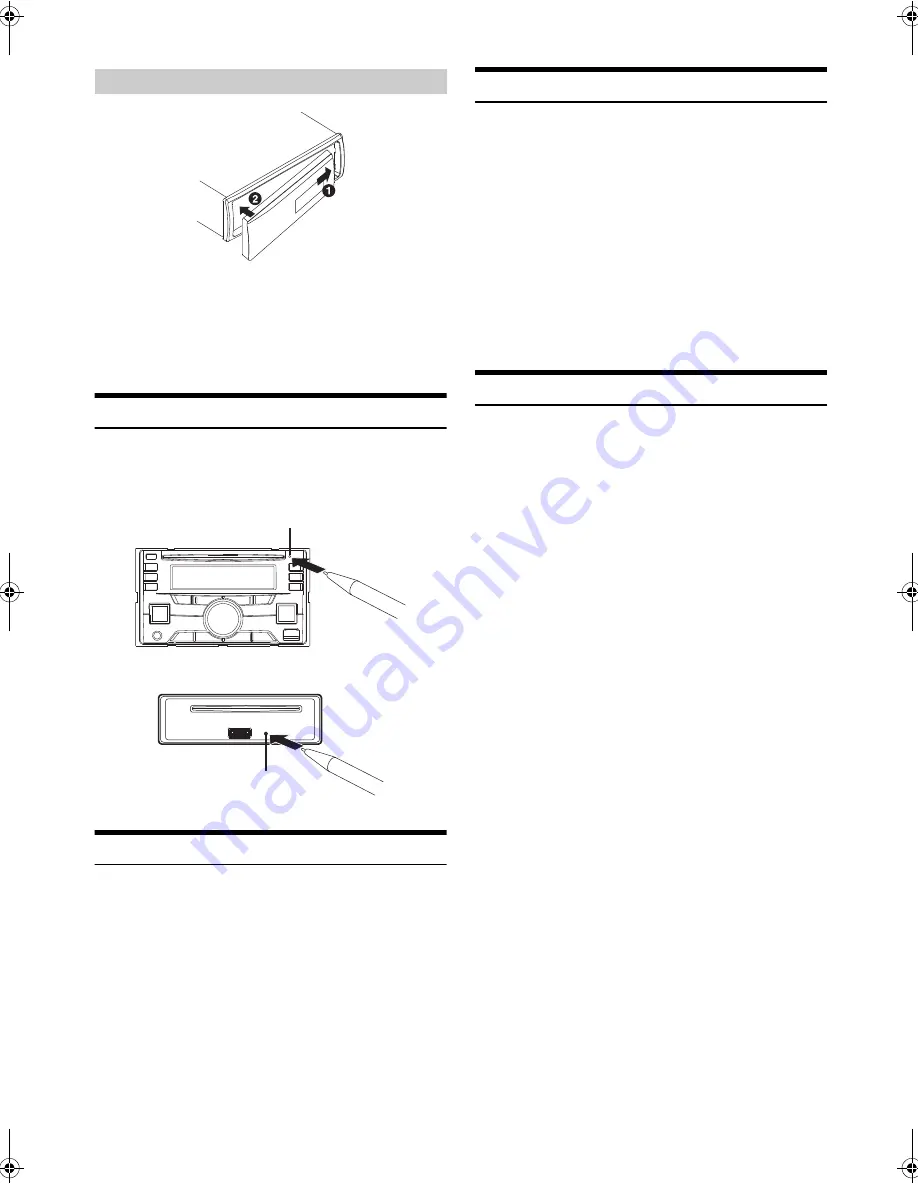
background image

10

-EN

Notes

• Before attaching the front panel, make sure that there is no dirt or dust 

on the connector terminals and no foreign object between the front 
panel and the main unit.

• Attach the front panel carefully, holding the sides of the front panel to 

avoid pushing buttons by mistake.

Initial System Start-Up

Be sure to press the 

RESET

 switch when using the unit for the first time, 

after changing the car battery, etc.

CDE-W265EBT 

CDE-164EBT 

Adjusting Volume

Turn the 

Rotary encoder

 until the desired sound is 

obtained.

Setting the Dimmer Control

Press and hold 

DIM.

 for at least 2 seconds repeatedly to 

select the DIMMER mode.

DIMMER AUTO 

 DIMMER ON 

 DIMMER OFF 

 DIMMER AUTO

DIMMER AUTO mode:

Decrease the illumination brightness of the unit’s buttons with the 
head lights of the vehicle ON. This mode decreases the unit’s 
backlighting in sync with headlight usage.

DIMMER ON mode:

Keep the illumination brightness of the backlighting dimmed.

DIMMER OFF mode:

Keep the illumination brightness of the backlighting bright.

Note

• The setting items are the same as DISPLAY setting in SETUP mode.

For details, refer to “Dimmer Control” on page 27.

Setting Time

1

Press and hold 

Y

SETUP

 for at least 2 seconds to 

activate the SETUP selection mode.

2

Turn the 

Rotary encoder

 to select GENERAL, and then 

press 



ENTER

.

3

Turn the 

Rotary encoder

 to select the CLOCK ADJ mode, 

and then press 



ENTER

.

The time indication will blink.

4

Turn the 

Rotary encoder

 to adjust the hours while the 

time indication is blinking.

5

When the hour has been adjusted, press 



ENTER

.

6

Turn the 

Rotary encoder

 to adjust the minutes while the 

time indication is blinking.

7

Press and hold 

Y

SETUP

 for at least 2 seconds to return 

to normal mode.

Notes

• To synchronize the clock to another clock/watch or radio time 

announcement, press and hold 



ENTER

 for at least 2 seconds after 

setting the “hour”. Minutes will reset to “00”. If the display shows over 
“30” minutes when you do this, the time will advance one hour.

• Pressing 

t

 will return to the previous mode.

• If no operation is performed for 60 seconds, the unit will return to 

normal mode automatically.

Attaching

RESET switch

RESET switch

00ALPINE.book  Page 10  Thursday, October 23, 2014  4:15 PM

Summary of Contents for CDE-164EBT

Page 1: ...ting BASS ENGINE SQ ON OFF 16 Displaying the BASS ENGINE SQ PARAMETER 16 Adjusting the Parametric Equalizer Curve 9BAND P EQ 16 Adjusting the Frequency CENTER FRQ 17 Setting the Bandwidth WIDTH Q 17 A...

Page 2: ...ON OFF 31 Setting the Phone Book Update 31 Setting the Phone Book Auto Update ON OFF AUTO 31 Setting the Phone Book Manual Update ON OFF MANUAL 31 Changing the Phone book List Order 31 Selecting the...

Page 3: ...ition Memory 42 Changing the Display 42 Information In Case of Difficulty 43 Basic 43 Radio 43 CD 43 MP3 WMA AAC 43 Audio 43 iPod 43 Indication for CD Player 43 Indication for USB Memory 44 Indication...

Page 4: ...and may result in fire USE THIS PRODUCT FOR MOBILE 12V APPLICATIONS Use for other than its designed application may result in fire electric shock or other injury DO NOT PLACE HANDS FINGERS OR FOREIGN...

Page 5: ...sc to the outer edge If the surface is heavily soiled dampen a clean soft cloth in a solution of mild neutral detergent before cleaning the disc Disc Accessories There are various accessories availabl...

Page 6: ...ot be recognized The resulting playback may contain noise that can damage speakers and or amplifiers It is recommended to back up important data on a personal computer Do not remove the USB device whi...

Page 7: ...standby state Method 2 Setting DEMO MODE to OFF standby state or QUITE OFF completely closed state in Setup menu For details about standby state and completely closed state please refer to Demonstrati...

Page 8: ...lumination brightness of the backlighting bright Note The setting items are the same as DISPLAY setting in SETUP mode For details refer to Dimmer Control on page 27 Setting Time 1 Press and hold Y SET...

Page 9: ...y is manually tuned in steps Manual tuning Controllable with Remote Control This unit can be controlled with an optional Alpine remote control For details consult your Alpine dealer Point the optional...

Page 10: ...uttons 1 to 6 in order of signal strength When the automatic memory has been completed the tuner goes to the station stored in preset location No 1 Note If no stations are stored the tuner will return...

Page 11: ...during a search to skip over a calculated percentage of tracks For details refer to Direct Search Function on page 38 Press t in the search mode to cancel Or the search mode is canceled if no operatio...

Page 12: ...tags WMA tags This device supports ID3 tag v1 and v2 and WMA tag If tag data is in an MP3 WMA AAC file this device can display the title track title artist name and album name ID3 tag WMA tag data Thi...

Page 13: ...der contains all folders and files It is created automatically for all burned discs CDE W265EBT CDE 164EBT Adjusting Subwoofer Level Bass Level Treble Level Balance Between Left and Right Fader Betwee...

Page 14: ...R OFF 5 Press and hold Y SETUP for at least 2 seconds to return to normal mode Notes Adjustment cannot be performed during a call Pressing t returns to the previous Sound menu mode If no operation is...

Page 15: ...40 50 63 80 Initial setting 100 125 160 200 Hz 3WAY System Setting contents LOW MID LOW 20 25 31 5 40 50 63 80 100 125 160 200 250 315 400 500 Initial setting 630 800 Hz MID HIGH 20 25 31 5 40 50 63 8...

Page 16: ...Note The total adjustment distance for all speakers should be less than 510 centimetres 201 inches 3 Repeat steps 1 and 2 for setting other speakers By setting these values sound from all speakers can...

Page 17: ...contain EQ PRESETS 9BAND EQ SUBWOOFER when set this item via TuneIt App X OVER SUBW SYS and MX SETTING These items are set automatically in BASS ENGINE SQ mode and cannot be adjusted separately From...

Page 18: ...ue List Example 2 Listening Position All Seats Delay Number Time Difference msec Distance cm Distance inch 0 0 0 0 0 0 0 1 0 1 3 4 1 3 2 0 2 6 8 2 7 3 0 3 10 2 4 0 4 0 4 13 6 5 4 5 0 5 17 0 6 7 6 0 6...

Page 19: ...76 7 6 258 4 101 8 77 7 7 261 8 103 2 78 7 8 265 2 104 5 79 7 9 268 6 105 9 80 8 0 272 0 107 2 81 8 1 275 4 108 5 82 8 2 278 8 109 9 83 8 3 282 2 111 2 84 8 4 285 6 112 6 85 8 5 289 0 113 9 86 8 6 29...

Page 20: ...ting the Crossover Settings X OVER on page 17 to made the setting 3 After setting turn the Rotary encoder to select DONE and then press ENTER TURN ACC OFF AND ON will be displayed 4 Switch the ignitio...

Page 21: ...h folder file information If there is no folder file information FOLDER FILE is displayed 3 ID3 tag WMA tag If an MP3 WMA AAC file contains ID3 tag WMA tag information the ID3 tag WMA tag information...

Page 22: ...OUND CALLER ID PB UPDATE PB ORDER SPEAKER SL and FW VERSION can be selected in this mode For details about these settings refer to Bluetooth SETUP on page 30 10 The Hands free phone talk level ring to...

Page 23: ...displayed 2 Turn the Rotary encoder to select the desired mode and then press ENTER LIKE 1 REPLAY NEXT PREVIOUS TTS VOLUME 2 1 Not displayed when the received Notification is Message type 2 It can al...

Page 24: ...normal mode Notes Press t to return to the previous mode If no operation is performed for 60 seconds the unit will return to normal mode automatically GENERAL is selected on the setup main menu in ste...

Page 25: ...nctions Setting item DEMO MODE Setting contents ON Initial setting OFF QUITE OFF ON The unit starts the demonstration if there is no operation for 30 seconds OFF Standby The demonstration mode is in t...

Page 26: ...ine different search modes Setting item IPOD LIST Further setting items PLAYLISTS ARTISTS ALBUMS AUDIOBOOKS PODCASTS GENRES COMPOSERS SONGS GENIUS MIX Setting contents OFF ON Notes The search mode for...

Page 27: ...How to connect to a Bluetooth compatible device Pairing on page 29 For details on the control from a Bluetooth compatible device refer to the Owner s Manual of the Bluetooth compatible device 1 Using...

Page 28: ...te When BT IN is set to OFF the indicators related to Hands free phone C battery charge and i signal strength will not be displayed By setting this item to ON the unit will auto pair when an iPod iPho...

Page 29: ...se this function according to the following setting Setting item CALLER ID Setting contents OFF ON Initial setting If you want to keep the ID information of the caller from others set this item to OFF...

Page 30: ...ontained in the Owner s Manual are based upon the latest available information and are believed to be accurate at the time of printing Alpine reserves the right to change or modify any information or...

Page 31: ...I and then press 4 Turn the Rotary encoder to select the third letter e g C and then press ENTER The names stored in phone book which begin with MIC are searched 5 Turn the Rotary encoder to select t...

Page 32: ...ction away from the main car speakers e g clipped on sun visor may also reduce feedback at high volume During a call activating the Voice Mute function will instantly mute the microphone input Your vo...

Page 33: ...nal If a USB Memory device is connected to the unit MP3 WMA AAC files can be searched and played back 1 Press V SOURCE to select the USB AUDIO mode 2 To pause playback press Pressing again will resume...

Page 34: ...ons described above Do not make a file s playback time more than 1 hour Media supported This device can play back files stored on USB Memory devices designed for USB connection Corresponding File Syst...

Page 35: ...guidelines Correct function of earlier versions cannot be guaranteed iPhone 5s Ver 7 1 1 iPhone 5c Ver 7 1 1 iPhone 5 Ver 7 1 1 iPhone 4s Ver 7 1 1 iPhone 4 Ver 7 1 1 iPhone 3GS Ver 6 1 6 iPhone 3G V...

Page 36: ...n to the previous mode When search is made during M I X play the M I X play mode will be canceled When search is made during song downloading on iPhone UPDATING will be displayed for a few second and...

Page 37: ...the iPod Control refer to Setting the iPod Control on page 37 Random Play Shuffle M I X The Shuffle function of the iPod iPhone is displayed as s on this unit Shuffle Albums The songs on each album ar...

Page 38: ...runs Android OS BlackBerry OS or iOS Just start with the name of one of your favorite artists songs or classical composers and Pandora will create a station that plays their music and more music like...

Page 39: ...ount 3 Turn the Rotary encoder to select the desired station and then press ENTER Pandora will play that station Genre Search 2 Turn the Rotary encoder to select GENRE and then press ENTER The GENRE s...

Page 40: ...encoder to select TRACK or ARTIST and then press ENTER A NEW TRACK or NEW ARTIST pop up screen A New Station based on current track or artist is created Notes Your New Station can be viewed on your P...

Page 41: ...CD player Eject the CD and remove it The CD is being improperly inserted Make sure the CD is being inserted following instructions in the CD Player Operation section Unable to fast forward or backward...

Page 42: ...off on or turning power off on A USB Memory is not connected Make sure the USB Memory device is correctly connected No song file is stored in the USB Memory Connect the USB Memory device after storin...

Page 43: ...g in the Pandora account The number of new stations reached the limit 100 stations Delete an existing station You switch CDE W265EBT CDE 164EBT to Pandora mode by pressing V SOURCE with a Smartphone c...

Page 44: ...dB Channel Separation 85 dB at 1 kHz Wave length 795 nm Laser power CLASS I USB requirements USB 1 1 2 0 Max Power Consumption Smartphone charge capable USB Class Mass Storage File System FAT 12 16 3...

Page 45: ...of other than designated parts may damage this unit internally or may not securely install the unit in place This may cause parts to become loose resulting in hazards or product failure ARRANGE THE WI...

Page 46: ...EBT Note For the screw marked use an appropriate screw for the chosen mounting location 3 Slide the CDE W265EBT CDE 164EBT into the dashboard until it clicks This ensures that the unit is properly loc...

Page 47: ...ble and secure location In a location that does not inhibit safely driving the vehicle Mount the microphone in a location where the driver s voice can easily be picked up Choose a location for the mic...

Page 48: ...ion Key Blue Orange Yellow Battery Speakers 2WAY system 2WAY system 3WAY system 3WAY system Green Front high range L Green Black White Front high range R White Black Gray Black Rear high range L Front...

Page 49: ...s securely fastened using the sheet metal screw provided Right Front Speaker Output Lead Gray Right Front Speaker Output Lead Gray Black Right Rear Speaker Output Lead Violet Black Right Rear Speaker...

Page 50: ...About the Rules of Bluetooth Electromagnetic Radiation Regulation Thailand This telecommunication equipment conforms to NTC technical requirement UAE OMAN ER0119686 13 DA0042125 10 R 1508 13 D100428...

Reviews: