background image

Page 

14 

to 

62


OPERATION


Power ON/OFF


Once the unit has been properly installed and the batteries are connected well, simply press On/Off switch (located 

on the LCD module) to turn on the unit. 


Operation and Display Panel


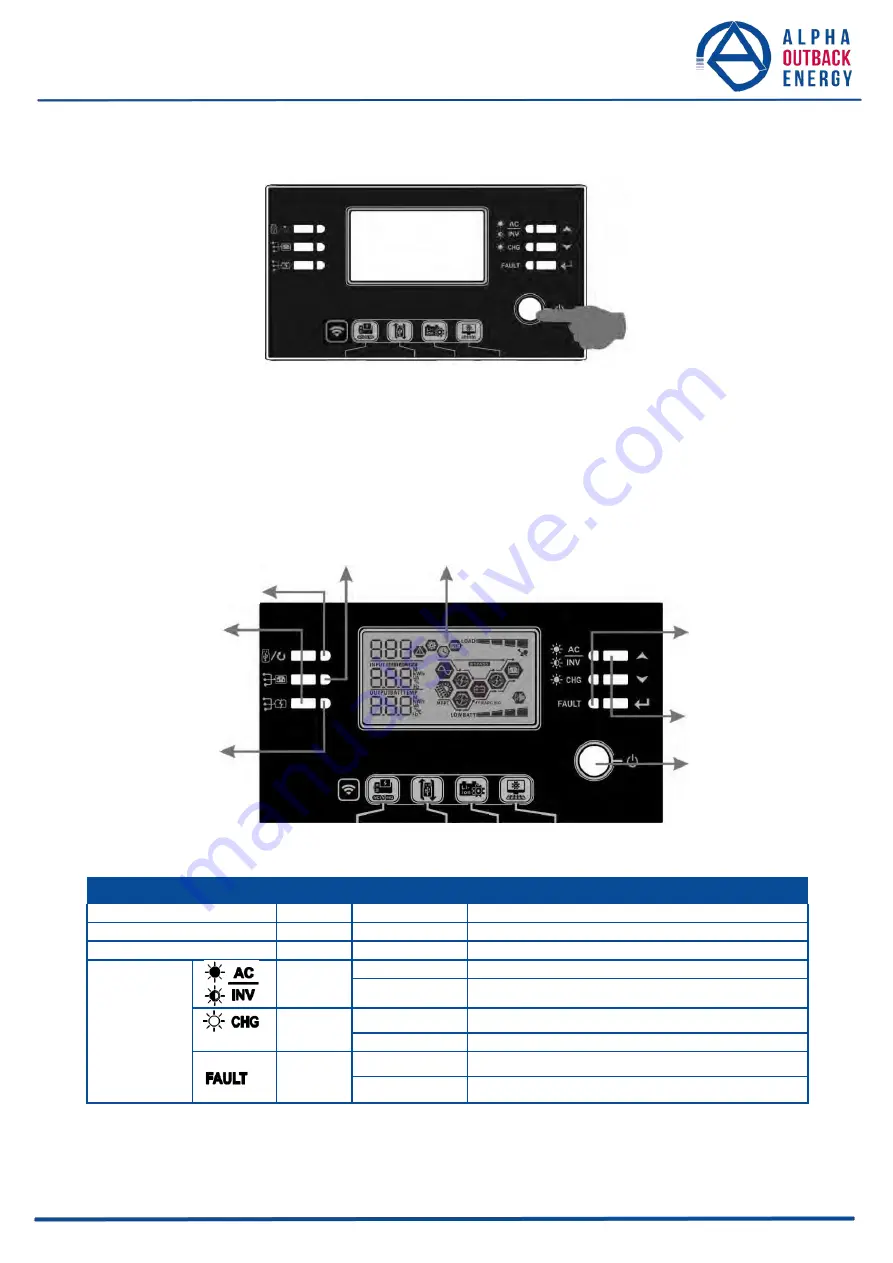
The  operation  and  the  LCD module,  shown  in  the  chart  below,  includes  six  indicators,  six  function  keys,  on/off 

switch and a LCD display, indicating the operating status and input/output power information. 


Setting  LED  2 

LCD  display 


Setting LED 1 

Function keys 


Setting  LED  3 


Status indicators 


Function keys 

On/off switch 


Indicators


LED Indicator


Color


Solid/Flashing


Messages


Setting LED 1


Green 

Solid On 

Output powered by utility 

Setting LED 2


Green 

Solid On 

Output powered by PV 

Setting LED 3


Green 

Solid On 

Output powered by battery 


Status 
indicators


Green 

Solid On 

Output is available in line mode 

Flashing 

Output is powered by battery in battery mode 


Green 

Solid On 

Battery is fully charged 

Flashing 

Battery is charging. 


Red 

Solid On 

Fault mode 

Flashing 

Warning mode 

Summary of Contents for SPC II-M5000-48

Page 1: ...SPCIII4000 24 SPCIII6000 48 Solar inverter charger USER MANUAL ...

Page 2: ...mmunication 13 Dry Contact Signal 13 OPERATION 14 Power ON OFF 14 Operation and Display Panel 14 LCD Display Icons 15 LCD Setting 17 Display Setting 28 Operating Mode Description 33 Battery Equalization Description 36 Fault Reference Code 37 Warning Indicator 38 SPECIFICATIONS 39 Table 1 Line Mode Specifications 39 Table 2 Inverter Mode Specifications 40 Table 3 Charge Mode Specifications 41 Table...

Page 3: ...e It s very important to correctly operate this inverter charger 8 Be very cautious when working with metal tools on or around batteries Dropping a tool could spark or short circuit batteries or other electrical parts and could cause an explosion 9 Please strictly follow installation procedure when you want to disconnect AC or DC terminals Please refer to INSTALLATION section of this manual for th...

Page 4: ... generator power Auto restart while AC is recovering Overload Over temperature short circuit protection Smart battery charger design for optimized battery performance Cold start function Removable LCD control module Multiple communication ports for BMS RS485 CAN BUS RS232 Built in Wi Fi for mobile monitoring Requires App OTG USB function dusk filters Configurable AC PV Output usage timer and prior...

Page 5: ...t 10 Battery input 11 Circuit breaker 12 Remote LCD panel communication port 13 Dry contact 14 USB communication port 15 BMS communication port CAN and RS232 or RS485 16 RS 232 communication port 17 Output source indicators refer to OPERATION Operation and Display Panel section for details and USB function setting reminder refer to OPERATION Function Setting for the details ...

Page 6: ...sider the followings before selecting your placements Do not mount the inverter on flammable construction materials Mount on a solid surface Install the inverter at eye level in order to allow easy LCD display readout For proper air circulation and heat dissipation allow a clearance of approx 20 cm to the side and approx 50 cm above and below the unit and 100cm to the front The ambient temperature...

Page 7: ...some applications however it s still recommended to have over current protection installed Please refer to typical amperage as required WARNING All wiring must be performed by a qualified personnel WARNING It s very important for system safety and efficient operation to use appropriate cables for battery connection To reduce risk of injury please use the proper recommended cable in the table below...

Page 8: ...attery for SPCIII6000 48 model 2 Please choose a suitable battery cable with correct connector which can well fit into the battery terminals refer to recommended cable size table Apply ring terminals to your battery wires and secure it to the battery terminal block with the bolts properly tightened Refer to battery cable size for torque value Make sure polarity at both the battery and the inverter...

Page 9: ...0 24 and 50A for SPCIII6000 48 CAUTION There are two power terminal blocks with IN Input and OUT Output markings DO NOT mistakenly connect to the wrong connectors WARNING All wiring must be performed by a qualified personnel WARNING It s very important for system safety and efficient operation to use appropriate cable size for AC input connection To reduce risk of injury please use the proper reco...

Page 10: ... sure the wires are securely connected PV Connection CAUTION Before connecting to PV modules please install a separately DC circuit breaker between the inverter and PV modules WARNING It s very important for system safety and efficient operation to use appropriate cable for PV module connection To reduce risk of injury please use the proper recommended cable size shown below Model Wire Size Cable ...

Page 11: ...n the table below SOLAR INPUT Q ty of panels Total input Solar Panel min in series 6 pcs max in series 12 pcs power 6 pcs in series 6 pcs 1500W Spec reference 8 pcs in series 8 pcs 2000W 250Wp 12 pcs in series 12 pcs 3000W Vmp 30 1Vdc 8 pieces in series and 2 sets in parallel 16 pcs 4000W Imp 8 3A 10 pieces in series and 2 sets in parallel 20 pcs 5000W Voc 37 7Vdc Isc 8 4A Cells 60 11 pieces in se...

Page 12: ...emoved and installed in a remote location with an optional communication cable Please take the following steps to implement this remote panel installation Step 1 Remove the screw on the bottom of LCD panel and pull down the module from the case Detach the cable from the remote communication port Be sure to replace the retention plate back to the inverter ...

Page 13: ...holes in the marked locations as shown in the illustration below The LCD module then can be securely mounted to your desired location Ø5 Ø9 Step 3 Connect LCD module to the inverter with an optional RJ45 communication cable as shown below RS 232 communication To PC Remote communication USB communication To PC BMS communication ...

Page 14: ...n please check Appendix C BMS Communication It is recommended to purchase a special communication cable if you are connecting to Lithium Ion battery banks Please refer to Appendix B BMS Communication Installation for details Dry Contact Signal There is one dry contact 3A 250VAC available on the rear panel It could be used to deliver signal to external device when battery voltage reaches warning le...

Page 15: ...t output power information Setting LED 2 LCD display Setting LED 1 Function keys Setting LED 3 Status indicators Function keys On off switch Indicators LED Indicator Color Solid Flashing Messages Setting LED 1 Green Solid On Output powered by utility Setting LED 2 Green Solid On Output powered by PV Setting LED 3 Green Solid On Output powered by battery Status indicators Green Solid On Output is a...

Page 16: ... Icons Icon Function description Input Source Information Indicates the AC input Indicates the PV input Indicate input voltage input frequency PV voltage charger current charger power battery voltage Configuration Program and Fault Information Indicates the setting programs Indicates the warning and fault codes Warning flashing with warning code Fault lighting with fault code Output Information In...

Page 17: ...ode it will present battery capacity Load Percentage Battery Voltage LCD Display Load 50 1 85V cell 1 85V cell 1 933V cell 1 933V cell 2 017V cell 2 017V cell Load 50 1 892V cell 1 892V cell 1 975V cell 1 975V cell 2 058V cell 2 058V cell Load Information Indicates overload Indicates the load level by 0 24 25 49 50 74 and 75 100 0 24 25 49 50 74 75 100 Mode Operation Information Indicates unit con...

Page 18: ...t Solar energy provides power to the loads as first priority If solar energy is not sufficient to power all connected loads Utility energy will supply power to the loads at the same time SBU priority Solar energy provides power to the loads as first priority If solar energy is not sufficient to power all connected loads battery energy will supply power to the loads at the same time Utility provide...

Page 19: ...d 29 Pylontech battery If selected programs of 02 26 27 and 29 will be automatically set up No need for further setting WECO battery only for 48V model If selected programs of 02 12 26 27 and 29 will be auto configured per battery supplier recommended No need for further adjustment Soltaro battery only for 48V model If selected programs of 02 26 27 and 29 will be automatically set up No need for f...

Page 20: ...ad occurs Restart disable default Restart enable 07 Auto restart when over temperature occurs Restart disable default Restart enable 09 Output frequency 50Hz default 60Hz 10 Output voltage 220V 230V default 240V 11 Maximum utility charging current Note If setting value in program 02 is smaller than that in program in 11 the inverter will apply charging current from program 02 for utility charger 3...

Page 21: ...vailable options for 24V model Battery fully charged 27V default Setting range is from 24V to 29V Increment of each click is 0 5V Available options for 48V model Battery fully charged 54V default Setting range is from 48V to 58V Increment of each click is 1V 16 Charger source priority To configure charger source priority If this inverter charger is working in Line Standby or Fault mode charger sou...

Page 22: ...e and sufficient 18 Alarm control Alarm on default Alarm off 19 Auto return to default display screen Return to default display screen default If selected no matter how users switch display screen it will automatically return to default display screen Input voltage output voltage after no button is pressed for 1 minute Stay at latest screen If selected the display screen will stay at latest screen...

Page 23: ... 48 default setting 56 4V If self defined is selected in program 5 this program can be set up Setting range is from 25 0V to 31 5V for SPCIII4000 24 model and 48 0V to 61 0V for SPCIII6000 48 model Increment of each click is 0 1V 27 Floating charging voltage SPCIII4000 24 default setting 27 0V SPCIII6000 48 default setting 54 0V If self defined is selected in program 5 this program can be set up S...

Page 24: ...8 0V for SPCIII6000 48 model Increment of each click is 0 1V Low DC cut off voltage will be fixed to setting value no matter what percentage of load is connected 30 Battery equalization Battery equalization Battery equalization disable default If Flooded or User Defined is selected in program 05 this program can be set up 31 Battery equalization voltage SPCIII4000 24 default setting 29 2V SPCIII60...

Page 25: ...e battery equalization immediately and LCD main page will shows If Disable is selected it will cancel equalization function until next activated equalization time arrives based on program 35 setting At this time will not be shown in LCD main page 37 Reset all stored data for PV generated power and output load energy Not reset Default Reset 93 Erase all data log Not reset Default Reset 94 Data log ...

Page 26: ... 31 98 Time setting Month For month setting the range is from 1 to 12 99 Time setting Year For year setting the range is from 17 to 99 Functional Setting There are three function keys on the display panel to implement special functions such as USB OTG timer setting for output source priority and timer setting for charger source priority 1 USB Function Setting Insert an OTG USB disk into the USB po...

Page 27: ...se check with your dealer or installer for detail instructions By pressing button to export data log from the inverter to USB disk If Export data log the selected function is ready LCD will display Press button to confirm the selection again Press button to select Yes LED 1 will flash once every second during the process It will only display and all LEDs will be on after this action is complete Th...

Page 28: ...ress button to set up Solar First Timer Press button to select staring time Press or button to adjust values and press to confirm Press button to select end time Press or button to adjust values press button to confirm The setting values are from 00 to 23 with 1 hour increment Press button to set up SBU Priority Timer Press button to select staring time Press or button to adjust values and press t...

Page 29: ... to adjust values press button to confirm The setting values are from 00 to 23 with 1 hour increment Press button to set up Solar Only Timer Press button to select staring time Press or button to adjust values and press to confirm Press button to select end time Press or button to adjust values press button to confirm The setting values are from 00 to 23 with 1 hour increment Press button to exit ...

Page 30: ...Page 29 to 62 Selectable information LCD display PV current PV current 2 5A PV power PV power 500W Charging current AC and PV charging current 50A PV charging current 50A AC charging current 50A ...

Page 31: ...splay Charging power AC and PV charging power 500W PV charging power 500W AC charging power 500W Battery voltage and output voltage Battery voltage 25 5V output voltage 230V Output frequency Output frequency 50Hz Load percentage Load percent 70 ...

Page 32: ...ill present x xkVA like below chart Load in Watt When load is lower than 1kW load in W will present xxxW like below chart When load is larger than 1kW 1KW load in W will present x xkW like below chart Battery voltage DC discharging current Battery voltage 25 5V discharging current 1A PV energy generated today and Load output energy today This PV Today energy 3 88kWh Load Today energy 9 88kWh ...

Page 33: ... energy 988kWh PV energy generated this year and Load output energy this year This PV year energy 3 88MWh Load year energy 9 88MWh PV energy generated totally and Load output total energy PV Total energy 38 8MWh Load Output Total energy 98 8MWh Real date Real date Nov 28 2020 Real time Real time 13 20 Main CPU version checking Main CPU version 00014 04 ...

Page 34: ...perating Mode Description Operation mode Description LCD display Charging by utility and PV energy Standby mode Charging by utility Note Standby mode The No output is supplied by inverter is not turned on the unit but it still can yet but at this time the charge the batteries inverter can charge the battery without AC output Charging by PV energy No charging ...

Page 35: ...vailable Grid and PV power are available Grid is available PV power is available No charging Line Mode The unit will provide output power from the mains It will also charge the battery at line mode Charging by utility and PV energy Charging by utility If SUB solar first is selected as output source priority and solar energy is not sufficient to provide the load solar energy and the utility will pr...

Page 36: ...selected as output source priority and battery is not connected solar energy and the utility will provide the loads Power from utility Battery Mode The unit will provide output power from battery and or PV power Power from battery and PV energy PV energy will supply power to the loads and charge battery at the same time No utility is available Power from battery only Power from PV energy only ...

Page 37: ...attery equalization function in LCD setting Program 30 first You can then apply this function by either one of the following methods 1 Setting equalization interval in Program 35 2 Activate equalization immediately in Program 36 When to Equalize In floating charge stage when the selected equalization interval battery equalization cycle is reached or equalization is activated immediately the contro...

Page 38: ...tion and return to the floating charging stage Fault Reference Code Fault Code Fault Event Icon on 01 Fan is locked when inverter is off 02 Over temperature 03 Battery voltage is too high 04 Battery voltage is too low 05 Output short circuited or over temperature is detected by internal converter components 06 Output voltage is too high 07 Overload time out 08 Bus voltage is too high 09 Bus soft s...

Page 39: ...s over charged Beep once every second 04 Low battery Beep once every second 07 Overload Beep once every 0 5 second 10 Output power derating Beep twice every 3 seconds 15 PV energy is low Beep twice every 3 seconds 16 High AC input 280VAC during BUS soft start None 32 Communication failure between inverter and remote display panel None Battery equalization None Battery is not connected None ...

Page 40: ...s Return Voltage 270Vac 7V Max AC Input Voltage 300Vac Nominal Input Frequency 50Hz 60Hz Auto detection Low Loss Frequency 40 1Hz Low Loss Return Frequency 42 1Hz High Loss Frequency 65 1Hz High Loss Return Frequency 63 1Hz Output Short Circuit Protection Circuit Breaker Efficiency Line Mode 95 Rated R load battery full charged Transfer Time 10ms typical UPS 20ms typical Appliances Output power de...

Page 41: ...s 110 load 10s 105 110 load Surge Capacity 2 rated power for 5 seconds Nominal DC Input Voltage 24Vdc 48Vdc Cold Start Voltage 23 0Vdc 46 0Vdc Low DC Warning Voltage 23 0Vdc 22 0Vdc 46 0Vdc 44 0Vdc load 50 load 50 Low DC Warning Return Voltage 23 5Vdc 23 0Vdc 47 0Vdc 46 0Vdc load 50 load 50 Low DC Cut off Voltage 21 5Vdc 21 0Vdc 43 0Vdc 42 0Vdc load 50 load 50 High DC Recovery Voltage 32Vdc 62Vdc ...

Page 42: ...Time Bulk Absorption Maintenance Constant Current Constant Voltage Floating MPPT Solar Charging Mode INVERTER MODEL SPCIII4000 24 SPCIII6000 48 Max PV Array Power 5000W 6000W Nominal PV Voltage 320Vdc 360Vdc Start up Voltage 150Vdc 10Vdc PV Array MPPT Voltage Range 120 450Vdc Max Input Current per MPPT 18A Max PV Array Open Circuit Voltage 500Vdc Max Charging Current AC charger plus solar charger ...

Page 43: ... Battery is disconnected Check if battery wires are connected well Buzzer beeps continuously and red LED is on Fault code 07 Overload error The inverter is overload 110 and time is up Reduce the connected load by switching off some equipment If PV input voltage is higher than specification the output power will be derated At this time if connected loads is higher than derated output power it will ...

Page 44: ...me 24Vdc 100Ah min Backup Time 24Vdc 200Ah min SPCIII4000 24 300 449 1100 600 222 525 900 124 303 1200 95 227 1500 68 164 1800 56 126 2100 48 108 2400 35 94 2700 31 74 3000 28 67 3300 25 59 3600 22 50 4000 17 38 Model Load VA Backup Time 48Vdc 100Ah min Backup Time 48Vdc 200Ah min SPCIII6000 48 500 613 1288 1000 268 613 1500 158 402 2000 111 271 2500 90 215 3000 76 182 3500 65 141 4000 50 112 4500...

Page 45: ...e according to the lithium battery parameters Have the inverter start or stop charging according to the status of lithium battery 2 Pin Assignment for BMS Communication Port 1 AOESS48 LFP4100 Lithium Battery Communication Configuration Dial switch address Used to set the address bit of battery module when multiple batteries are wired in parallel No Dial switch address RS485 CAN 1 2 3 4 5 6 0 OFF O...

Page 46: ... Step 4 Be sure to select battery type as Lib in LCD program 5 If communication between the inverter and battery is successful the battery icon on LCD display will flash Generally speaking it will take longer than 1 minute to establish communication 3 LIO 4810 150A ESS LIO I 4810 Lithium Battery Communication Configuration LIO 4805 LIO 4810 150A ...

Page 47: ...D switch From number 0 to 9 the number can be random no particular order Maximum 10 battery modules can be operated in parallel Installation and Operation After ID no is assigned for each battery module please set up LCD panel in inverter and install the wiring connection as following steps Step 1 Use supplied RJ11 signal cable to connect into the extension port P1 or P2 Step 2 Use supplied RJ45 c...

Page 48: ...nual button cannot be approached just simply turn on the inverter module The battery module will be automatically turned on Step 5 Turn on the inverter Step 6 Be sure to select battery type as LIB in LCD program 5 If communication between the inverter and battery is successful the battery icon on LCD display will flash Generally speaking it will take longer than 1 minute to establish communication...

Page 49: ...equired to set up master battery with this setting and slave batteries are unrestricted 1 0 0 Multiple group condition It s required to set up master battery on the first group with this setting and slave batteries are unrestricted 0 1 0 Multiple group condition It s required to set up master battery on the second group with this setting and slave batteries are unrestricted 1 1 0 Multiple group co...

Page 50: ...r is ready Step 4 Turn on the inverter Step 5 Be sure to select battery type as PYL in LCD program 5 If communication between the inverter and battery is successful the battery icon on LCD display will flash Generally speaking it will take longer than 1 minute to establish communication Active Function This function is to activate lithium battery automatically while commissioning After battery wir...

Page 51: ...Step 2 Switch on Lithium battery Step 3 Turn on the inverter Step 4 Be sure to select battery type as WEC in LCD program 5 If communication between the inverter and battery is successful the battery icon on LCD display will flash Usually it will take longer than 1 minute to establish communication ...

Page 52: ...en DC isolator and switch on Lithium battery Step 3 Turn on the inverter Step 4 Be sure to select battery type as SOL in LCD program 5 If communication between the inverter and battery is successful the battery icon on LCD display will flash Usually it will take longer than 1 minute to establish communication ...

Page 53: ...ttery Communication lost only available when the battery type is setting as Pylontech Battery After battery is connected communication signal is not detected for 3 minutes buzzer will beep After 10 minutes inverter will stop charging and discharging to lithium battery Communication lost occurs after the inverter and battery is connected successfully buzzer beeps immediately If battery status is no...

Page 54: ...ning Wi Fi module with WatchPower APP available for both iOS and Android based device All data loggers and parameters are saved in iCloud The major functions of this APP Delivers device status during normal operation Allows to configure device setting after installation Notifies users when a warning or alarm occurs Allows users to query inverter history data 2 WatchPower App 2 1 Download and insta...

Page 55: ...ll in all required information and scan the remote box PN by tapping icon Or you can simply enter PN directly Then tap Register button Then a Registration success window will pop up Tap Go now to continue setting local Wi Fi network connection Step 2 Local Wi Fi Module Configuration Now you are in Wi Fi Config page There are detailed setup procedure listed in How to connect section and you may fol...

Page 56: ...enter default password 12345678 Then return to WatchPower APP and tap button when Wi Fi module is connected successfully Step 3 Wi Fi Network settings Tap icon to select your local Wi Fi router name to access the internet and enter password Step 4 Tap Confirm to complete the Wi Fi configuration between the Wi Fi module and the Internet ...

Page 57: ... module is not monitoring properly please tap on the top right corner of the screen for further details It will show repair suggestion Please follow it to fix the problem Then repeat the steps in the chapter 4 2 to re set network setting After all setting tap Rediagnosis to re connect again ...

Page 58: ...egistered name and password to login Note Tick Remember Me for your login convenience afterwards Overview After login is successfully you can access Overview page to have overview of your monitoring devices including overall operation situation and Energy information for Current power and Today power as below diagram ...

Page 59: ...ice Delete device Tap icon on the top right corner and manually enter part number to add device This part number label is pasted on the bottom of remote LCD panel After entering part number tap Confirm to add this device in the Device list Part number label is pasted on the bottom of remote LCD panel For more information about Device List please refer to the section 2 4 ...

Page 60: ...rd Clear cache and Log out shown as below diagrams 2 4 Device List In Device List page you can pull down to refresh the device information and then tap any device you want to check up for its real time status and related information as well as to change parameter settings Please refer to the parameter setting list ...

Page 61: ...tandby mode Line Mode Inverter will power the load from the utility with or without PV charging Qualified utility or PV source can charge battery Battery Mode Inverter will power the load from the batter with or without PV charging Only PV source can charge battery Device Alarm and Name Modification In this page tap the icon on the top right corner to enter the device alarm page Then you can revie...

Page 62: ... and Load percent Please slide up to see more basic information Production Information displays Model type Inverter type Main CPU version Bluetooth CPU version and secondary CPU version Rated Information displays information of Nominal AC voltage Nominal AC current Rated battery voltage Nominal output voltage Nominal output frequency Nominal output current Nominal output apparent power and Nominal...

Page 63: ... models Please always see the original product manual for detailed setting instructions Parameter setting list Item Description Output setting Output source priority To configure load power source priority AC input range When selecting UPS it s allowed to connect personal computer Please check product manual for details When selecting Appliance it s allowed to connect home appliances Output voltag...

Page 64: ... 1 minute Bypass Function If enabled unit will transfer to line mode when overload happened in battery mode Beeps while primary source interrupt If enabled buzzer will alarm when primary source is abnormal Over Temperature Auto Restart If disabled the unit won t be restarted after over temperature fault is solved Overload Auto Restart If disabled the unit won t be restarted after overload occurs B...

Reviews: