W 3 2 S E R I E S
H I G H P R E S S U R E B R E A T H I N G A I R C O M P R E S S O R
55
2.
Remove the snap ring from the valve by prying under its tapered edge with a penknife. Withdraw the
internal parts of the valve and place them on a clean surface in the correct relationship so that the valve
can be properly reassembled.
3.
After disassembly, inspect the condition of all the parts. If theres are no signs of wear, clean the parts or
replace them with new original.
4.
To clean the valve parts use a light brush to brush and scrape. When cleaning valve parts use extreme
care to prevent damaging the parts.
Use new o-rings and gaskets. When reassembling the valve, make sure all parts are replaced exactly as
removed and that new gaskets and “O” rings are used. It is important to install original Alkin “O” rings as
these are made of special high temperature resistant material and ordinary o-rings will be promptly damaged
causing failures
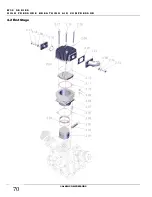
2.5.5 Cylinder&piston removal and replacement
To Remove Cylinders and Pistons Proceed as follows:
1.
Disconnect all tubing connected to the cylinders and drain the oil from the crankcase.
2.
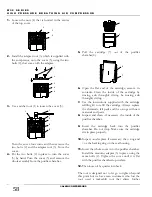
Remove the bolts attaching the 2
nd
and 3rd stage cylinders to the crosshead cylinders, and pull the
compression cylinder off the piston. Next, take out the attaching screws connecting the crosshead
cylinder to the crankcase and pull the crosshead cylinder off the piston. Pull the end of the connecting
rod off the end of the crankshaft and withdraw the rod and piston. If the piston is to be removed from
the connecting rod, follow the procedure outlined under piston removal & replacement on this page.
3.
To remove the 1 st stage piston, first take out the attaching
screws
between the 1st stage cylinders, and
and the crankcase. Then pull the 1 st stage cylinder off the top of the piston. Pull the end of the
connecting rod off the end of the crankshaft and lift the cylinder -with the piston inside- off the
crankcase. The piston can now be pushed out of the cylinder. To remove the piston from the connecting
rod, follow the procedure outlined under “
Piston Pin Removal and Replacement
” on this page.
To Replace Piston and Cylinders
–
Proceed as follows:
4.
To replace the 1st stage piston, lubricate cylinder bore and insert the connecting rod. Use an appropriate
piston ring compressor method to prevent damage to the rings when inserting, and push the piston into
the cylinder as far as possible. Next, replace the crankcase-to-cylinder gasket, after which, the cylinder,
piston and connecting rod may be replaced as a unit by inserting the connecting rod (with its oil dipper
pointing down) into the crankcase. Lubricate the piston rings and slide the 1st stage cylinder over the
piston using an appropriate piston ring compressor method to prevent damage to the rings. If the
airheads have been removed from the cylinders they must be replaced according to the procedure
outlined under “
air head replacement
”
5.
To replace the 2
nd
and 3rd stage pistons lubricate the bore of the crosshead cylinder and insert the
connecting rod and piston into it. Next replace the cylinder to frame gasket, after which the cylinder,
piston and connecting rod may be replaced as a unit by inserting the connecting rod. Next, replace the
gasket between the crosshead and compression cylinder. Lubricate the piston rings and slide the
compression cylinder over the piston using an appropriate piston ring compressor method to prevent
damage to the rings. With the compression cylinder replaced, bolt it to the crosshead cylinder. If the
airhead was removed, it is essential that
it be replaced in the manner described under “
air head
replacement
”
6.
Replace the crankcase cover and all tubing and fittings that were removed.
7.
Fill the crankcase to the overflow point with Anderol 750 oil.

