background image

Intercom Mute: If enabled, once the call
established, the callee will be muted.

Hotline

HotLine allows user to call out a defined number
automatically after hearing the dailtone without dialing
any number.

Active: To enable or disable HotLine feature.

Number: To set a defined HotLine number.

Delay Time: To set the automatically call out
interval after hearing the dailtone.

Sections

Description

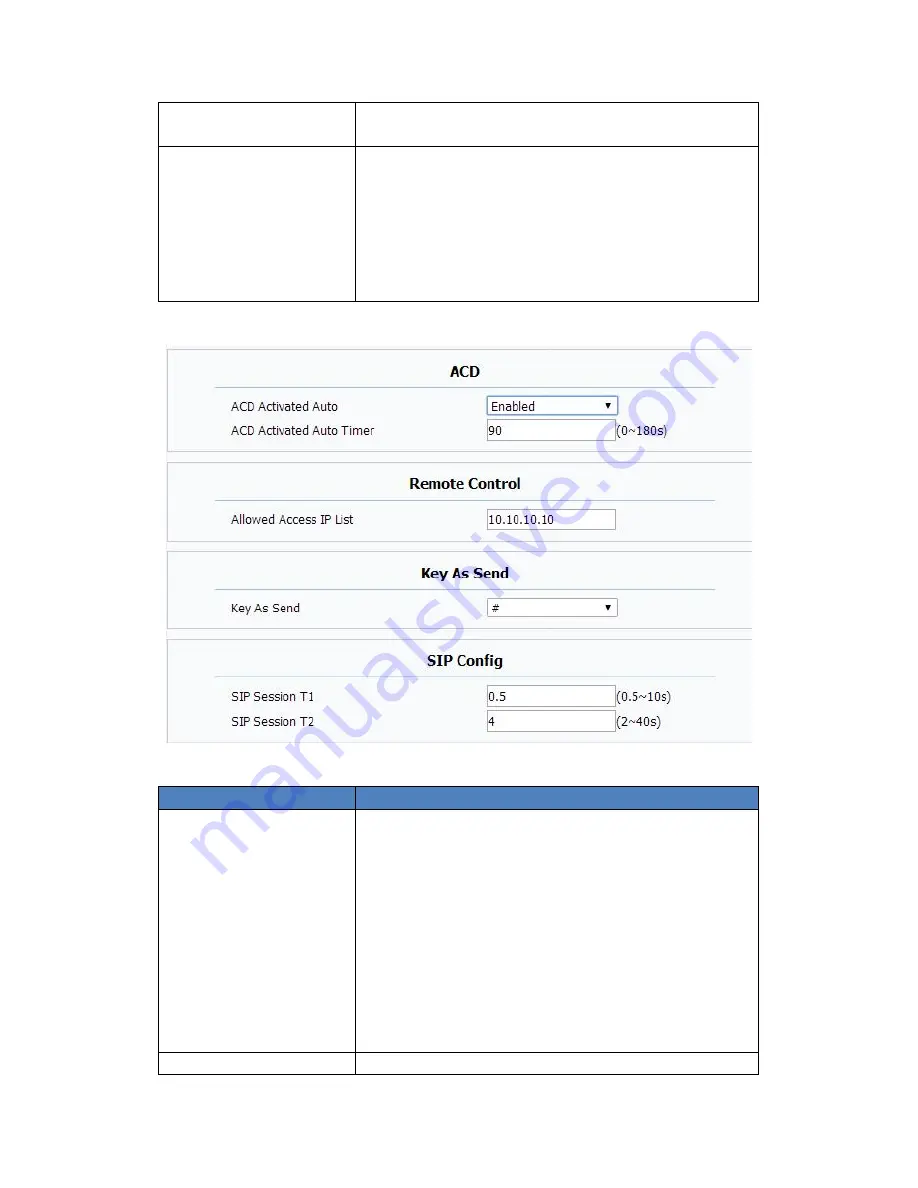
ACD

ACD (Automatic Call Distribution) is most used in
call-center market, it allows IP phone to login the
system with multiple status so that the system could
distribute an incoming calls to available user or agents.

ACD Activated Auto: If enabled, Agent status will
turn to available automatically within a designated
time(decided by ACD Activated Auto Timer).

ACD Activated Auto Timer: To configure interval
when will Agent status becomes available
automatically.

ACD Pwd Required: To enable the ACD password.

Remote Control

Remote Control allows specific host to interact with IP

Summary of Contents for VP-R49P

Page 1: ...VP R49P User Manual ...

Page 2: ...3 1 5 View Turn Off Notification 14 3 2Connecting to Network and Wi Fi 14 3 2 1Configuring Static IP 15 3 2 2 Configuring DHCP 16 3 2 3 Configuring PPPOE 17 3 2 4 Configuring Wi Fi 18 3 3 SIP Account Configuration 21 3 3 1 Add Account 22 3 3 2 SIP Account ON OFF 24 3 3 3 Modify Remove SIP Account 25 3 4 Sound 26 3 4 1 Silent Mode 27 3 4 2 Volumes 27 3 4 3 Ringtone 28 3 4 4 System Sound 29 3 5 Call...

Page 3: ... 3 9 3 Shortcuts 41 3 9 4 Modify Extended Bar 42 3 9 5 Ringtone 42 3 10 Backup Reset 43 4 Function 44 4 1 Call Function 44 4 1 1 Make A Call 44 4 1 2 Receive A Call 47 4 1 3 Call Options 49 4 1 4 Call Records 50 4 2 Contacts 53 4 2 1 Local Phone Book 53 4 2 2 Group 56 4 3 BroadSoft Phone Book 57 4 4 Remote Phone Book 57 4 5 LDAP 58 4 6 BLF 58 4 7 Intercom 58 4 8 Call Return 59 4 9 BLF List 59 4 10...

Page 4: ...ount 71 4 21 2 View Calendar 72 4 21 3 New Activities 72 4 21 4 Edit Activities 73 4 21 5 Delete Activities 74 4 22 Clock 74 4 22 1 Alarm 75 4 22 2 Countdown Timer 76 4 22 3 Stopwatch 77 4 23 Email 77 4 23 1 Add A New Email Account 77 4 24 Music 78 4 25 Explorer 79 4 26 Video Player 81 4 27 Others 82 4 27 1 Apk Installer 82 4 27 2 Ping Tool 83 5 Software upgrade 86 5 1 Immediate Update 86 5 1 1 Se...

Page 5: ...eference 105 7 8 Phone Call Feature 106 7 9 Phone Audio 111 7 10 Phone Video 112 7 11 Phone Ext Key 114 7 12 Phone Replace Rule 114 7 13 Phone Dial Now 116 7 14 Phone Action URL 117 7 15 Phone Multicast 119 7 16 PhoneBook Local Book 120 7 17 PhoneBook Remote Book 121 7 18 PhoneBook Call Log 122 7 19 PhoneBook LDAP 124 7 20 PhoneBook Broadsoft 125 7 21 Upgrade Basic 126 7 22 Upgrade Advanced 126 7 ...

Page 6: ...15 of the FCC Rules Operation is subject to the following two conditions 1 This device may not cause harmful interference and 2 this device must accept any interference received including interference that may cause undesired operation FCC Radiation Exposure Statement This equipment complies with FCC radiation exposure limits set forth for an uncontrolled environment This equipment should be insta...

Page 7: ... circuit different from that to which the receiver is connected 1 2Technical Specification Model VP R49P Graphic Display 7 inch capacitive touch screen TFT LCD 1024 600 pixels 16 9 wide screen aspect ratio Camera 5M pixels CMOS camera with privacy shutter Network Protocol SIP RFC3261 TCP UDP IP PPPOE RTP RTCP ect Operation System Android 4 2 Voice Codec G 711A U G 723 G 729 G 722 iLBC AMR NB AMR W...

Page 8: ... or other network access devices It also supports POE Power over Ethernet TF External TF card PC Share the network access from LAN port and for PC and other equipment connection Power Connect to 12V adapter Power supply Handset Connect to handset Lock Lock the video phone with a Laptop lock Note If Power over Ethernet is being used do not plug in the AC adapter 1 4 Keypad Description Interface Des...

Page 9: ...Use the matched network cable to connect the LAN Port of the video phone to the Router or Switch Viewing the top right corner of the screen if the icon shows like this network cable is connected properly Connecting to PC Use the matched network cable to connect the PC Port of the video phone to the PC s Ethernet port The PC can access to the internet network via PC Port of the video phone ...

Page 10: ...t the installation and the usage 1 Do not use this product near water such as bath washbasin kitchen sink and other damp places and so on 2 Place the device in a place away from heat 3 Place the device away from traffic areas to prevent collisions 4 Please use the equipment with the matching power adapter or POE ...

Page 11: ... the current account Extended Screen Prompt Display the location of current screen page and show how many pages extended Shortcuts at the bottom of the screen user can drag a shortcut to this region to achieve the replacement of the shortcut Supports max six shortcuts 3 1 2 Status and notifications Instruction The status bar in main screen is divided into two zones notification area and status are...

Page 12: ...work is not connected Mute mode Alarm clock is set PPPOE is connected PPPOE is failed Notification Area Icon Description SIP account is registered Missed call number means how many missed calls Downloading Uploading Receives a new email An event is coming ...

Page 13: ...eached Then lift your finger up to release Slide Move your finger fast across the screen to slide To view different idle screens or menu pages slide left or right to view the status bar on top of the screen place your finger on the bar and slide it down If your finger stays on the screen for too long the item may be selected and sliding won t occur Double click Click on the screen twice in quick s...

Page 14: ...lick the Reboot 3 1 5 View Turn Off Notification When viewing notifications simply press and hold the status bar drag down as shown below To turn off notifications simply hold the notice at the bottom of the screen and then drag up or press the Back on the hard keyboard Click on the icon to clear up the notice 3 2Connecting to Network and Wi Fi VP R49P supports a variety of network connections Eth...

Page 15: ...s to enter the static IP configuration Mode 1 In the main screen tap Settings Wireless Networks Ethernet Using static IP Mode 2 Drag down the status bar click shortcut icon on the status bar SETTINGS Wireless Networks Ethernet Use static IP Mode 3 In the main screen tap Network Settings LAN Connecting Static IP Configuration page is shown as below Configuration parameter specification Parameter Sp...

Page 16: ...3 2 2 Configuring DHCP You can select one of the following methods to enter the DHCP configuration Mode 1 In the main screen tap Settings Wireless Networks Ethernet uncheck Using static IP Mode 2 Drag down the status bar click shortcut icon on the status bar SETTINGS Wireless Networks Ethernet uncheck Use static IP Mode 3 In the main screen tap Network Settings LAN Connecting DHCP Configuration pa...

Page 17: ...condary DNS address 2 If DHCP is failed the IP address will show as 0 0 0 0 3 2 3 Configuring PPPOE You can select one of the following methods to enter the PPPOE configuration Mode 1 In the main screen tap Settings Wireless Networks Ethernet More PPPOE Mode 2 Drag down the status bar click shortcut icon on the status bar SETTINGS Wireless Networks Ethernet More PPPOE Mode 3 In the main screen tap...

Page 18: ... the primary DNS Secondary DNS information status as connected 2 Not Dial IP address information will be 0 0 0 0 3 There is a redial entry under Alternate DNS click redial then re launch a PPPOE dial up process re dial 3 2 4 Configuring Wi Fi You can select one of the following methods to enter the Wi Fi configuration Mode 1 In the main screen tap Settings Wireless Networks Ethernet Wi Fi Mode 2 D...

Page 19: ...environment if a Wi Fi AP is without password protection there is no lock icon on Wi Fi signal it will automatically connect when clicked 3 If a Wi Fi AP is encryption Wi Fi signal will be added the lock icon and when checked it will pop up a dialog box to enter a password If the password is incorrect the connection will not be successful as shown below ...

Page 20: ...e Proxy Settings Proxy Settings Static IP 5 Long press on the connected Wi Fi AP it will pop up a dialog box you can forget the network or modify the network Long press on the non connected Wi Fi AP it will pop up a dialog box and you can click and connect to network ...

Page 21: ...on the Router the phone will no need to input the wi fi password Wi Fi Direct and Advanced 9 In Advanced Menu shown as below a Check Network notification it will notify you when an open network is available b Check Avoid poor connections it will prompt that don t use a WiFi network unless it has a good internet connection c View the Wi Fi Mac address and IP address 3 3 SIP Account Configuration Yo...

Page 22: ...3 Directly pick up the handset or press Speaker then click Mode 4 Click Browser input IP address to enter login interface Input username admin password is admin click Login into web then click Account Basic 3 3 1 Add Account Click an account to enter Account Editor ...

Page 23: ...Parameter Specification Register Name SIP Account ID provided by ISP User Name SIP User Name provided by ISP Password SIP Password provided by ISP Display Name SIP Display name Reg Server IP SIP Register Server format domain IP for example 194 168 1 2 ...

Page 24: ...2 Backup Proxy Port The default port is 5060 After all the parameters are configured Click save button to save the configurations then the sip account is added successfully 3 3 2 SIP Account ON OFF After SIP account is configured and registered successfully it will display the prompt Registered in the Account Manager and the icon will be displayed on the status bar See the below picture a If you w...

Page 25: ...nd then you can check with the account configuration or network connection See the below picture 3 3 3 Modify Remove SIP Account 1 Modify the sip account Directly click the account to modify 2 Remove the sip account Click the box of the account which you want to delete and then press Clear Account ...

Page 26: ... to enter the Sound configuration Mode 1 In the main screen click Settings Sound Mode 2 Drag down the status bar click shortcut icon Sound Configuration page is shown as below Including Volume Ringtone and Notification Dial pad touch tones and Touch sound ...

Page 27: ...ton then choose Silent mode in the pop up menu In addition to the media and the alarm sound the rest sound is mute As shown in the picture below 3 4 2 Volumes In Sound configuration page click Volumes the volume configuration is shown as below ...

Page 28: ...o increase or decrease the volume Usually volume button is to adjust for ringtone or notification volume but in the broadcast media pressing volume button is to adjust for media volume 3 4 3 Ringtone The ringtone settings including the default ringtone and default notification tone In the sound interface select the default ringtone or default notification tone and then click the ringtone you want ...

Page 29: ...ch tones and Touch sounds are enabled in default configuration 3 5 Call Settings 3 5 1 Always forwarding Forwarding Number All the incoming calls will be forwarded unconditionally to specified number Configuration on the phone 1 Phone Settings Call Settings Call Forwarding 2 Select the desired account 3 Enable Always Number 4 Input the number you want to forward ...

Page 30: ...Configuration on the phone 1 Phone Settings Call Settings Call Forwarding 2 Select the desired account 3 Enable Call Forwarding Busy 4 Input the number you want to forward 3 5 3 No Answer Forwarding Forwarding Number The incoming calls will be forwarded to the specified number when the ring tone is time out without answer ...

Page 31: ...wer Forwarding 4 Input the number you want to forward 3 5 4 DND DND function is to prevent foreign phone from disturbing if open DND external phone call can t be received turned off by default Configuration on the phone 1 Phone Settings Call Settings Call Forwarding 2 Select the desired account 3 Enable Do not Disturb ...

Page 32: ...figuration on the phone 1 Phone Settings Call Settings Other Call Settings 2 Enable Call Waiting 3 5 6 Time out Setup the no answer forwarding time When the call is beyond the time the default is 30 seconds without answer it will transfer to the target number 3 5 7 Playtone The caller will hear the tone when waiting 3 5 8 Intercom setting Intercom function is more convenient to call the other part...

Page 33: ...lly after the timeout 3 6 Dial Plan Rules Allow user to select Replace Rules or Dial Now to display or edit Rules Modify Allow user to modify selected rules information for replace rule you can modify related accounts prefix and replace Area Code Area codes are also known as NPAs Numbering Plan Areas They usually indicate different geographical areas within one country If entered numbers match the...

Page 34: ... Auto Provision Manual Autop to setup the Auto Provision server address in URL area And configure the username and password for server authentication Automatic Autop to setup the Autop time 3 8 Personalize ...

Page 35: ...ll show up the dialing interface When there is incoming call pick up the handset to answer the call App Mode in the idle pick up the handset it will show up the corresponding APP When there is incoming call the phone can not be answered via handset Auto Mode in the idle pick up the handset it will show up the corresponding APP When there is incoming call the phone can be answered by handset 3 7 Re...

Page 36: ...the icon to reboot 3 8 Date Time You can select one of the following methods to enter Date Time configuration Mode 1 In the main screen tap Settings Date time Mode 2 Drag down the status bar click shortcut icon on the status bar SETTINGS Date time The configuration page is shown as below ...

Page 37: ... time select a time zone Check Use 24 hour format and then 1 00 PM will change to 13 00 Click Set date pop up date set interface as shown below You can increase or decrease the corresponding value by dragging upper or lower also can directly input corresponding value in input flied and then click the Done button ...

Page 38: ...hour format you can increase or decrease the corresponding time value by dragging upper and lower Click AM button it will change to morning and then click PM button then changed back to afternoon If check Use 24 hour format time setting interface as shown below ...

Page 39: ...want to set as wallpaper and then click Set wallpaper Click Gallery In the library click the corresponding picture folder select the picture you want to set as wallpaper then press and hold the clip frame picture drag the clip box crop the picture finally click OK When clipping if want to change clip size of the box press clipping frame the border follows the direction of the arrow to be shown in ...

Page 40: ...d location on the desktop 3 9 2 2 Modify An Added Widget If you want to modify the location of added widgets on the desktop hold the widget until the icon appears on the upper left corner of the screen you can drag the widget to the corresponding position of the desktop If you want to change the space size of added widgets on the desktop press and hold the widget until the icon appears on the uppe...

Page 41: ... change 3 9 2 3 Delete A Widget Hold the widget until the icon appears on the upper left corner of the screen you can drag the widget to to delete the widget 3 9 3 Shortcuts You can add the shortcuts such as Application Webpage bookmarks and so on to the main screen desktop 3 9 3 1 Add A Shortcut In the main screen Click right slide the screen choose and add a shortcut ...

Page 42: ...shortcut 3 9 4 Modify Extended Bar You can modify the quick start program on the extended bar at the bottom of the screen The default extended bar as shown below In the main screen hold the shortcut until the icon appears on the upper left corner of the screen you can drag the shortcut to to delete the shortcut or replace with another shortcut 3 9 5 Ringtone If you choose the ringtone provided by ...

Page 43: ...3 10 Backup Reset 1 Click Setting 2 Click Backup reset 3 Click Factory data reset 4 Click Reset Multimedia Terminal 5 Click Erase everything ...

Page 44: ...count configuration refers to section 3 3 4 1 1 Make A Call You can directly dial from the keypad from the contact or from call records 4 1 1 1 Dial Out Directly 1 You can choose one of the following steps to enter into the dialing interface Directly pick up the handle Press Speaker button on the keypad In the main screen Click In the main screen select Dialing interface is shown as below ...

Page 45: ...ll please click Audio Call if you want to make a video call please click Video Call 3 If you have registered a multiple of available SIP accounts when finishing dialing you can click line button to choose the outgoing account for the number as shown below 4 1 1 2 Dial Out From Contact You can choose one of the following steps to enter into the contacts In dialing interface Click the icon Contact i...

Page 46: ...hone supports contacts fuzzy matching queried intuitive concise dialing interface for the intelligent input greatly reducing the number of buttons achieve rapid effective positioning search avoid duplication of invalid operation saving time For example to find Inn only press the number keys 12 to locate the contact quickly When input no number displaying the current call records when input numbers...

Page 47: ...tored in the contacts it will show the contact name otherwise the caller number will be displayed 4 1 2 1 Answer A Call 1 Answer an audio call When receiving an audio call as shown below Click Audio or pick up phone to answer 2 Answer a video call When receiving an video call as shown below ...

Page 48: ...o call if a video invite is requested it will pop up the following window Click Accept to accept the video invite and then the call will change to video call Click Reject to reject the video invite audio call will retain 10s without any operation the video invite will terminate 4 1 2 2 Reject A Call If you want to reject a call click in calling interface If you want to reject a call you can add th...

Page 49: ... call Click to switch to audio call Click to switch to Speaker Click to switch to handset Extended function Function under development 4 1 3 1 Dialing Interface Click the keyboard in the conversation screen will appear the soft keyboard Input the number by soft keyboard or keypad on the phone 4 1 3 2 Video Options During video call you can switch picture through the button on the video interface ...

Page 50: ...ll will be hold During a call you can click on any line in the list to resume the call 4 1 4 Call Records 4 1 4 1 View Call Records When got a missed call the screen will display the missed call notification in above status bar You can hold the status bar and drag down to open the notification and then click the missed call notification to view call records You can also directly through the dialin...

Page 51: ...acket Click the number or contact and you can view all the call records details on the right 4 1 4 2 Call From Call Records In Missed Call Received Call Dialed Call or Forwarded Call you can choose one of the following steps to initiate a call Click a contact or a number in the list If you want to initiate an audio call directly please click the icon in call records If you want to initiate an audi...

Page 52: ...all records steps as below Press the icon on the top right corner Click to select all records Click 4 1 4 4 Add A Contact From Call Records If you want to save a contact from the call records or merge the contact into the existing contact you can do the following operations Click the number in the call records list If you want add a new contact click New Contact A new contact page will pop up Refe...

Page 53: ... the dialing interface and then click the icon 4 2 1 Local Phone Book You can view audio call video call add edit delete the contacts 4 2 1 1 Add A New Contact 1 Click the icon on the top right corner and click New Contact in the drop down window 2 The new contact interface as shown below ...

Page 54: ...the image from Take Photo or Choose photo from Gallery Delete the note Cancel the edit Save the contact Some more information If you want to add some more information please click it will pop up the page of contact details as shown ...

Page 55: ...Click to save the contact 4 2 1 2 Modify The Contact 1 Select the contact you need to modify in the contact list 2 Click 3 Enter into contact edit page you can edit the contact information ...

Page 56: ...he Contact Click in Contact page or directly press the number button on keypad to search the number When you input numbers the system will list the current matching results for searching you can also use the on screen keyboard to input the letters 4 2 2 Group Group it will be convenient for you to have contact group management Contacts should at least belong to a group the default is no group 4 2 ...

Page 57: ...leted 4 2 2 4 Edit A Group 1 In Contact page click the group you need to edit 2 Click and display the tool bar 4 3 BroadSoft Phone Book To setup Broadsoft contact For Broadsoft PhoneBook s server address port username and password you need to consult your Broadsoft service provider for further information 4 4 Remote Phone Book 1 Access the remote phone book add the contacts to the local phone book...

Page 58: ... It often use OpenLDAP server to get the contact For setting details please consult with your system administrator for further information 4 6 BLF Busy Lamp Field BLF is used to monitor a specific user for status changes on IP phones For example you can configure a BLF key on a supervisor s phone to monitor the phone user status busy or idle When the monitored user places a call a busy indicator o...

Page 59: ...e sip phone will reply the subscribe news in the form of xml list to improve efficiency BLF List Code While using BroadSoft platform when press BLF List key configured the BLF LIST CODE can Pick up call or Barge in call 4 10 Pickup Group Pickup You can use pickup to answer other users incoming call The IP phone Akuvox R49P supports specified pickup and group pickup Specified pickup can answer spec...

Page 60: ...s walking around HotDesking feature will make the staffs login his account on any computer in the company In some public places the working people is not fixed anyone can use HotDesking for logging his account and setting the phones to the familiar mode such as the remote function of the computer 4 13 Conference You can use the conference feature to hold a 3 way conference by pressing the Conferen...

Page 61: ...ty answers your call press the Conference softkey or the Conference key on the keypad to start 3 way conference 5 Select the phone you want to make a conference call then click Start Meetings You will start conference call ...

Page 62: ...4 14 Transfer 4 14 1 Blind Transfer 1 When the IP phone blind transfers a call 2 Pick up a call press transfer key on the keypad or click 3 Enter the target number ...

Page 63: ...forms the semi attended attended transfer 1 Pick up a call press transfer key on the keypad or click 2 Enter the target number 3 Press Attended softkey to call out 4 When the third party answered the transfer call click Transfer button in the screen Then the call is transferred successfully ...

Page 64: ...his section describes the default web browser in the video phone and you can also download your preferred browser through the internet You can use one of the following methods to run the browser Mode 1 In the main screen click Mode 2 In the main screen click 4 16 1 Open The Webpage 4 16 1 1 Browser Address Bar Run the browser enter the URL in the address bar or direct input the information to ...

Page 65: ...rd to complete 4 16 1 2 Bookmark And Browsing History Run the browser click to view the bookmark Add a new webpage View the bookmark and browsing history Others 4 17 Camera Open the camera in the main screen click You can view your photos and videos in Gallery ...

Page 66: ...te balance setting 4 17 1 2 Mode Switch Click on the lower right corner to switch the mode Panoramic camera mode Video mode Photo mode 4 17 1 3 Take A Photograph You can click on the center button on the right side to take pictures It supports automatic focusing if you want to adjust the focal length please use two fingers to press on the screen shrinkage or expansion to adjust the focal length ...

Page 67: ...o stop the video recording and save 4 18 Gallery You can use Gallery to view photos or videos and you can also view the picture or video downloaded from the Internet You can edit the photo or picture and set it as wallpaper You can follow the below method to enter into the gallery In the main screen click ...

Page 68: ...ge the image 4 19 Bluetooth Bluetooth is a proprietary open wireless technology standard for exchanging data over short distances from fixed and mobile devices creating personal area networks with high levels of security On VP R49P users could use Bluetooth to transfer files share contact information with other Bluetooth portable devices by installing Bluetooth Application or use Bluetooth headset...

Page 69: ...r untick the option for Bluetooth 4 19 2 Changing Bluetooth Device Name The VP R49P uses SVP3300 as Bluetooth device name by default The device name will be visible to other devices when connecting them Follow the steps below to change the name Go to VP R49P s Settings Click on Wireless networks Click on Bluetooth and click Bluetooth to turn it on Click on Bluetooth settings Rename and enter a nam...

Page 70: ...o pair them Confirm the passkey in the prompted message if any Or if PIN is required please refer to the device s documentation or other procedures to obtain the PIN 4 19 4 Un pairing A Bluetooth Device After successfully pared the VP R49P will show item PAIRED DEVICES above the Bluetooth device ID in the scan list Once it s connected users could also tap on to the Bluetooth device ID needed to be...

Page 71: ...n To access USB storage click on the screen Explorer USB to access and manage your data 4 21 Calendar To start the calendar In the main screen click Calendar As shown below 4 21 1 Add An Account While using the calendar at the first time it will remind you to add an account ...

Page 72: ...ou can also make the calendar display daily or weekly While using daily or weekly displaying you can slide the calendar left and right to view the different day or week Click the date on the upper left corner it will display the drop down list Calendar displaying mode can be selected as daily weekly or monthly 4 21 3 New Activities 1 While Calendar is displaying as daily or weekly you can use the ...

Page 73: ...2 Input the details of the activity as shown below 3 Click Done to finish 4 21 4 Edit Activities You can click on schedule needed to be modified to edit the schedule ...

Page 74: ...ile viewing the activity you can click DELETE on the upper right corner to delete the activity 4 22 Clock Enter the Clock In the main screen click Clock As shown below Description Alarm Countdown timer Stopwatch Time zone Others ...

Page 75: ... 1 Alarm You can add one or multiple alarms 1 Click 2 Click 3 Input the time of alarm 4 If you want to repeat the alarm in some days of a week please click REPEAT 5 You can choose the ringtone of the alarm ...

Page 76: ...alarm ringtone you can directly click on the alarm 4 22 1 3 Delete Alarm In Alarm page you can use the following method to delete the alarm Press and hold the alarm after pop up the dialog box click and then click OK 4 22 2 Countdown Timer 1 Click 2 Click the number to set the countdown time 3 Click START Click on the time in the page of countdown timer can stop or continue the time and the other ...

Page 77: ...3 Email Email Application can let you use POP3 or IMAP service to send and receive e mail Start Email In the main screen click Email 4 23 1 Add A New Email Account Make sure the email account has enabled POP3 or IMAP service and you can add many accounts 1 Please choose one of the following methods to start If you haven t added an e mail account yet while starting the e mail application you will b...

Page 78: ...ail account and password and then click Next If there is no account type in the equipment database you want to set the device will require you to enter more detailed information the receiving server settings and outgoing server settings 3 Input the account name and your name click OK 4 24 Music In the main screen click Music The music page is shown as below ...

Page 79: ...ll songs You can also view or play the songs from the playlists To view the currently playing song please click the now playing label 4 25 Explorer User can use explorer to manage the files in the device In the main screen click icon Explorer icon As shown below ...

Page 80: ...Click mnt to enter to show as below If insert the USB device will dislpayed in this layer Shown as below Click to modify the sort by name time size type Click to create a new folder or photo folder ...

Page 81: ...After entering you can click on the list of videos to watch As shown below Follow the prompt as shown in the picture slide different direction to adjust the brightness volume or speed Click to choose different screen size Click to adjust playback speed or add suitable file to play As shown below Brightness Volume Speed ...

Page 82: ...4 27 Others 4 27 1 Apk Installer User need open phone permission before installing Go to the path Settings Security tick Unknown sources ...

Page 83: ...capture and view the log information 4 27 2 1 Ping Query Ping query interface is as shown You can input the address you want to Ping click the Ping button you can view the Ping query results If you take a long Ping query in the input box please manually enter the Ping address such as and then click the Ping button 4 27 2 2 Tcpdump Log captured tool interface is as shown ...

Page 84: ...Press Start Tcpdump to start the log captured If you want to finish the log captured you can press Stop Tcpdump to stop the capture and the system will prompt the file saved path You can use Wireshark and other tools on PC to read the logs 4 27 2 3 Logcat Logcat interface is as shown ...

Page 85: ...ct the log level through the drop down list Or click to see more options if you need to save the log please click select Save If you need to highlight the log information please click select highlight and then the log will be showed as different color ...

Page 86: ...e Update In the main screen tap on settings icon System Multimedia Terminal System Upgrade System Update Now Update interface as shown Three ways to update immediately Select other upgrade package Local Update Remote Upgrade as shown ...

Page 87: ...SB to copy the upgrade package into Internal Memory then press Select other upgrade package find mnt sdcard find upgrade document then click OK to upgrade 5 1 2 Local Update 1 Via USB to Upgrade Change the name of upgrade package into upgrade zip then copy it into USB insert USB enter the upgrade interface you will find the path of upgrade package because video phone has searched it automatically ...

Page 88: ...opy the upgrade package into Internal Memory enter the upgrade interface you will find the path of upgrade package mut sdcard upgrade zip because video phone has searched it automatically press Local Update to start upgrading 5 1 3 Remote update 1 Click Server Address and input the server address that contains upgrade package As shown ...

Page 89: ...automatically If exist a new version it will prompt Press OK to download upgrade document 3 After finish downloading it prompts Download update image success You need to restart system for update press reboot now and then system will upgrade automatically As shown ...

Page 90: ...ct the new version automatically in time if there is the status bar will show There is a new version please update Click and download the image for upgrade As shown 5 3 Upgrade on the web 1 Click Upgrade Basic 2 Choose the software you want to update from the computer 3 Click Please refer to chapter 7 14 for more detail ...

Page 91: ...ck Check Update After System Power On Every time you power on the system will check the new version automatically If there is a new one the status bar will notice System has new version please update now click and download the image for upgrade ...

Page 92: ...rface check Status Info Mode 3 Slide down the top left click the account enter the setting interface check Status Info 6 3 Sip account registration query You can choose one of the following methods to enter the SIP account registration query If the account is successfully registered the icon will be light up in notification area of phone Mode 1 Press Speaker button or pick up to enter the dialing ...

Page 93: ...whether the outlet is working properly Failure 2 No voice when pick up the handle Please check whether the connection of handset and base is working properly Please adjust the volume key on keyboard when off hook the phone Observe the display of volume prompt Please pay attention that the volume key in on hook and off hook situation is to adjust the ring volume and media volume call volume separat...

Page 94: ...he icon of successful registration is in the notification area If there is no explanation of configuration failure please contact network administrator to recover it Failure 4 No ringing when incoming a call Please make sure the handle is completely hung on the base Please adjust the volume key on keyboard when on hook the phone Observe the display of volume prompt Please pay attention that the vo...

Page 95: ...ogin 1 Open the browser on your computer 2 Input the IP address in the address bar 3 Enter the user name and password user name admin password admin then click 7 2 Status Basic Click Status Basic to check the phone information ...

Page 96: ...t such as Port Type which could be DHCP Static PPPoE Link Status IP Address Subnet Mask Gateway Primary DNS server Secondary DNS server Account Information To display device s Account information and Registration status account username registered server s address Register result 7 3 Account Basic 1 Click Account Basic 2 Select the desired account from account 1 to account 6 then enable the Accoun...

Page 97: ... Register Name Allocated by SIP server provider used for authentication User Name Allocated by your SIP server provide used for authentication Password Used for authorization SIP Server 1 To display and configure Primary SIP server settings Server IP SIP server address it could be an URL or IP address Registration Period The registration will expire after Registration period the IP phone will re r...

Page 98: ...Proxy Server To display and configure Outbound Proxy server settings An outbound proxy server is used to receive all initiating request messages and route them to the designated SIP server Note If configured all SIP request messages from the IP phone will be sent to the outbound proxy server forcefully Transport Type To display and configure Transport type for SIP message UDP UDP is an unreliable ...

Page 99: ...unt settings or to select which account to display Audio Codecs To display and configure available unavailable Audio codecs list Codec means coder decoder which is used to transfer analog signal to digital signal or voice versa settings STUN Short for Simple Traversal of UDP over NATS a solution to solve NAT issues Note By default NAT is disabled ...

Page 100: ...bitrate is 128 the highest bitrate is 2048 Codec payload From 90 119 Sections Description Subscribe To display and configure MWI BLF ACD subscription settings MWI Message Waiting Indicator which is used to indicate whether there is unread new voice message BLF BLF is short for Busy Lamp Field which is used to monitor the designated extension status ACD Automatic Call Distribution is often used in ...

Page 101: ...le to traditional telephone server Type Info use SIP Info message to indicate DTMF message Call To display and configure call related features Max Local SIP Port To configure maximum local sip port for designated account Min Local SIP Port To configure minimum local sip port for designated account Caller ID Header To configure which Caller ID format to fetch for displaying on Phone UI Auto Answer ...

Page 102: ...ion Timer To display or configure session timer settings Active To enable or disable this feature If enable the ongoing call will be disconnected automatically once the session expired unless it s been refreshed by UAC or UAS Session Expire Configure session expire time Session Refresher To configure who should be response for refreshing a session Note UAC means User Agent Client here stands for I...

Page 103: ...live UDP Alive Msg Interval Keepalive message interval Rport Remote Port if enabled it will add Remote Port into outgoing SIP message for designated account Conference To select Local or network conference Type To select desired conference type Local or Network conference Conference URI If network conference is selected a network conference URI is needed to be input User Agent One can customize Us...

Page 104: ...ount NumberList DoorPhone Fill multiple doorphone number 7 5 Network 1 Click Network Advanced 2 Fill the corresponding parameters you need Sections Description Local RTP To display and configure Local RTP settings Max RTP Port Determine the maximum port that RTP stream can use Min RTP Port Determine the minimum port that RTP stream can use VLAN To display and configure VLAN settings LAN Port PC Po...

Page 105: ...ult your administrator for specific VLAN settings in your networking environment 7 6 Phone Time Sections Description Web Language To choose the web language 7 7 Phone Preference Sections Description Key Press Sound To configure the sound volume for key press Volume The valid volume range is from 0 15 by default it s 8 Ringtone Volume To configure the sound volume for ringtone ...

Page 106: ... it s 8 7 8 Phone Call Feature 1 Click Phone Call Feature 2 Fill the corresponding parameters you need Sections Description Mode Phone To enable or disable feature key sync Feature Key Sync To enable or disable feature key sync Mode Select the desired mode ...

Page 107: ... to setup the number you want to forward when the phone is no answers with timeout On Code Off Code this code is used to turned on off the function on server side DND DND Do Not Disturb allows IP phones to ignore any incoming calls DND Emergency Enable this function users can still receive the call from DND Authorized number when in emergency situation DND Authorized Number R49P supports multiple ...

Page 108: ...Call Waiting Tone If enabled it allows IP phones to play the call waiting tone to the waiting callee Auto Redial Auto redial allows IP phones to redial an unsuccessful call for designated times within designated interval Auto Redial To enable or disable auto redial feature Auto Redial Interval Determine the interval between two consecutive attempts Auto Redial Times Determine how many times to red...

Page 109: ...cription ACD ACD Automatic Call Distribution is most used in call center market it allows IP phone to login the system with multiple status so that the system could distribute an incoming calls to available user or agents ACD Activated Auto If enabled Agent status will turn to available automatically within a designated time decided by ACD Activated Auto Timer ACD Activated Auto Timer To configure...

Page 110: ...d allows you to disable send key or assign pound key as send key SIP Config Setup the SIP protocol package interval T2 is maximum The interval should be larger the T1 but less then T2 Sections Description UACSTA Using CSTA for SIP phone user agents It can control some features of calling UACSTA is used to send ECMA 323 CSTA XML information during SIP calling The default status is disabled Door Pho...

Page 111: ...uto answer mode audio or video Early DTMF To enable or disable early DTMF Multicast codec To choose different multicast codec Direct IP To enable or disable direct IP call 7 9 Phone Audio Sections Description Echo Canceller Echo Canceller To remove acoustic echo from a voice communication in order to improve the voice quality VAD Voice Activity Detection Allow IP phone to detect the presence or ab...

Page 112: ...gorithms quickly responds when periods of silence occur and inserts artificial noise until voice activity resumes The insertion of artificial noise gives the illusion of a constant transmission stream so that background sound is consistent throughout the call and the listener does not think the line has released Mic Volume To configure Microphone volume for handset mode Automatic Generation Contro...

Page 113: ...d video quality H264 Level Different profiles has corresponding Level value IDR Interval IDR means Instantaneous Decoding Refresh It is used to control the process of coding and decoding Rate Control Choose one H264 video rate Others Hardware Endec Acceleration User can enable the Hardware Endec Acceleration when you need Hardware Decodec Acceleration Disabled by default Color Enhancement To incre...

Page 114: ...ssign specific feature to the designated key on expansion module For keys the available feature list DND Menu MSG Status Book Fwd PickUp Group PickUp Intercom Speed Dial History Favorites Redial Account ACD BLF BLFList Call Return Hot Desking Record XML Browser DTMF 7 12 Phone Replace Rule ...

Page 115: ...for the replace rule Input a suitable prefix value Enter the replace number Click Submit to save All replace rules will show in the list Users can edit or delete the exited replace rules Area Code Area codes are also known as NPAs Numbering Plan Areas They usually indicate different geographical areas within one country If entered numbers match the predefined area code rule the IP phone will autom...

Page 116: ...odify selected rules information for dial now rule user can modify related accounts Dial now Rule itself Click Add to add new dial now number Select the related account for dial now Enter the number in Dial Now Rule area Click submit to save All dial now numbers will show in the list Users can edit or delete the exited dial now number Dial Now Delay Allow user configure dial now delay time for dia...

Page 117: ...reas within one country If entered numbers match the predefined area code rule the IP phone will automatically prefix outgoing number with area code Note There is only one area code rule supported 7 14 Phone Action URL Sections Description Action URL To display and configure Action URL settings Setup Completed When the IP phone completes startup Registered When the IP phone successfully registers ...

Page 118: ...orward Close Busy Forward When the IP phone disables the busy forward Open No Answer Forward When the IP phone enables the no answer forward Close No Answer Forward When the IP phone disables the no answer forward Transfer Call When the IP phone transfers a call Blind Transfer When the IP phone blind transfers a call Attended Transfer When the IP phone performs the semi attended attended transfer ...

Page 119: ...from busy to idle 7 15 Phone Multicast Sections Description Multicast Setting To display and configure the Multicast setting Paging Barge Choose the multicast number the range is 1 10 Paging priority Active Enable o disable the multicast Priority List To setup the multicast parameters Listening Address Enter the IP address you need to listen Label Input the label for each listening address ...

Page 120: ...list contacts Search To search designated contacts from local phonebook Dial To dial out a call or hangup an ongoing call from Web UI Note For this feature you need to have the remote control privilege to control IP phone via Web UI Please refer to section Remote Control in the Web UI Phone Call Feature page Contact Setting Enter the contact information in corresponding area Click Add You will see...

Page 121: ...play or edit Group contacts Group Setting To display or change Group name related ringtone or description Import Export To import or export the contact or blacklist file 7 17 PhoneBook Remote Book Go to the path Phone Book Remote Book ...

Page 122: ...e To configure display remote book name on Phone UI Search Remote Phonebook Name To enable or disable search remote phonebook name Search Flash Interval To set interval Range from 120s to 2592000s Note IP phone support at most 5 remote books Please refer to your administrator for how to establish a remote book server and how to create remote book xml file 7 18 PhoneBook Call Log Go to the path Pho...

Page 123: ... All calls Dialed calls Received calls Missed calls Forwarded calls HangUp To click to hangup ongoing call on the IP phone Note For HangUp feature you need to have the remote control privilege to control IP phone via Web UI Please refer to section Remote Control in the Web UI Phone Call Feature page ...

Page 124: ...re LDAP server s address Port To configure LDAP server s port Base DN To configure searching base DN on LDAP server User Name To configure user name for accessing LDAP server Password To configure password for accessing LDAP server Name Attribute To configure which name attributes should be feedback from LDAP server Number Attribute To configure which number attributes should be feedback from LDAP...

Page 125: ...y and configure Broadsoft PhoneBook settings PhoneBook Item To select specific item to configure Display Name The name displayed at IP phone s LCD screen when accessed via Phone UI Server Address Broadsoft PhoneBook server s address Server Port Broadsoft PhoneBook server s port User Name Username used to access Broadsoft PhoneBook server Password Password used to access Broadsoft PhoneBook server ...

Page 126: ...ware version Upgrade To select upgrading rom file from local or a remote server automatically Note Please make sure it s right file format for right model Reset To Factorry Setting To setup R49P to factory setting Reset Config To Factory Setting To setup the configuration file to factory setting Reboot Click Submit to reboot the device 7 22 Upgrade Advanced ...

Page 127: ...tomatically to get Auto Provisioning server s address By default this SIP message is sent to multicast address 224 0 1 75 PNP server address by standard DHCP Option To display and configure custom DHCP option DHCP option If configured IP Phone will use designated DHCP option to get Auto Provisioning server s address via DHCP This setting require DHCP server to support corresponding option ...

Page 128: ...oning configuration file AES Key MAC Used for IP phone to decipher MAC oriented auto provisioning configuration file for example file name could be 0c1105888888 cfg if IP phone s MAC address is 0c1105888888 Note AES is one of many encryption it should be configure only configure filed is ciphered with AES otherwise left blank Automatic AutoP To display and configure Auto Provisioning mode settings...

Page 129: ... means the more specific syslog is saved to a temporary file By default it s level 3 Export Log Click to export temporary syslog file to local PC Remote System Log To enable or disable Remote System Log Remote System Server To input the syslog server address PCAP To start stop packets capturing or to export captured Packet file Start To start capturing all the packets file sent or ...

Page 130: ...splay or configure others features from this page Config file To export or import configure file for IP phone 7 23 Security Basic 1 Choose the user name admin or user 2 Enter the current password 3 Enter the new password 4 Confirm the new password Note Security is configurable via web only Sections Description Web Password Modify To modify user s password User Name Choose the character you are adm...

Page 131: ... Sections Description Web Server Certificate To display or delete Certificate which is used when IP phone is connected from any incoming HTTPs request Note The default certificate could not be deleted Web Server Certificate Upload To upload a certificate file which will be used as server certificate ...

Page 132: ... which is used when IP phone is connecting to any HTTPs server Client Certificate Upload To upload certificate files this is used as client certificate Only Accept trusted Certificates If this option is enabled only trusted certificates will be accepted ...

Reviews: