


FS1-X v1.1
www.aja.com
38
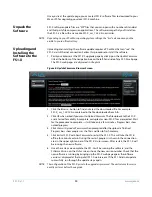
• The front panel ALARM LED will go off and the REF LED will light blue, indicating
no alarm exists and the FS1-X is genlocked to an external reference signal.
• The Status menu
GEN
parameters will report
Ref
and indicate the format of the
incoming reference signal or
OK
.
NOTE:
If you connect a 625i25 frame rate color black reference signal, the alarm condition above
persists because the default FS1-X output frame rate setting is 29.97/59.94. To clear this alarm
when using 625i25 reference, press the SYSTEM button, turn the SELECT knob to 9 Output
Frame Rates, and turn the ADJUST knob to choose 50/25.
4. Disconnect one of the power cords, leaving the other attached.
• The ALARM LED will light red, and the PWR LED of the power supply with the
removed cord will turn off.
5. Reconnect the power cable. The ALARM LED will turn off and the PWR LED will light.
This workflow confirms the FS1-X powers up successfully and reports reference and
power supply alarms.
NOTE:
FS1-X Reference, Power Supply, and Video Format alarms can be disabled, if desired,
Internal Test Signals
to All Outputs
This workflow generates bars and tone and sends them to all the FS1-X outputs. This
example uses the HDMI output connector for convenient monitoring, but any output can
be used for that purpose. In the following procedures, where the terms
select
and
adjust
are used, turn the front panel
SELECT
and
ADJUST
knobs.
Setup
• Connect the FS1-X HDMI output connector to an HDMI display equipped with audio
monitoring using a standard HDMI cable.
Procedure
1. Press the
VIDEO PROC
button.
• Select
3 Vid 1 Output Mode
, and adjust to
Test Pattern
.
• Select
21 Vid 1 Test Pattern
and adjust to
75% Bars
.
2. Press the
VIDEO OUTPUT
button.
• Select
1.2 SDI2 Video Out
and adjust to
Vid 1
.
• Select
2.2 Fiber2 Video Out
and adjust to
Vid 1
.
• Select
3 HDMI Video Out
and adjust to
Vid 1
.
3. Press the
AUDIO OUTPUT
button.
• Select
11 Global Audio Out
and adjust to
Sig Gen 1KHz
.
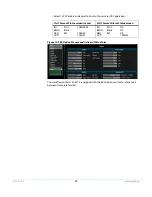
You should now be able to see and hear the test signals on the HDMI display, and on
any other devices connected to the FS1-X outputs.
This workflow confirms the FS1-X generates and outputs video and audio.
Vid 1 Format Status screen
Vid 1 Format Alarm Status screen
IN1
SDI 1
No Input
BKGD
Black
GEN
Ref
525i59
OUT1
525i59
IN1
SDI 1
OK
BKGD
Black
GEN
Ref
OK
OUT1
525i59


