


FS1-X v1.1
www.aja.com
26
Chapter 3: Installation & Configuration
Installation Overview
The installation and set up of an FS1-X is very simple. Plug both AC supply cords into AC
mains power (separate branch circuits for redundancy), connect the LAN connector to a
LAN, WAN or local computer with a web-browser, and then connect source and
destination video and audio equipment.
NOTE:
The AJA
FS1-X
should be plugged into 3-wire 100-240 VAC 50/60 Hz power (autosensing)
before you make connections to other equipment. The AC cords provide a path to ground for
accidental static discharge to protect system equipment. The
FS1-X
has two fully
independent and redundant power supplies and will operate with one or both AC power
cords plugged into the unit. However, fault-tolerance exists only if both power supplies are
connected and plugged into separate branch circuits. Then if power is lost on a branch or one
of the supplies, the
FS1-X
will continue to operate on the remaining circuit and power supply.
Installation
Summary
All the steps of installation and configuration are documented in this chapter and are
summarized as follows:
1. Unpack the shipping box, removing the FS1-X and two power cords.
2. Install any physical options, such as fiber optic I/O modules or Dolby I/O cards.
3. Mount the physical chassis as desired: front rack, rear rack, or desk mount. If you are
mounting multiple FS1-X units, try to place them visually in the same area so you can
use an attached computer to turn on and see the
ID
LED of the FS1-X you’re
communicating with. For physical installation details, see
“FS1-X Chassis Installation”
on page 28
.
4. Connect the two FS1-X power cords to mains AC. For redundancy, use both power
supplies and connect them to separate branch circuits so that the FS1-X will continue
to operate even if a circuit breaker opens on one branch.
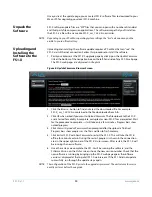
5. If you plan to use remote control, connect your computer to the FS1-X directly using
an Ethernet cable, or connect both the computer and the FS1-X to a local area
network through an appropriate hub or router. Also set the FS1-X IP address in the
menus, and then use a computer to test (ping) the FS1-X over the network
connection to verify communication. For details, see
“Networking” on page 29
.
6. Install a web browser on the computer, if not already present, for accessing the FS1-X
web pages. You can access the pages simply by entering the FS1-X IP address in the
browser address field. See
“Web Browser Control” on page 33
for details.
7. Connect the FS1-X to system audio and video sources, including VTRs, monitors, DVD
players, video switchers, and audio mixers. For details, see
“System Cabling” on
page 35
.
8. Test the FS1-X with all of your devices to verify everything is working.
Warning!
To meet safety regulations for leakage current and to ensure redundancy in the event
that a branch circuit breaker shuts off a branch, connect the FS1-X dual power
supplies to separate branch circuits.


