


34
.
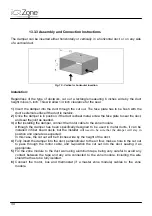
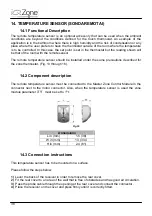
13.3.3 Assembly and Connection Instructions
The damper can be inserted either horizontally or vertically in a horizontal duct, or on any side
of a vertical duct.
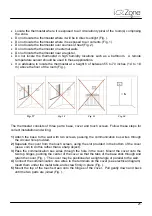
Fig. 10 - Vertical or horizontal insertion
Installation:
Regardless of the type of ductwork, cut out a rectangle measuring 6 inches wide by the duct
height minus ½ inch. This will allow 1/4 inch clearance for the seal.
1)
Insert the damper into the duct through the cut out. The face plate has to be flush with the
duct’s external surface if the duct is metallic.
2)
Once the damper is in position, if the duct is sheet metal, screw the face plate to seal the duct,
and seal the joint as needed.
3)
After installing the damper, connect the motor cable to the zone module.
Although the damper has been specifically designed to be used in metal ducts, it can be
installed in fiber board ducts, but the installer
will need to be sure that the damper will stay in
position and operate as expected.
In this case, the cut out will be 8 inches wide by the height of the duct.
4)
Fully insert the damper into the duct, perpendicular to the air flow, make a hole in the cut out
to pass through the motor cable, and re-position the cut out into the duct, sealing it as
appropriate.
5)
Fix the zone module to the duct wall using aluminum tape, being very careful to avoid any
contact between the tape and any wire connected to the zone module, including the wire
shield that has to be fully isolated.
6)
Connect the motor, bus and thermostat (if a master zone module) cables to the zone
module.
Summary of Contents for iQ Zone
Page 1: ...Installation Manual...
Page 2: ......
Page 5: ......
Page 17: ...17 Fig 12 Fig 13 Fig 14...
Page 43: ......
Page 44: ......
Page 45: ......