USO
6
USE
6-4
RV - RVL
6.3
Avviamento per inizio lavoro
• Sollevare la trinciatrice da terra ed escludere il
piede d'appoggio ruotandolo di 180°.
• Abbassare la trinciatrice finché il rullo sia a contatto
con il terreno.
• Innestare la presa di forza e lasciare lentamente la
frizione onde evitare sforzi eccessivi sugli organi di
trasmissione.
• Mandare a regime la presa di forza della trattrice
(540 o 1000 giri/minuto) rispettando il numero di giri
indicato nella decalcomania applicata sul timone
della trinciatrice.
• Determinare la velocità di avanzamento in funzione
del tipo di prodotto da trinciare e del grado di frantu-
mazione che si vuole ottenere.
• Nel caso di manovre con curve strette si consiglia di
sollevare leggermente la trinciatrice da terra.
• Se il terreno su cui si lavora presenta piccoli dossi,
in corrispondenza di questi dislivelli, si consiglia di
alzare sufficientemente la trinciatrice. Superata la
zona critica, riabbassare la trinciatrice e riprendere il
lavoro normale.
6.3
Start for work beginning
• Elevate the shredder from the ground, and retract
the support foot by rotating it 180°.
• Lower the shredder in order to make the roller touch
the ground.
• Insert the PTO and slowly release the clutch, in
order to avoid overloading the transmission organs.
• Let the tractor PTO reach the correct speed (540 or
1000 rpm). Make sure the correct rpm indicated by
the decal on the drawbar of the shredder is
respected.
• Set the advance speed according to the type of
material to be shredded and the desired crushing
degree.
• In case of manoeuvres with narrow curves, it is rec-
ommended that the shredder is slightly raised from
the ground.
• If the working ground presents little humps, it is
advisable to lift the shredder to overcome the drop.
Once the critical point is over, lower again the
shredder and resume normal operation.
Summary of Contents for RV 125
Page 6: ...AVVERTENZE 0 WARNINGS 0 2 RV RVL Fig B Fig D Fig C Fig E Fig A Fig F Fig G D C D F G B A E ...
Page 10: ......
Page 24: ......
Page 28: ......
Page 42: ...INSTALLAZIONE 4 INSTALLATION 4 14 RV RVL Fig 4 13 Supporto albero cardanico Cardan shaft rest ...
Page 44: ......
Page 50: ......
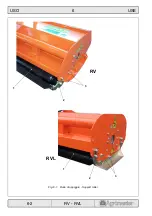
Page 52: ...USO 6 USE 6 2 RV RVL Fig 6 1 Rullo di appoggio Support roller 1 2 3 RV RVL 1 2 3 ...
Page 60: ......
Page 66: ...MANUTENZIONE 8 MAINTENANCE 8 6 RV RVL Fig 8 4 Sostituzione olio Oil change 3 2 1 ...
Page 68: ...MANUTENZIONE 8 MAINTENANCE 8 8 RV RVL Fig 8 5 1 3 2 ...
Page 72: ......
Page 82: ......


