


6-18
Maintenance
Cleaning Connections for Accurate Measurements
Care of Connector Savers
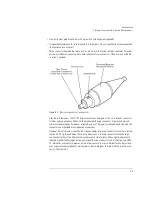
The connector saver is used to protect the input connector of the OSA from damage. It functions
as a standoff between the front panel input connector and the input fiber. If the fibers are not
thoroughly cleaned, repeated connections can result in a scratched, chipped, or dirty input con-
nector. Contamination, or damage to the connector, will cause loss of signal and increased
reflections resulting in poor return loss and measurement error. With glass-to-glass interfaces,
any degradation of a ferrule or fiber endface, any stray particles, or finger oil on the endface can
have a significant effect on connector performance. Many times an instrument must be serviced
to replace a damaged connector when thousands of dollars and lost time could have been
avoided if better care were given to the fiber optic connector.
The connector saver is intended to serve as a replaceable interface. When cleaned and attached
to the front panel, it should remain in place and successive input fiber changes should be
attached to the connector saver. If the connector saver is damaged, you can easily replace it.
Connector saver damage can be detected by examining the connector saver with a fiber scope, a
reflectometer, or substituting a new connector saver (and observing a difference in the measure-
ment).
The connector saver should be cleaned before any connection. While the connector saver is pro-
vided to protect the front panel input connector from dirty fibers, the fiber and connector saver
must be cleaned. Any dirt between fiber connections causes high insertion loss and increased
reflections and can also damage the fibers themselves. The advantage to using the connector
saver is that if it is damaged, it is much less expensive and faster to replace than the front panel
input connector.
Summary of Contents for 8614 B Series
Page 1: ...Agilent 8614xB Series Optical Spectrum Analyzer User s Guide ...
Page 12: ...1 4 Getting Started Product Overview Agilent 8614xB Front and Rear Panels ...
Page 13: ...1 5 Getting Started Product Overview ...
Page 15: ...1 7 Getting Started Product Overview Figure 1 2 Display Annotations ...
Page 26: ...1 18 Getting Started The Softkey Panels ...
Page 31: ...1 23 Getting Started The Softkey Panels The Systems Menus continued ...
Page 40: ...1 32 Getting Started Product Options and Accessories ...
Page 75: ...3 Function Reference ...
Page 186: ...4 16 Remote Front Panel Operation Remote Front Panel ...
Page 226: ...6 2 Maintenance Changing the Printer Paper Changing the Printer Paper ...
Page 271: ......