


1-11
Getting Started
Setting Up the Analyzer
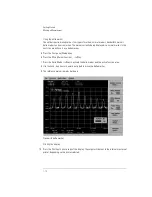
Step 3. Apply Power to Instrument
• Press the power switch at the lower left-hand corner of the front panel.
• After a short initialization period, the display will look similar to the picture on this page.
• Allow the instrument to warm up for at least 1 hour.
Step 4. Clean Connectors and Prepare for Measurements
CAUTION
Fiber-optic connectors are easily damaged when connected to dirty or damaged cables and
accessories. The front-panel INPUT connector of the Agilent 8614x series is no exception. When
you use improper cleaning and handling techniques, you risk expensive instrument repairs,
damaged cables, and compromised measurements. Before you connect any fiber-optic cable to
the Agilent 8614x series optical spectrum analyzer,
refer to “Cleaning Connections for Accurate
Measurements” on page 6-8
.
CAUTION
A front-panel connector saver is provided with Agilent 8614x series instruments. Attach the
connector saver to the front-panel INPUT connector of the instrument. You can now make your
connections to the connector saver instead of the instrument. This will help prevent damage to the
front-panel INPUT connector of the instrument. Damage to the front-panel INPUT connector is
expensive in terms of both repair costs and down-time. Use the front-panel connector saver to
prevent damage to the front-panel INPUT connector.
• After the instrument has warmed up for at least 1 hour, perform an auto align by pressing the
front panel Auto Align button. This will ensure optimal amplitude accuracy, and can correct for
any mis-alignment caused by the instrument shipment.
To learn more about this or any Agilent Technologies Optical Test and Measurement Products,
visit our web site at
http://www.agilent.com/comms/optical
Note
All product specifications apply to measurements made
without
using the front-panel con-
nector saver.
Summary of Contents for 8614 B Series
Page 1: ...Agilent 8614xB Series Optical Spectrum Analyzer User s Guide ...
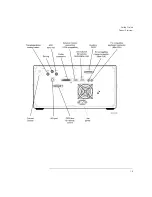
Page 12: ...1 4 Getting Started Product Overview Agilent 8614xB Front and Rear Panels ...
Page 13: ...1 5 Getting Started Product Overview ...
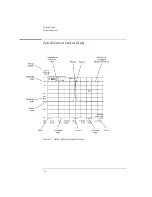
Page 15: ...1 7 Getting Started Product Overview Figure 1 2 Display Annotations ...
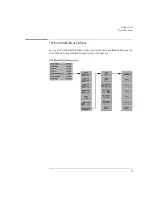
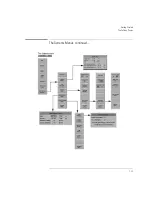
Page 26: ...1 18 Getting Started The Softkey Panels ...
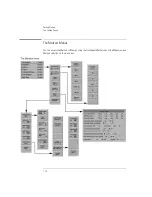
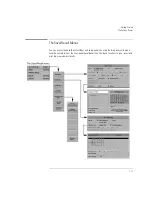
Page 31: ...1 23 Getting Started The Softkey Panels The Systems Menus continued ...
Page 40: ...1 32 Getting Started Product Options and Accessories ...
Page 75: ...3 Function Reference ...
Page 186: ...4 16 Remote Front Panel Operation Remote Front Panel ...
Page 226: ...6 2 Maintenance Changing the Printer Paper Changing the Printer Paper ...
Page 271: ......