background image

Zeus Hand van Aether Biomedical, distributeur Loth Fabenim B.V.

EN

Zeus Hand Configurator - Web Application Instructions

29

Update Firmware

13


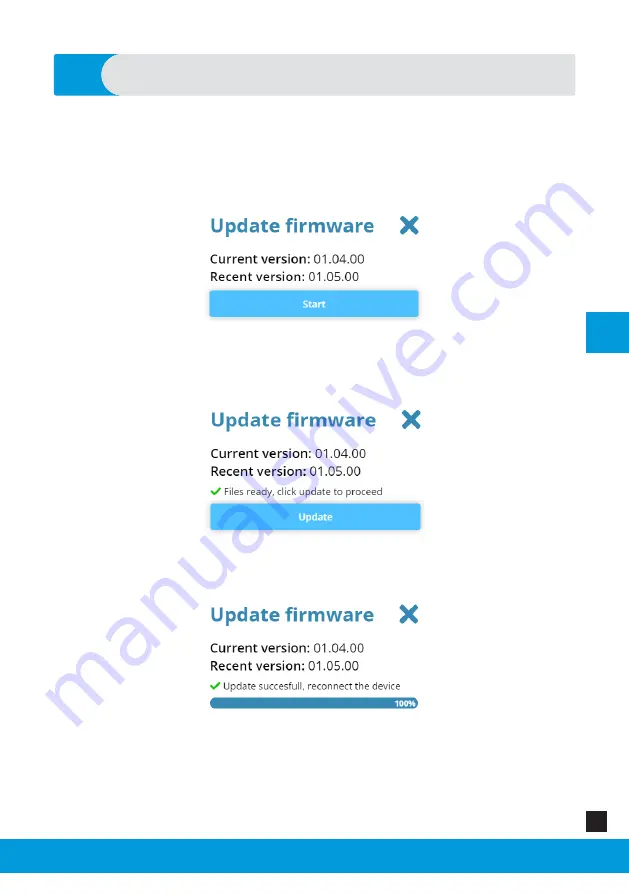
To update firmware of the Zeus hand you need to press the Update firmware 


button. A window should pop up showing you the version of the firmware which 


is currently on the prosthesis and the most recent version. You need to press  
the Start button to begin the update.

  It will download the newest firmware and wait for you to press the Update 


button.


You will be informed when the update process is finished.

WARNING

: Do not turn off the hand and do not close Zeus-configurator, until the 

update process finishes. Doing so may render the hand non-functional.

Summary of Contents for Zeus Hand

Page 1: ...Distributeur ZEUS The Power In Your Hand Zeus Hand Configurator Web Application Instructions ...

Page 2: ......

Page 3: ...Energy Connection 9 6 Starting the Programme 10 7 Navigation 11 8 Connecting the Hand Prosthesis with the Application 12 9 Choose Grips Tab 15 10 EMG Settings Tab 18 11 Grip Configuration Tab 22 12 Prosthesis Settings Tab 23 13 Update Firmware 29 14 Service Menu 30 15 Application Settings Tab 31 16 Side Buttons 32 17 Top Bar 35 18 Closing the Software 36 19 Troubleshooting 37 20 Security 39 21 Oth...

Page 4: ...n We highly recommend keeping this document in a safe place If you have any questions about the product please contact us on sales lothfabenim nl WARNING Clinicians certified by Aether Biomedical can connect with the Zeus prosthetic hand by opening the Zeus Configurator application through the Patient Management panel If you are testing evaluating the Zeus hand and are a demo user use the applicat...

Page 5: ...pplication There is no requirement to download anything from a website to launch the program The Zeus Configurator must be accessed via Google Chrome web browser version 56 or higher or Microsoft Edge web browser version 90 or higher from the device using system Windows version 10 or higher or Mac OS version 11 or higher Zeus configurator allows clinicians to adjust various settings and parameters...

Page 6: ... Aether Biomedical Patients as the users of the prosthesis are not allowed to make any changes to it via this software The software provided by Aether Biomedical is designed exclusively for the Zeus hand configuration The Zeus Configurator is intended to be used to configure the Zeus hand and customize it for the user Additionally the software also provides the required tools to service and repair...

Page 7: ...ly two sensors that detect and amplify raw EMG signals from the skin that come from muscle movements To create those signals the patient has to contract their muscles Depending on the different levels of amputation there are specific types of signals to change the grips Co contraction can be made by the majority of the users and provides a very reliable control of the prosthesis Therefore it was c...

Page 8: ...ttings Ignore EMG spikes settings and Autograsp settings There are a number of grips which the user can choose Co contraction default option allows the user to switch between grips The clinician can view the user s muscle contractions in real time graphs and adjust the activation levels thresholds REMEMBER Changes should be made to the settings that are not optimal for the user the previous settin...

Page 9: ...ion 5 The Zeus hand uses BLE Bluetooth Low Energy to communicate with the Zeus Configurator To start configuring the Zeus it is necessary to turn on the Bluetooth on your computer device If your device does not come with a Bluetooth modem inbuilt you can use a BLE dongle You will need to install its drivers according to the provider s instructions ...

Page 10: ... you are a clinician certified by Aether Biomedical open the Zeus Configurator application by going through the Patient Management panel If you are testing evaluating the Zeus hand an are a demo user follow the next steps Open the following url in the chosen web browser https zeus configurator com To log in as a clinician and have acess to all settings of the prosthesis you need to provide the fol...

Page 11: ...ocess with the prosthesis or return to the patient management panel In the Settings Area you can change the settings of the Zeus hand Its content depends on the currently chosen tab in the main menu Side Buttons enable you to save settings to the prosthesis load seved versions of the settings return to the default settings and undo the last change in the settings They are desribed in detail in the...

Page 12: ...d Prosthesis with the Application 8 If you are a clinician certified by Aether Biomedical open the Zeus Configurator application through the Patient Management panel and follow the steps below On the top of the Main Menu the chosen device is displayed Turn on the battery of the prosthesis To connect to this device press the Connect button ...

Page 13: ...ar on the list make sure that the battery of the prosthesis is turned on Select the device and click on the Pair button The application should now connect with the Zeus hand It will retrieve its settings and display them on the screen If you cannot connect to the prosthesis check if you selected the correct prosthesis and turn its battery off and on If you are testing evaluating the Zeus hand and ...

Page 14: ...opup screen The scanning process might take up to several seconds If your device does not appear on the list make sure that the battery of the prosthesis is turned on Select the device that you want to connect to and click on the Pair button The application should now connect with the Zeus hand It will retrieve its settings and display them on the screen If you cannot connect to the prosthesis che...

Page 15: ... right corner of the Settings Area you will find the Pairing mode Sequential mode switch Changing this switch will select the corresponding control mode setting in the prosthesis Choosing the control mode changes the displayed graphics in the Settings Area There you can select the order in which the grips will be accessed in each of the control modes ...

Page 16: ...n opposed group of grips is active To switch between the opposed group of grips and the non opposed group of grips the user has to move the thumb in the desired position and then provide a Change Signal Within each group of grip there are two subgroups the primary group and the secondary group Each subgroup has two grips within it the default grip and the alternate grip To switch between the defau...

Page 17: ...roups with the thumb opposed and non opposed To switch between the groups you need to manually adjust the thumb position and a Change Signal or a Secondary Change Signal The order and number of grips of each of the groups can be modified after selecting sequential mode in the Settings Area In sequential mode there can be a maximum of 5 grips in each of the groups defined by the thumb position This...

Page 18: ... a suitable grip change signal threshold for each patient individually On the right side of the screen there are 2 additional sliders They can be used to adjust a suitable activation level for the open and close signal You can adjust the timescale on the graph by slider at the bottom of Settings Area You can hide or show the thresholds on the graph by toggling the checkbox beneath their sliders Yo...

Page 19: ...er Biomedical distributeur Loth Fabenim B V EN Zeus Hand Configurator Web Application Instructions 19 EMG Settings Tab Separate in this option both muscle signals Flexion and Extension are shown on the separate graphs 10 ...

Page 20: ...hich is used for Soft grip functionality The threshold bar reflects how high each signal must reach to register as a valid signal It verifies if the signal the patient made is strong enough to be read and for the hand to start moving If the patient has problems controlling the hand the threshold bar can be adjusted Adjustment Effect Consequence Raising Patient needs a higher signal in order for th...

Page 21: ...Zeus Hand van Aether Biomedical distributeur Loth Fabenim B V EN Zeus Hand Configurator Web Application Instructions 21 EMG Settings Tab 10 ...

Page 22: ...o while closing Both of those parameters can be adjusted for each finger individually in every grip 1000 is fully closed 0 fully open This can be used for fine tuning of the grips To begin you have to select the right grip in the dropbox at the top right corner You can activate the movement of the hand while configuring the grips to see what the finger positions actually look like by checking the ...

Page 23: ...ilitation process It relates to the production and sending of good quality EMG signals Dual Direct Dual Inversed Single These options mean the patient can use one electrode or two in direct or in versed mode to control the prosthesis Dual direct mode is the default option with signals from two electrodes being used to control the prosthesis Dual inverted mode simply swaps the electrode inputs The ...

Page 24: ...t the same level regardless of the EMG signal strength The threshold can be changed in the settings Grip switching modes This section allows the user to select the type of the signal used to change the grip This can either be Co contraction default is the simultaneous contraction of both muscles used to control the prosthesis By default if the co contraction is shorter than 0 5s then it is treated...

Page 25: ...first generation of the signal closes the fingers the second generation of the signal opens the fingers Double short impulse of the signal is used for a primary grip change signal and triple short impulses are used for a secondary grip change signal Prosthesis Settings Tab 12 Grip switching modes These settings will appear when correct grip switching mode is selected Co contraction Co contraction ...

Page 26: ...is Settings Tab 12 Open open and single electrode Pulse timings The frist slider allows you to specify the valid length of the signal impulses The second slider allows you to specify the time that needs to pass between two pulses which is important as the prosthesis always waits as the patient might want to do the third impulse ...

Page 27: ...limited by the soft grip functionality It adjusts the maximum grip force applied by the hand on an object It also enables you to specify an additional threshold for the EMG closing signal which once exceeded restores the full strength By default then the patient can have a very light touch but likewise can squeeze and even squash an object if desired When enabling this function you need to calibra...

Page 28: ...table slider WARNING Keep in mind that this function will create a delay in the prosthesis response time as the initial part of the signal is ignored Auto grasp Auto grasp is a function for preventing slippage of the object being held Once the fingers close around an object it is detected and a constant small force is applied to prevent dropping it If the object starts slipping from the hand the f...

Page 29: ... showing you the version of the firmware which is currently on the prosthesis and the most recent version You need to press the Start button to begin the update It will download the newest firmware and wait for you to press the Update button You will be informed when the update process is finished WARNING Do not turn off the hand and do not close Zeus configurator until the update process finishes...

Page 30: ...ons 30 Service Menu 14 In the Service Menu you can open and close every finger to check the movement of the digits and also get better access to the screws and pins of the fingers Pressing the Service Position button of any finger will move that finger to the best position to start the repair process of this digit ...

Page 31: ...the Settings tab Here you can get information about the version of the software and if you are dealing with the version of the Zeus prosthesis hand with Bluetooth classic connection you can change the Bluetooth mode of the application The default bluetooth module in the Zeus hand is the BLE module Do not change this unless explicitly specified by the manufacturer ...

Page 32: ... chosen settings restore settings to the default values undo last action Send to prosthesis Sends the current configuration of the settings to the prosthesis to the prosthesis REMEMBER After sending settings if you want to undo some actions you have to send them to the prosthesis once again Versions this button opens the versions menu In the version menu you can add the version of all defined sett...

Page 33: ...en you are done press the Save button Side Buttons 16 If you want to load previously saved settings click on their name This will expand this version options Here you can press the Import button to load the settings to the software REMEMBER that this will load the settings to the software but you will still need to send them to the prosthesis In this menu you can also modify the notes and other in...

Page 34: ...s any trouble with the Zeus functionality with changed settings or if the user is not satisfied with the current configuration it is possible to restore the default settings Undo pressing this button undoes the last change in the software REMEMBER it does not modify the changes on the prosthesis device You still need to send the settings to the prosthetic device ...

Page 35: ...ettings to the prosthesis appear here You can check the Hand details by clicking on the Information icon A new window will pop up showing the serial number of the prosthesis and its firmware version By clicking on Help Tour button you can activate the tutorial of the currently selected tab It contains useful information and help regarding the settings Language button enables you to change the chos...

Page 36: ...EN Zeus Hand Configurator Web Application Instructions 36 Closing the Software 18 If you want to get back to the patient management panel press the button on the Main Menu To close the software please close the web browser s tab or close the web browser completely ...

Page 37: ...onnect to the prosthesis once again If the connection with the hand is lost this special error message will be shown on the screen If this message appears check that the hand has not lost power if so turn the hand back on you may need to charge it and connect the device to the application once again When there is a problem with the connection this special error message will be shown on the screen ...

Page 38: ...ial error message will be shown on the screen If this message appears it means that there was a problem with interpreting the settings currently stored on the prosthesis Try connecting the prosthesis once again If there are still problems with the program please contact the Aether Biomedical team by filling in the form on the website www aetherbiomedical com or reaching out to us at info aetherbio...

Page 39: ...lled It is recommended to check the certificate of the web page before logging in It is recommended to close the application when you are not using it or you are away from the computer The application will automatically log you out after 1 hour of not using it If you need to reset the hand to the factory settings you have to Connect to the hand via application Click the restore defaults button The...

Page 40: ...tored by a programme of internal and external audits All individual products are marked indicating that they comply with the requirements of the Medical Device Regulation 2017 745 The mark may be on the packaging accompanying literature or an enclosure rather than the product itself Symbols CE Mark This mark indicates the product conforms with the essential requirements and provisions of Medical D...

Page 41: ...Zeus Hand van Aether Biomedical distributeur Loth Fabenim B V EN Zeus Hand Configurator Web Application Instructions 41 ...

Page 42: ...2 506 Fax 31 30 27 11 045 Email sales lothfabenim nl www lothfabenim nl Version 3 0 2022 07 08 Aether Biomedical ul Królowej Jadwigi 43 61 880 Poznań Poland Tel 48 515 856 103 Email info aetherbiomedical com www aetherbiomedical com Please contact us if you find any page missing or disordered ...

Reviews: