


Important Safety Instructions
49
Important Safety Instructions
Read and follow all instructions marked on the product and in the
documentation before operating the system. Retain all safety and
operating instructions for future use.
X
Read these safety instructions carefully.
X
Keep this user’s manual for future reference.
X
The equipment should be operated in an ambient tempera-
ture between 0
°
C to 50
°
C.
X
The equipment should be operated only from the type of
power source indicated on the rating label. Make sure the
voltage of the power source is correct when connecting the
equipment to the power outlet.
X
If the user’s equipment has a voltage selector switch, make
sure that the switch is set to the proper position for the area.
The voltage selector switch is set at the factory to the cor-
rect voltage.
X
For pluggable equipment, ensure they are installed near a
socket-outlet that is easily accessible.
X
Secure the power cord to prevent unnecessary accidents.
Do not place anything over the power cord.
X
If the equipment will not be in use for long periods of time,
disconnect the equipment from the power outlet to avoid
being damaged by transient over voltage.
X
All cautions and warnings on the equipment must be noted.
X
Keep this equipment away from humidity.
X
Do not use this equipment near water or a heat source.
X
Place this equipment on a stable surface when installing to
prevent injury.
X
Never pour any liquid into the product to prevent fire or elec-
trical shock.
Summary of Contents for 96864-1
Page 11: ......
Page 17: ...6 Introduction ...
Page 20: ...Chassis Overview 9 Rear Panel Figure 2 2 PXIS 2508 2558T Rear Panel Foot stand ...
Page 21: ...10 Chassis Overview Left Panel Figure 2 3 PXIS 2508 2558T Left Panel ...
Page 22: ...Chassis Overview 11 Right Panel Figure 2 4 PXIS 2508 2558T Right Panel ...
Page 23: ...12 Chassis Overview Top Panel Figure 2 5 PXIS 2508 2558T Top Panel ...
Page 24: ...Chassis Overview 13 Base Panel Figure 2 6 PXIS 2508 2558T Base Panel ...
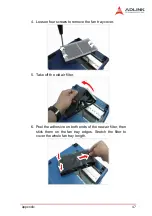
Page 31: ...20 Installation 5 Fasten the screw on the module front panel then con nect all devices ...
Page 41: ...30 Installation ...
Page 53: ...42 Remote Management ...