13 © Adam Equipment Company 2011
The Counters are incremented any time the calibration section or the Factory
parameters section have been modified.
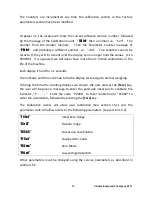
At power on, the display will show the current software revision number followed
by the message of the Calibration Count “
[AL[nt
” then a number i.e. “123”. The
number from the counter memory. Then the Parameter Counter message of
“
PAr[nt
” and probably a different number, i.e. “234”. The counters cannot be
reset to 0, they will increment until the display can no longer hold the values. (1 to
999999). It is expected we will never have more than 1 million calibrations in the
life of the machine.
Each display is held for 1-2 seconds.
The indicator will then continue to do the display test and go to normal weighing.
If during the time the counting displays are shown, the user presses the
[Tare]
key,
the user will be given a message to enter the passcode necessary to calibrate the
indicator, “P - - - - “ Enter the code “P0000” to Enter calibration or “P1000” to
enter the parameters, followed by pressing the
[Tare]
key.
The Calibration access will allow user calibration (See section 15.1) and the
parameter code will allow access to the following parameters. (see section 15.2).
“F4 Int”
Initial Zero Range
“F5 rEZ”
Re-Zero range
“F6 SCS”
Successive Tare Enable
“F7 Cnt”
Display ADC counts
“F8 Zem”
Zero Mode
“F9 Lvd”
Low voltage detection
Other parameters must be changed using the service parameters as described in
section 15.2


