background image

Model DT333-0700


4-Wire mV/TC Dual Transmitter w/USB 


Acromag, Inc. Tel: 248-295-0880  

            - 13 -                                   

http://www.acromag.com  

- 13 - 

https://www.acromag.com 


CONFIGURATION SOFTWARE 

Quick Overview 

 Android 


This dual transmitter can be setup & calibrated via the Acromag 

Agility™ Config Tool.  

The 

Agility™ 

software APP can be 

downloaded free of charge fro

play.google.com

 To connect to 

this transmitter, a USB OTG (On-The-Go) cable (5028-565) and USB 
A to Mini-B cable (4001-113) are required.  This app is compatible 
with Android devices using Ice Cream Sandwich (4.0) or later. 

 
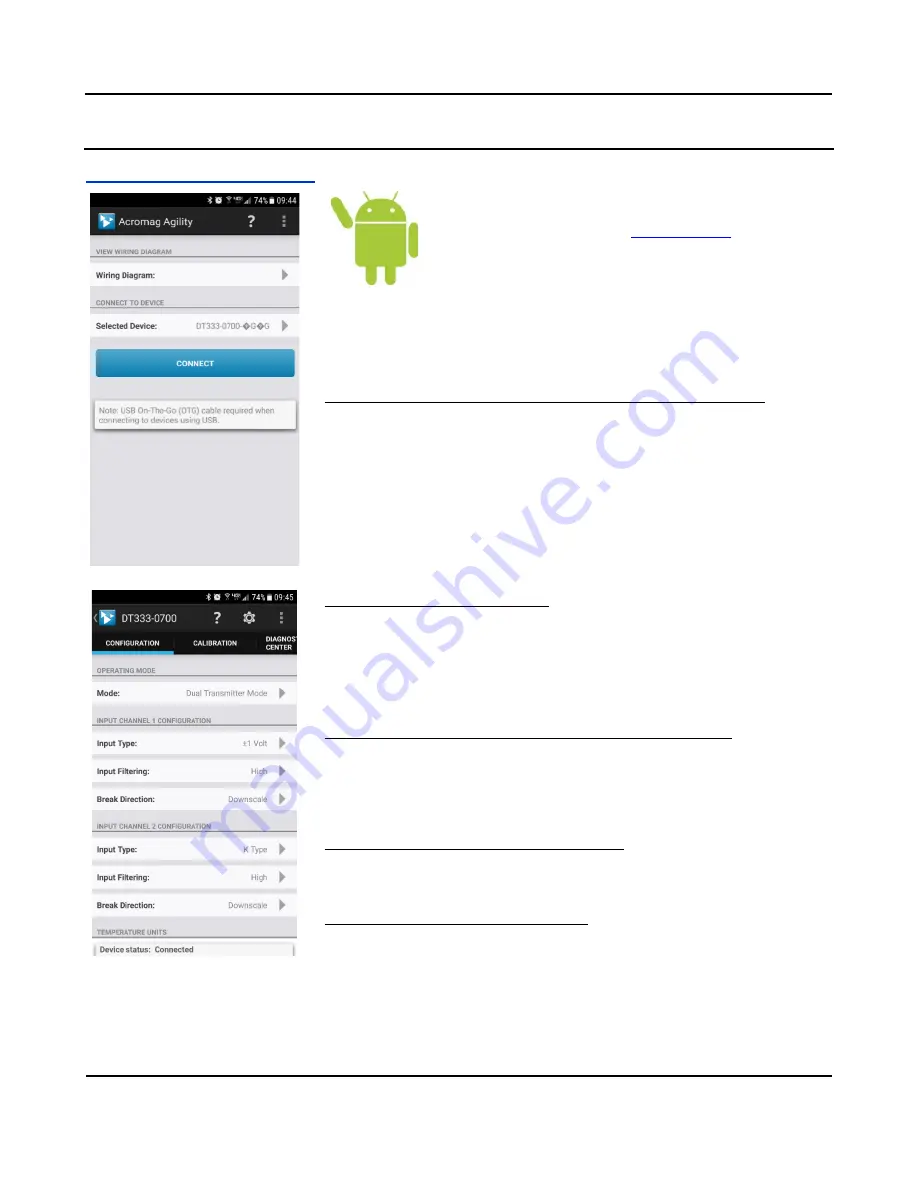
The initial connection screen of the app is shown at left.  Once a device is 
connected, the main portion of the app will launch.  The screen is divided into three 
tabs for this model. A short description of each tab follows.  
 

Connection Screen Set up 

 DEVICE SELECT (First Connect to Unit Here) 


Select from connected transmitters by tapping the 

[Select Device]

 button. This 

will bring up a list of attached devices.  Select the desired device and tap the 
Connect button to open the device. 


To view wiring diagrams of a transmitter, tap the 

[Wiring Diagram]

 button and 

select the desired model.  Swipe left or right to view more diagrams.  No 
connection is required to view the diagrams. 


Android requires user permission to access external hardware.  If the Device 

List displays “No Device Permission”, select this device and when prompted to 

give permission to access the USB device, tap 

[OK]


Configuration Tab 

 CONFIGURE I/O  


Once connected, the app will automatically read your transmitter and display 
its current configuration. 


Changing any option on this page will send the changes to the transmitter 
instantly.  The device status at the bottom of the page will report if the changes 
were sent successfully. 


Calibration Tab 

 (Calibrate the Inputs and/or Outputs if Needed)  


On screen instruction guides the set up to properly calibrate the transmitter.  
After completing instructions, tap the 

[Calibrate]

 button. 


The device status at the bottom of the page will report if the calibration was 
sent successfully. 

 
Diagnostic Center Tab 

 (Verify Input operation)  


Select the polling indicator by tapping the 

[Indicator]

 button. 


Start polling by tapping the 

[Start Polling]

 button. 

 
Utility Page 

 (Reboot or Restore Settings)  


Tap the 

[Gear]

 in the Action bar to access the Utility Page. 


You can tap the 

[Restore/Reset Factory]

 utility buttons to get out of trouble if 

you ever misconfigure or improperly calibrate a transmitter. 


Summary of Contents for DT333-0700

Page 1: ...oltage Outputs Model DT333 0700 Dual Input Transmitter for Thermocouple and 100mV 1V Input USER S MANUAL ACROMAG INCORPORATED Tel 248 295 0880 30765 South Wixom Road Wixom MI 48393 2417 U S A email sales acromag com Copyright 2018 Acromag Inc Printed in the USA Data and specifications are subject to change without notice 8501130C ...

Page 2: ...th Ground Connections 11 USB Connections 12 CONFIGURATION SOFTWARE 13 Quick Overview Android 13 Quick Overview Windows 14 OPERATION STEP BY STEP 17 Connections 17 Thermocouple Millivoltage Versus Temperature Reference Table 18 Configuration 19 Calibration Optional 22 Diagnostics 24 BLOCK DIAGRAM 25 How It Works 25 TROUBLESHOOTING 26 Diagnostics Table 26 Service Repair Assistance 27 ACCESSORIES 28 ...

Page 3: ...The information of this manual may change without notice Acromag makes no warranty of any kind regarding this material including but not limited to the implied warranties of merchantability and fitness for its intended purpose Further Acromag assumes no responsibility for any errors that may appear in this manual and makes no commitment to update or keep current the information contained in this m...

Page 4: ... or a CH1 signal splitter High measurement accuracy and linearity with 16 bit I O conversion Adjustable scalable inputs and outputs TC Type J K T R S B E N 100mV or 1V input signal support TC inputs are linearized with respect to temperature and include Cold Junction Compensation which may be turned on off Supports both Celsius and Fahrenheit temperature units Variable digital input filter adjustm...

Page 5: ...rom the DIN rail A spring loaded DIN clip is located on the input side bottom The opposite rounded edge at the bottom of the output side allows you to tilt the unit upward to lift it from the rail while prying the spring clip back with a screwdriver To attach the module to T type DIN rail angle the top of the unit towards the rail and place the top groove of the module over the upper lip of the DI...

Page 6: ...of 90o C Input wiring may be shielded or unshielded type Ideally output wires should be twisted pair or shielded twisted pair Terminals are pluggable and can be removed from their sockets by prying outward from the top with a flat head screwdriver blade This model allows thermocouples or low voltage inputs to be wired to TB1 and drivers separate outputs Strip back wire insulation 0 25 inch on each...

Page 7: ...N clip side as shown in the connection drawing below Observe proper polarity when making input connections Transmitter input signals are separately isolated from the outputs each other and power TC inputs use polarized terminals at TB1 and TB3 observe proper polarity The positive input is on the left and labeled and the negative input is to its right See connection figure below per input model Eac...

Page 8: ...per polarity Note that twisted pair wiring is often used to connect the longest distance between each field transmitter output and the remote load as shown above Additionally shielded twisted pair wiring is recommended for best results An output connection to earth ground at each output return will help protect the circuit from damage in noisy environments WARNING For compliance to applicable safe...

Page 9: ...r to each power terminal block individually Power connections are isolated from the inputs and outputs The supply voltage should be from 6 32V DC This voltage must never exceed 36V DC peak or damage to the unit may result Variations in power supply voltage between the minimum required and 32V maximum has negligible effect on transmitter accuracy Note the placement of earth ground at power The powe...

Page 10: ...t as unit power connected at power terminal TB5 You could power multiple units by snapping them together along the DIN rail bus using connector 1005 063 then connecting a mating terminal block select a Left or Right side connector see figure below While the intent of the bus power connector is to allow several units to conveniently share a single supply you could also use the bus power connector t...

Page 11: ...ical Connections Drawings for Inputs Outputs and Power and note the position of earth ground for each isolated circuit Earth ground provides a safe destination for potentially destructive transient energy in each isolated circuit helping to prevent damage to circuitry as circuit capacitors and transient voltage suppressors steer towards the negative terminals of their circuits where earth ground i...

Page 12: ...recommended and required when connected to a grounded input Input 1 and USB connections are isolated from each output and power of this model USB Isolation is recommended for safety and noise suppression It is required when the input signal happens to be grounded You may use Acromag model USB ISOLATOR to isolate your USB port or you can optionally use another USB signal isolator that supports USB ...

Page 13: ...esired model Swipe left or right to view more diagrams No connection is required to view the diagrams Android requires user permission to access external hardware If the Device List displays No Device Permission select this device and when prompted to give permission to access the USB device tap OK Configuration Tab CONFIGURE I O Once connected the app will automatically read your transmitter and ...

Page 14: ...our separately tabbed pages as follows Communication Set up Configuration Calibration and Diagnostics A short description of each of these configuration pages follows Communication Set up First Connect to Unit Here Select from connected transmitters and Open Close communication with them Display the Model Serial Number and Manufacturer of the connected transmitter and report the status of communic...

Page 15: ...Unit Operation Use this screen to verify communication with the unit or problems with your input wiring Click Start Polling to periodically read your input channels and validate operation Click Stop Polling to stop polling the input channels The simulated red lamp to the left of the button flashes slowly when the software polls the input channels Stop polling before selecting another page or sendi...

Page 16: ... full scale endpoint Calibration Temperature Reference This model embeds two very accurate temperature sensors in the plastic around the input terminals at TB1 and TB3 to cold junction compensate thermocouple signal wires To explain the voltage measured from a T C reflects the difference in temperature between each end To discern the temperature being sensed it is necessary to know the temperature...

Page 17: ...ate the output You could connect a current meter in series with the load to read the output current directly or a digital volt meter in parallel with the load to measure output voltage Alternatively you could simply connect a voltmeter across a precision load resistor to accurately read an output current as a function of the IR voltage drop produced in the load resistor recommended for current out...

Page 18: ...9 116 6 157 5 753 2 101 22 556 700 39 132 29 129 53 112 6 743 6 275 2 431 24 527 760 42 919 31 628 57 870 7 461 6 913 2 854 26 883 800 33 275 61 017 7 950 7 345 3 154 28 455 900 37 326 68 787 9 205 8 449 3 957 32 371 950 39 314 72 603 9 850 9 014 4 387 34 319 1000 41 276 76 373 10 506 9 587 4 834 36 256 1200 48 828 13 228 11 951 6 786 43 846 1300 52 410 14 629 13 159 7 848 47 513 1372 54 886 15 64...

Page 19: ...own in the third screen at left If you happen to be connected to more than one unit via a USB hub you can use the Device scroll field to select another unit using its serial number suffix of the Device Model number to help discern one unit from another Once you have selected a device click the Open button to open communication with the unit After clicking Open the selected unit s Model Serial Numb...

Page 20: ... to write them to the device by clicking Send I O Config after completing your changes or by saving them to a file by clicking File in the upper left hand corner of the screen Select the Input Type Range for the Channel Input Type refers to the nominal input range wired to TB1 channel 1 or TB3 channel 2 and you may select TC types J K T R S E B N or 100mV Note that nominal input ranges may be resc...

Page 21: ...e a channel return but only one signal may be loaded at a time Active Sourcing Current Output Ranges are 0 20mA 4 20mA and Disabled and the current output will drive up to 525Ω Sourcing Voltage Output Ranges are 10V 5V 0 10V 0 5V and Disabled and the voltage output may drive 1KΩ or higher loads Only one output signal of the channel current or voltage may be loaded at one time Select the I O Scalin...

Page 22: ...nput Range to calibrate on the Configuration page and make sure you write your selection to the unit by clicking Send I O Config After selecting a channel and setting its nominal input range click Input Cal Instructions to begin input calibration and enable the Input Zero and Full Scale buttons Click Input Zero and you will be prompted to input the minimum signal of your nominal input range at TB1...

Page 23: ...djustment controls to drive the output to its precise nominal range full scale i e 20 000mA 5V or 10V depending on the output range setting Measure this output level accurately or performance will be degraded At the precise output range full scale click Output Full Scale of the Calibration Output section to calibrate the output full scale level If the output acts erratic or appears imprecise you m...

Page 24: ...ion tool to restore the unit to its initial configuration when decommissioning a module CALIBRATION COMMUNICATION STATUS This field displays calibration status messages like No Error Transfer Error and Timeout Error during calibration If you encounter a Transfer or Timeout Error calibration has not been completed and you may have to repeat the process Diagnostics At this point after Configuration ...

Page 25: ...us power terminals along the DIN rail Set up involves selecting the input range for each input T C type or 100mV 1V selecting the output range for each output current or voltage selecting input filter levels and scaling input range endpoints to each output range zero full scale endpoints I O scaling may be done in reverse to produce a reverse acting output signal Refer to the block diagram above t...

Page 26: ...ded input signal and earth ground of the PC USB port The input return of this model is normally biased to 1 25V off input ground to process negative going signals A grounded signal source could inadvertently short this bias to earth ground and clip the negative input range with a non isolated USB connection to a PC For this reason and for increased safety and noise immunity it is best to connect t...

Page 27: ... Scaled input or output range is too small Scaling the input output to very small spans diminishes I O resolution and signal to noise ratio potentially magnifying error Every halving of the nominal range reduces resolution by 1 bit Increase your I O span An orange output fault LED is ON The corresponding current output load is too large to drive it accurately or is an open circuit or the output dr...

Page 28: ...ansmitters and SP splitters USB Isolator USB Isolator Order USB ISOLATOR USB Signal Isolator USB A B Cable 4001 112 Instructions 8500 900 This kit contains a USB isolator and a 1M USB A B cable for connection to a PC This isolator and cable are also included in TTC SIP see above USB A B Cable USB A B Cable Order 4001 112 USB A B Cable 4001 112 This is a 1 meter USB A B replacement cable for connec...

Page 29: ... terminal block male connector 1005 221 Two End Stops for 35 mm DIN Rails 1027 222 not shown SP splitters and DT transmitters are shipped with their bus port plugged Remove this plug and insert DIN Rail Bus Connector 1005 063 which allows multiple units to snap together Then add a left or right side terminal block to mate to the bus connector to wire power to the bus These terminals can be used to...

Page 30: ...ith upscale fault detection and channel CJC turned ON Field recalibration of any model will require use of the TTC SIP configuration kit ordered separately see Accessories Input Each This unit has separate isolated input channels at TB1 and TB3 for thermocouple or millivoltage input signals This unit has three different operating modes dual transmitter single transmitter and CH1 signal splitter In...

Page 31: ...24mA 11V or 5 5V Downscale output limit is approximately 0mA 11V or 5 5V Note that selecting a reverse acting output will flip the output break detent but not the input reading IMPORTANT Calibration should be done with break detection already set as required by the application as changing it will affect calibration somewhat Input Bias Current 125nA typical TC break current Input Analog to Digital ...

Page 32: ...785 or 1 17867 T C B 260 to 1820 C 0 317mV to 13 820mV NONE 64 33300 to 55954 or 1 22654 T C N 230 to 1300 C 4 226mV to 47 513mV NONE 16 30995 to 52696 or 1 21701 CJC 50 C to 150 C 0V to 1V NONE 1 32768 to 58983 or 1 26214 This count is then converted to TC temperature via a linearizer function for the TC type the transmitter output is made linear with respect to TC temperature not TC voltage The ...

Page 33: ...n also raise RF immunity Output Ambient Temperature Effect Better than 80ppm C 0 0080 C over ambient temperature range This includes the combined effect of zero and span drift for reference test conditions see Input Specifications Output Resolution Each output is driven by a 16 bit voltage current DAC from Texas Instruments DAC8760IPWPR and its nominal range resolution is indicated in Table 4 belo...

Page 34: ...nal Ground Connects directly to Signal Ground IMPORTANT USB Isolation is Required Input 1 is isolated from input 2 each output and power and may be connected to grounded or un grounded input sensors but its circuit ground also connects in common to the USB power signal shield ground which in turn makes a connection to earth at the PC when directly connected to its USB port Failure to connect USB w...

Page 35: ...um requirements of the applicable standard but this product has typically been tested to comply with higher standards in some cases Operating Temperature 40 C to 70 C 40 F to 158 F It is recommended this unit be mounted upright on a DIN rail allowing free air to flow into the bottom vent pass through the unit and out the top vent Storage Temperature 40 C to 85 C 40 F to 185 F Relative Humidity 5 t...

Page 36: ...EN IEC 60079 0 3 Transient protection should be provided and set to a level not exceeding 140 of the peak rated voltage value at the supply terminals to the equipment Reliability Prediction MTBF Mean Time Between Failure MTBF in hours using MIL HDBK 217F FN2 Per MIL HDBK 217 Ground Benign Controlled GBGC Temperature MTBF Hours MTBF Years Failure Rate FIT 25 C TBD TBD TBD 40 C TBD TBD TBD Configura...

Page 37: ...cromag com REVISION HISTORY The following table shows the revision history for this document Release Date Version EGR DOC Description of Revision 11 DEC 2018 A BC ARP Initial Release 15 SEP 2020 B CAP ARP Added cULus ATEX IECEx and FCC approvals 28 JAN 2022 C CAP AMM Added Altitude Up to 2000 meters Environmental Section ...

Reviews: